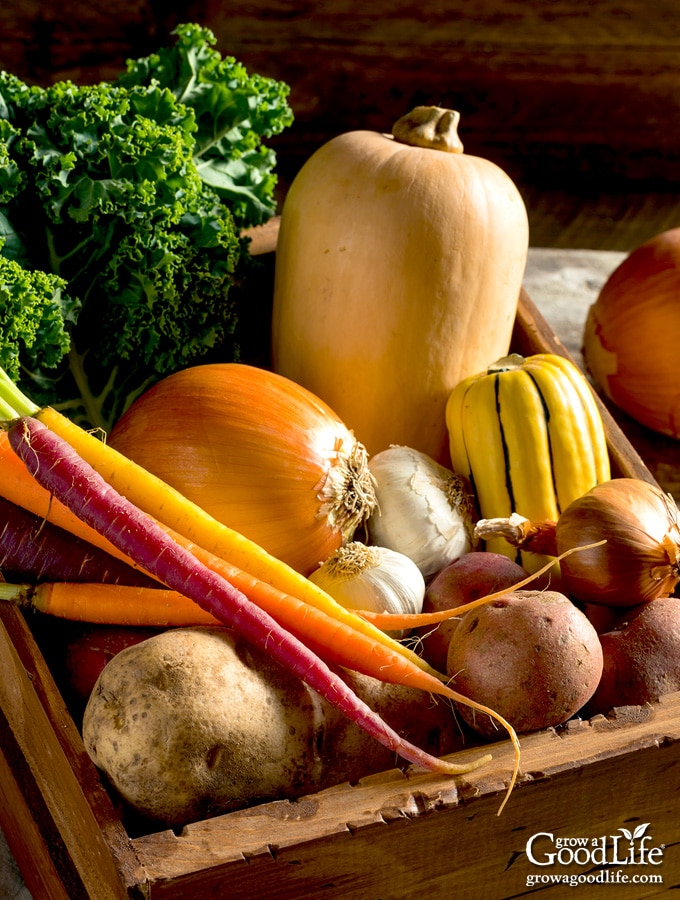
9 Crops to Grow for Food Storage
This post may contain affiliate links, which means that I may receive a commission if you make a purchase using these links. As an Amazon Associate I earn from qualifying purchases.
If you have an area in your basement that stays cool all winter long, you can make use of these cold spots to keep storage crops fresh well into winter. Try experimenting with these nine crops to grow for winter food storage.
I’ve been gardening in one form or another all my life. I came from a family that tended several large gardens. When I left home, I grew fresh herbs and attempted to grow some vegetables in pots while dreaming of a future in a home of my own with a yard and a vegetable garden. Finally, I purchased a home on a few acres and began growing my own food with a small, weed filled garden.
The first year, I grew a few herbs and some vegetables for fresh eating during the summer. The following year, I thought it would be fun to learn how to can and planted extras to preserve tomato sauce, salsa, carrots, and string beans.
I remember organizing the jars on shelves in the basement, taking a step back, and feeling such a sense of pride. I felt so gratified and accomplished that I grew and preserved my own chemical free food to enjoy through the winter. I wondered what else I could grow to get us through until the garden produced again.
The years that followed involved expanding the garden and improving the soil so I could grow and preserve even more. Our basement is unheated and stays between 40-50?F all winter so I also experimented with crops that can be stored in baskets, on shelves, or in buckets of damp sand without dehydrating, freezing, or canning.
9 Crops to Grow for Food Storage
Do you have area in your home that stays cool during the winter months? If so, you can make use of these cold spots to keep storage crops fresh well into winter. Try experimenting with growing vegetables for winter food storage. Here are my favorite keeper crops that I grow each year for winter food storage:
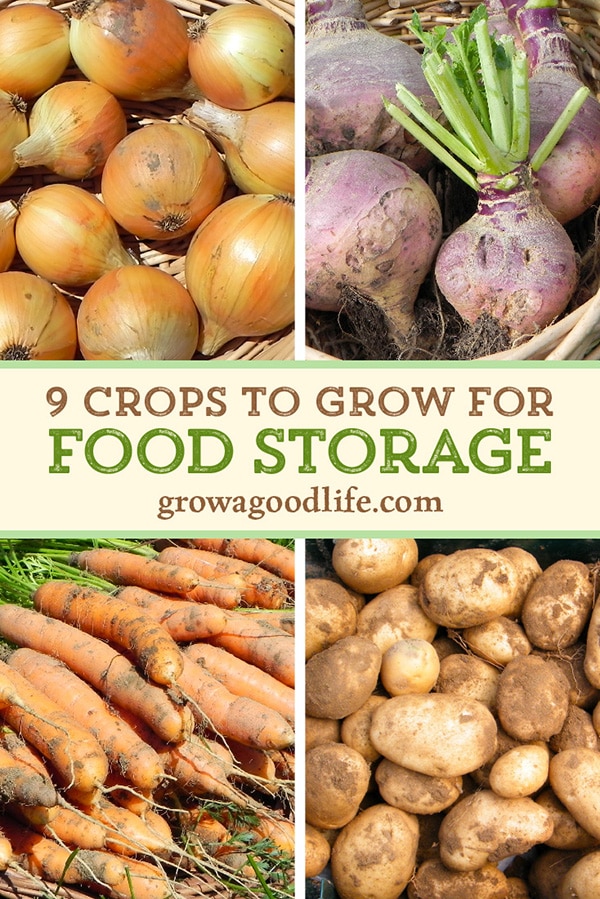
Onions and Shallots
Choose onion or shallot varieties that are known for their long-term storage capabilities. Since different varieties are triggered to bulb by day-length, also be sure to select varieties for your growing area. Onions grown from seed seem to last longer in storage. Varieties to Consider: Patterson, Stuttgarter, and Redwing.
Growing Tips for Storage Onions: In northern climates, onions are planted in early spring. Allow onions to mature fully to ensure the greatest storage capability. Onions are finished growing when the tops flop over, and the foliage begins to turn yellow. Harvest the onions on a dry day taking care not to damage or bruise the bulbs. Cure the onions by spreading them out in a single layer in a dark, cool, and dry location with good airflow.
How to Store Onions: Allow onions to cure for several weeks or until the tops are completely dry and no green is visible when trimming the foliage. Once cured, trim tops to 1-inch and store loosely in baskets or mesh bags in a cool, dark, and dry location for winter.
Check the onions every few weeks and remove any that develop soft areas. Different varieties and storage conditions will affect how long they last. Our onions usually last until April before they begin to get soft and sprout.

Garlic
Select varieties that grow well in your area. Softneck varieties have a reputation for storing well and are suited for growing in mild climates. Hardneck varieties are more suited for areas with cold winters.
Storing Tips for Garlic: Garlic is planted in the fall, harvested the following summer, and cured before storing. Curing allows the layers to dry out forming a protective cover around the bulb. Store cured garlic loosely in baskets or mesh bags in a cool, dark, and dry location. Sort through the garlic every now and then and pull out any bulbs that feel soft. Different strains and varieties of garlic have different storage lives; ours usually last until April before it begins to sprout.

Rutabagas
Rutabagas are a long-season crop that requires at least 90 days to mature. Sow seeds three months before your first expected fall frost (look up yours here). Depending on the variety, thin seedlings to 6 to 12 inches apart so the roots have room to expand. Variety to consider: American Purple Top.
Storing Tips for Rutabagas: Rutabagas can withstand light frosts but harvest before a hard freeze. Harvest gently and trim tops and tap root to 1-inch. Brush off loose soil, but do not wash. Store rutabagas in buckets or totes packed with damp sand or sawdust. Ideal storage condition for rutabagas is at a temperature of 32- 35˚F and 90% humidity. They shrivel easily, so check sand frequently and re-moisten if needed. Under these conditions, rutabagas usually last 2 to 4 months in storage.

Celeriac
Celeriac, also known as Celery Root is a long season crop that needs 90 to 120 days to reach harvest. Seeds are sown early indoors under lights 10 to 12 weeks before the average last frost date and transplanted hardened off seedlings to the garden about two weeks before your last frost date. Celeriac has similar growing requirements as it’s cousin, celery and needs lots of water. Self-watering containers are ideal for growing celeriac.
Tips for Storing Celeriac: Celeriac can tolerate light frosts but harvest before a hard freeze. Harvest and trim tops and gnarly roots to 1-inch. Shake off loose soil, but do not wash. Store celeriac in buckets or totes packed with damp sand or sawdust. Ideal storage condition is at a temperature of 32- 40˚F and 90% humidity. They shrivel easily, so check sand frequently and re-moisten if needed. Under these conditions, celeriac usually last 2 to 4 months in storage.

Carrots
Choose carrot varieties that are known for their long-term storage capabilities. Start seeds late in the season so the carrots are mature by frost. Varieties to consider: Chantenay, Imperator, and Danvers.
Tips for Storing Carrots: Carrots can be left in the ground though light frosts, but dig before the ground freezes for longer storage potential. Trim foliage, brush off excess soil, and sort by size. Larger carrots seem to last longer in storage. Layer the carrots in sand or sawdust in a box or tote beginning with the largest ones on the bottom so you can use up the smaller ones first. Ideal storage condition is at a temperature of 32-35˚F and 90% humidity. Under these conditions, carrots can last 4 to 6 months in storage.
- Homemade Seed Mats make spacing carrot seeds easy.
- 4 Tips for Growing Great Spring Carrots

Parsnip
Parsnips require a full season of growth. Sow in early spring and keep moist until seeds germinate, which could take up to 3 weeks. Depending on the variety, thin seedlings to 2 to 4 inches apart so the roots have room to expand. Variety to consider: All American.
Tips for Storing Parsnip: Parsnips should be left in the ground until frost to sweeten the flavor, but dig before the ground complete freezes. Trim foliage, brush off excess soil, and sort by size. Layer the parsnips in sand or sawdust in a box or tote beginning with the largest ones on the bottom so you can use up the smaller ones first. Ideal storage condition is at a temperature of 32- 35?F and 90% humidity. Under these conditions, parsnips can last 3 to 5 months in storage.

Potatoes
Select late season potato varieties that are known for their winter storage capabilities such as Yukon Gold, Katahdin, and Kennebec. Plant potato seeds according to your chosen potato planting method.
Tips for Storing Potatoes: Once the foliage has withered and the plants have finished growing, allow the potatoes to remain in the soil until the end of the season. This allows the skins to thicken up a bit to resist scratching when harvesting. Dig the storage crop of potatoes before the ground freezes. Choose a warm, dry day after a period of little or no rain. Read more detail on how to prepare potatoes for storage: 5 Steps to Storing Potatoes for Winter.

Winter Squash and Pumpkins:
Plant winter squash and pumpkin in the spring after all danger of frost is past. Sow seeds according to the package directions and allow plenty of room for the vines to ramble.
Harvest ripe squash at the end of the season before frost and cure before storing. Usually by the end of summer, the squash vines have shriveled and died, and I leave the mature squash in the garden to field cure. Alternately, you can harvest squash by cutting the vine and leaving a 1-inch stem. The stem helps prevent rot when you are keeping winter squash in storage. Do not carry the squash by the stem because it can break off reducing the storage quality of the fruit. Cure at 80 to 85?F for about 10 days. Curing allows the squash’s skin to thicken and form a protective barrier.
Tips for Storing Winter Squash: Store cured squashes and pumpkins in an area that is dry, cool, and receives good air circulation. Ideal storage condition for winter squash is at a temperature of 50-55°F and 50-70% humidity. I store mine on wire shelves near the basement stairs because it remains a little warmer than the rest of the basement. Most winter squash and will keep for several months in storage. Some, such as Butternut and Blue Hubbard can last up to 6 months.
• How to Harvest, Cure, and Store Winter Squash

Dried Beans
Select bean varieties suitable for drying and plant in early spring after all danger of frost is past. There are so many varieties of dried beans to choose from that mature in less than 100 days. Allow the beans to dry on the vine and harvest in early October before frost.
Tips for Storing Dried Beans: Spread the dried pods out in a single layer and allow them to dry completely before shelling. To test the beans, hit them with a hammer and the bean should shatter. Shell and store dried beans in jars in a dark and cool area. Dried beans will easily last up to a year in storage.

Guidelines for Successful Food Storage
- Experiment with different crops to see what works for your storage conditions. Take advantage of your local farmers’ markets and farm stands to test potential storing areas around your home.
- Even if you don’t have enough room in your garden, you can stock up on winter food storage crops at your local farmers’ markets during the fall: 14 Crops to Stock Up on for Winter Food Storage
- Seek out varieties that are known to last longer in storage.
- Grow more than you think you will need to allow for some spoilage.
- Harvest crops at the prime. Time your plantings so they mature at the end of your growing season.
- Store mature and unblemished crops with no cuts, nicks, or bruises.
This article was originally published on April 1, 2015. It has been updated with additional information, photos, and video.
You May Also Like:
- How to Harvest and Store Herbs for Food Storage
- How to Prepare for Canning Season
- 10 Reasons to Grow Your Own Organic Food
- 10 Steps to Starting Seedlings Indoors
- 13 Easy Vegetables to Direct Sow

We would also add sunchokes on this list. Easy to grow.