Homemade Seed Mats or Seed Tapes
This post may contain affiliate links, which means that I may receive a commission if you make a purchase using these links. As an Amazon Associate I earn from qualifying purchases.
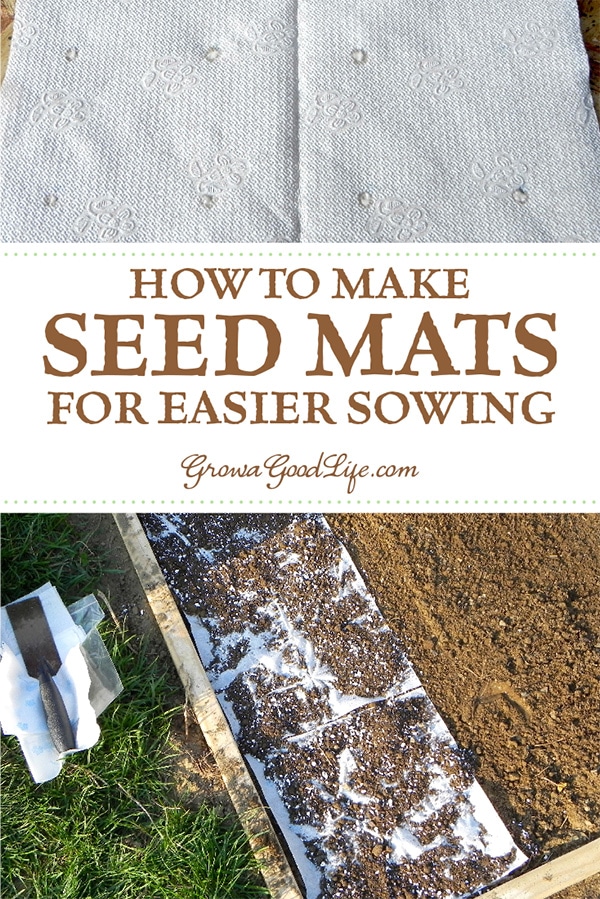
Seed mats are helpful for planting tiny seeds, such as lettuce and carrots that are hard to sow one at a time.

Instead of scattering seeds then thinning later, creating seed mats allows you to space out the seeds according to the suggested spacing on the back of the seed package or Square Foot Garden spacing recommendations. I have used seed mats for sowing carrots, lettuce, and spinach with good results over the years. This year, I prepared seed mats for carrots, lettuce and succession plantings of spinach.

Seed mats made with napkins work particularly well for the Square Foot Gardens because one napkin fits into one square. Even if you garden in rows, strips of napkins or even bathroom tissue can be used to make your seed tape.
How to Make the Seed Mats:
 You’ll need:
 You’ll need:
- 12 x 12 inch cardboard square
- Marker
- Ruler
- Thin napkins
- Flour and enough water to make a paste
- Toothpicks
- Seeds
- Tweezers
Make a Template:
Check the back of the seed package for the recommended seed spacing or refer to the Square Foot Garden’s guidelines. This example is for carrots which are 3-inches or 16 per square foot.
Measure 1.5 inches (half of 3) in from the upper left corner, then measure 3-inches across and mark along your cardboard. Do the same along the other edges and then draw your lines. Place a dot with your marker where the lines intersect. There are 3-inches between each dot.

Make Your Seed Mat:
- Mix the flour and water together to make a paste. It should coat a toothpick without dripping off.
- Open up the napkin and layer it on your template.
- Using the dots as a guide, dab a drop of the paste onto the napkin with your toothpick.
- Use tweezers to place two seeds into each dab of paste.
- Write the name of the variety on each mat and allow it to dry completely.


Once the seed mats are dry, they can be folded up and stored in a zipper bag until ready to plant.

When planting time comes, it is easy to place the seed mats in the beds, cover with soil, and water.

At first it seems like extra work to make the seeds mats compared to sowing the seeds directly in the garden. But having the seed mats prepared ahead of time to plant when the soil is ready will save some time. I find it easier to make seed mats at my leisure inside rather than hovering over a garden bed trying to space out tiny seeds evenly.
You May Also Like:
- How to Organize Seeds and Make a Seed List
- Mapping the Garden Beds
- How to Develop a Seed Starting Schedule
- 13 Easy Vegetables to Direct Sow
This works can be done using for remembering a loved one using an initial so that seeds grow showing that initial
Jay, That’s such a beautiful and meaningful idea. I love the thought of using seeds to create an initial in remembrance of a loved one. Thank you for sharing this!
You can use Elmer’s School Glue for you DIY seed tape/mats!
Elaine, Yes, you can. Elmer’s is non toxic.
I was just reading Your article on using the napkins for seed mats. I was wondering if in your opinion; the napkins or the toilet paper, would it not retain moisture and help with termination of the seed, until it did decompose?
Sue, I am guessing you meant “germination” instead of “termination”—right? No worries, we all have those autocorrect moments! Now, regarding your question, paper napkins can help retain moisture during the germination process. This helps to create a suitable environment for the seeds to germinate by providing the necessary moisture for sprouting.
I love this idea. I am going to have to try it for my carrots & lettuce this year.
Here is another idea for block planting larger seeds, when you have your soil nicely loosened press the bottom of a muffin tin in the dirt. Plant your seeds in the indentations, no thinning, easy to see if you need to replant due to slugs, birds or just poor germination. You can vary the spacing by using different sized muffin tins. I tried this for my beets last year & it worked great.
can seed mats be made out of tissue paper as well as napkins?
Margaret, Yes, they can. Super handy when you are planting a row instead of a square foot garden.
Do you think it is possible for this to work using grass seed? Just need it in a few bare spots but don’t want the birds feasting on it which has happened before.
Mary, I don’t see why not. Give it a try and let me know how it goes.
I stumbled upon a crude version of this while planting my winter garden in San Diego today. As I was planting I was formulating this method too. My question is that due to Celiac Disease, I cannot use flour as a paste, do you think something like cornstarch would have a similar result?
You should be able to use any type of flour. Test it out to see if it is thick enough to hold the seed when dry.
If you make mats or tape with 2 ply napkins or toilet paper, mats can be made without the glue. Separate the plys. Lightly mist with water, place seeds and cover with 2nd ply. Mist and press plys together. When they dry they stay together. Job done. The trick is to not use a lot of water. When it’s time to plant, you can presprout the seed or not as you wish. Just place, cover with recommended thickness of soil, press lightly and water. Voila! Done!
try rice flour
I would worry about cornstarch. I thought I read that cornmeal reduced germination.
This is an interesting point, Julie. Corn gluten meal is used as weed prevention. Corn gluten is a by-product of the milling process used to produce corn starch and corn syrup from corn. It works by obstructing root development during seed germination.
Corn starch must not have the same effect on seeds because it is often used for making a gel suspension for planting seeds: https://extension.umaine.edu/publications/2410e/