How to Grow Tomatoes
This post may contain affiliate links, which means that I may receive a commission if you make a purchase using these links. As an Amazon Associate I earn from qualifying purchases.
Tomatoes are one of the most popular crops to grow in a home vegetable garden. Learn everything you need to know for growing tomatoes from seed to harvest with our complete guide.

Whether you’re a seasoned gardener or just starting out, growing your own tomatoes can be a fun and rewarding experience. From selecting the right varieties to planting, watering, fertilizing, and harvesting, there are many factors to consider when it comes to growing healthy, productive tomato plants.
This article provides everything you need to grow delicious tomatoes in your backyard. Whether you prefer cherry tomatoes, slicing tomatoes, or paste tomatoes, we’ve got you covered. So let’s begin your journey to growing your own delicious tomatoes!
About Tomatoes
Tomatoes are part of the Solanaceae or nightshade family, and their scientific name is Solanum lycopersicum. Originally from South America, tomatoes were domesticated by the Aztecs and later brought to Europe by Spanish conquistadors in the 16th century.
Today, tomatoes are one of the most popular crops to grow in a backyard vegetable garden. They are a favorite among gardeners because they are relatively easy to grow, provide a bountiful harvest, and are versatile in the kitchen.
Grocery store tomatoes cannot compare to the taste of one harvested fresh from your own vegetable garden. You can eat tomatoes raw in salads, sandwiches, and salsas and simmer them into sauces, soups, stews, and chilies. You can also preserve tomatoes in many ways and enjoy their homegrown flavor all year. Plus, they come in a wide variety of shapes, sizes, and colors, making them a fun and colorful addition to any garden.
Types of Tomatoes to Consider Growing
There are hundreds of tomato varieties to choose from to grow in your garden. Their diverse flavors range from sweet to acidic and bold and earthy. In addition, colors can vary from the traditional red to pink, yellow, purple, green, and striped. Some things to consider when choosing tomato varieties to grow include:
Indeterminate vs. Determinate Tomatoes
Tomatoes come in indeterminate and determinate varieties that differ in their growth habits and yield.
- Indeterminate tomatoes continue to grow and produce fruit all season until killed by frost or disease. The vines can grow up to 12 feet and need trellis support to keep the vines growing vertically and off the ground. As they grow, the plants bloom, set fruit, and ripen tomatoes throughout the growing season. Tomato plants that continually produce over a long period of time result in a greater yield per plant.
- Determinate tomatoes, also called “bush” tomatoes, are bred to grow compact plants that are about 2 to 4 feet tall. The plants grow until they reach a determined size, and then the plants focus on producing and ripening fruit. The fruit of determinant tomato varieties tends to ripen around the same time, which is ideal for turning them into canned tomato sauce and salsa.
In addition, tomatoes also have different days to maturity and resistance to diseases. Therefore, it is a good idea to choose several varieties to grow so you can explore distinct flavors and growth patterns.
The most popular types include cherry and grape, slicing, and oblong paste tomatoes. Each type has unique characteristics that make it well-suited to different uses. Here are different types of tomatoes you may want to consider growing in your garden:
Cherry and Grape Tomatoes
These small, bite-sized tomatoes are perfect for snacking or adding to salads. Cherry tomatoes are round and typically about the size of a cherry, while grape tomatoes are slightly oblong and smaller than cherry tomatoes. These tomatoes are generally very sweet and juicy, with a high sugar content.
Cherry and grape tomatoes are a great choice for snacking, adding to salads, or using in recipes that call for small, flavorful tomatoes. Some popular cherry and grape tomato varieties include the following:
- Black Cherry: This is an heirloom cherry tomato variety with a dark red color and a rich, complex flavor.
- Matt’s Wild Cherry: This variety produces an abundance of small, 1/2-inch round, dark red cherry-sized tomatoes with a sweet, tangy flavor.
- Principe Borghese: This is a small, oblong grape variety that is similar in size and shape to a grape. Principe Borghese grape tomatoes have a rich flavor and dry flesh and are ideal for sauces and sun-dried tomatoes.
- Red and Yellow Pear: These small, pear-shaped tomatoes with a bright yellow color and a sweet, juicy flavor.
- Supersweet 100: This popular cherry tomato variety is known for its sweet flavor and high yield. Supersweet 100 tomatoes are small and round, with a bright red color and a thin skin.
- Sun Gold: This is a popular hybrid cherry tomato with a bright orange color and a sweet, fruity flavor. Sun Gold tomatoes are small and round, with a slightly thicker skin than other cherry tomato varieties.
Slicing Tomatoes
Slicing tomatoes are the classic round, juicy tomatoes that are often used for sandwiches and burgers. They come in a range of colors, from classic red to yellow, orange, and even purple. Slicing tomatoes are juicy, flavorful, and meaty enough to hold up well when sliced. Some popular slicing tomato varieties include:
- Beefsteak: This is one of the most popular and well-known slicing tomato varieties. Beefsteak tomatoes are large and meaty, with a classic round shape and a rich, juicy flavor.
- Brandywine: This is one of the most popular heirloom tomatoes, known for its large size, pinkish-red color, and rich, sweet flavor. Brandywine tomatoes take longer to mature than some other varieties, but many gardeners consider them worth the wait.
- Cherokee Purple: This is another popular heirloom tomato with a distinctive deep purple color and a sweet, rich flavor.
- Mortgage Lifter: This is another heirloom tomato variety known for its large size and delicious, juicy flavor.
Paste Tomatoes
Paste or plum tomatoes are often used for making sauces, salsas, and canning. They have thick walls, a meatier texture, fewer seeds, and less water content than other tomato varieties. Some of my favorite paste tomato varieties include:
- Roma: This is one of the most popular paste tomato varieties, known for its oblong shape and meaty texture.
- San Marzano: This is an Italian heirloom tomato with a distinctive elongated shape and a sweet, rich flavor.
- Amish Paste: This is a large, meaty tomato with a sweet, juicy flavor.
- Opalka: This is a Polish heirloom tomato with a long, slender shape and a meaty, slightly sweet flavor.
Tasty Heirloom Tomatoes
There are also heirloom tomato varieties, which are often prized for their unique flavors and colors. Although these may take some extra care to grow, the flavor is worth it. Each variety has its own unique flavor, texture, and appearance, making them a fun and interesting addition to any garden. Some examples of heirloom tomatoes include:
- Green Zebra: This variety of heirloom tomatoes has a unique green and yellow striped skin and a tangy, slightly sour flavor. Green Zebra tomatoes are often used for making salsa or adding to sandwiches.
- Black Krim: This variety has a dark red color and a rich, smoky flavor. Black Krim is delicious raw in salads or layered on burgers or sandwiches.
- Costoluto Genovese: This is an Italian heirloom tomato with a distinctive ribbed shape and a deep red color. Costoluto Genovese tomatoes have a sweet, slightly acidic flavor and are often used for making sauces or canning.
When deciding which types of tomatoes to grow, consider how you plan to use them and what your growing environment is like. For those living in short gardening seasons, choose varieties that mature fast, so they have time to grow and produce before the gardening season ends.
How to Grow Tomatoes
In this section, we’ll provide you with all the information you need to get your tomato plants off to a good start, including choosing the best planting location, starting tomato plants from seed, transplanting seedlings, and how to care for the plants. So let’s begin your journey to growing your delicious tomatoes!
Garden Site Selection
Tomatoes are a warm-season crop that grows best in full sun with rich, well-draining soil. Choose a bright and sunny spot in your vegetable garden to grow tomato plants. Tomatoes thrive with at least 6 to 8 hours of full sunlight per day.
Also, select a garden bed that did not grow tomatoes or their family members last season. Tomato plants are vulnerable to a number of soil-borne pathogens and insects, and plants that belong to the same family are often susceptible to similar pests and diseases.
Rotating your tomato crop to different areas that have not grown tomatoes, peppers, eggplant, tomatillos, and potatoes helps to reduce nutrition depletion and the build-up of pathogens. It also helps prevent pests from finding your plants early in the season. Learn more about the benefits of crop rotation in the backyard garden.
Additionally, when you consider the area where you will be growing tomatoes, plan on space for the plants, plus tomato supports. You can find out how much space your tomato plants need and how tall the plants will grow by referencing the seed package or looking up your tomato variety online. Learn How to Map Your Garden Beds.
Begin with Healthy Tomato Plants
Healthy seedlings will establish quickly and grow into vigorous plants that produce abundantly even when challenged by some pests and diseases. You can purchase transplants at your local garden center or start your tomato plants from seeds indoors under lights.
If you purchase tomato seedlings, ensure they come from a quality source. Your local nursery greenhouse will have a supply of the most popular tomato varieties that grow well in your area.
Look for small, sturdy tomato plants that are healthy. Smaller plants adapt to transplanting more easily than larger plants. Aim for about 4 to 8-inch tall plants with sturdy stems and healthy foliage.
Check leaves for signs of insects and diseases. Healthy foliage will be evenly green. Avoid plants with leaves that are yellow, spotted, wilted, or curled. These plants are stressed and may not adapt well when transplanted.
Growing Tomatoes from Seed
Starting tomato plants from seed is a great way to explore varieties that are not available in garden centers. Plus, nurturing and raising your own tomato seedlings is fun.
Growing your seedlings offers you more flexibility and control over your garden. You can choose your favorite varieties, grow the number of plants you need, and work within the planting dates that suit your growing area.
In addition, growing transplants is also a frugal way to get an abundance of tomato plants for your garden. A package of seeds will grow numerous tomato plants over several years and costs about the same as a 6-pack of tomato transplants at your local garden center.
These articles provide more information on setting up grow lights, sowing seeds indoors, and making a seed-starting schedule so you’ll know the right time to sow seeds based on your estimated last frost date:
- Using Grow Lights for Seedlings
- 10 Steps for Starting Seeds Indoors
- How to Make a Seed Starting and Planting Schedule
Sowing Tomato Seeds
Start tomato seeds indoors about 6 to 8 weeks before your last frost date for your area. You can find your estimated last frost date by contacting your local extension office (search for “extension office near me”) or enter your zip code here at PlantMaps.com.
To sow tomato seeds:
- Fill your seed starting containers with damp seed starting mix to within 1/2-inch of the top of the container.
- Poke shallow holes in the soil, about 1/4 inch deep.
- Place one or two tomato seeds in each hole, and then cover the seeds with a thin layer of potting mix and use a spray bottle to dampen the soil.
- Cover the seed tray with a humidity dome or clear plastic lid to create a mini greenhouse, which will help keep the soil moist and warm.
- Place the seedling trays in an area that maintains a temperature between 65 to 85˚F. Use a seedling heat mat for extra warmth to encourage the seeds to germinate quicker.
- Keep the soil evenly moist but not waterlogged, and the seeds should sprout in about a week.
- Once the seeds sprout, remove them from the heat, take off the humidity dome, and place them under grow lights. Position the lights about 2 to 3 inches above the plants, and use a timer to keep the lights on for 16 hours and off for 8 hours.
- Feed the tomato seedlings with a liquid organic fertilizer once the true leaves develop. Once the true leaves have developed, fertilize your plants by applying a half-strength solution of organic liquid fertilizer, such as fish emulsion or worm-casting tea. Continue feeding every two weeks or as described on the label for the best results.
As the seedlings grow, keep the soil evenly moist and adjust the lights to keep them several inches above the plants to prevent them from becoming leggy.
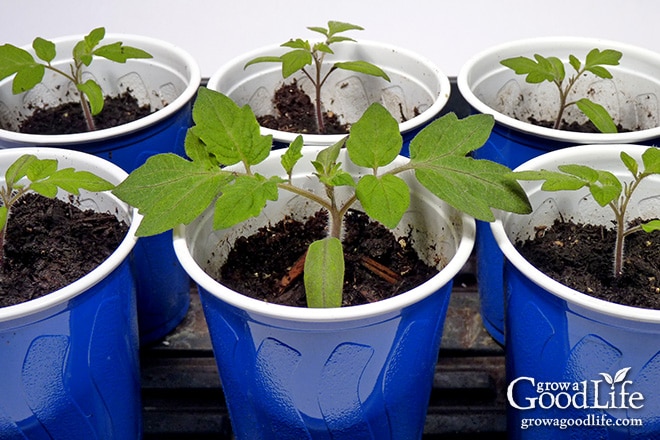
Potting Up into Larger Containers
When the seedlings have several sets of true leaves, you can transplant them into larger pots in good quality potting soil mixed with some organic fertilizer.
Water new transplants well to keep the soil evenly moist until the plants begin to show new growth, and then reduce watering to once or twice a week when the soil surface is dry about 1/2 to 1 inch.
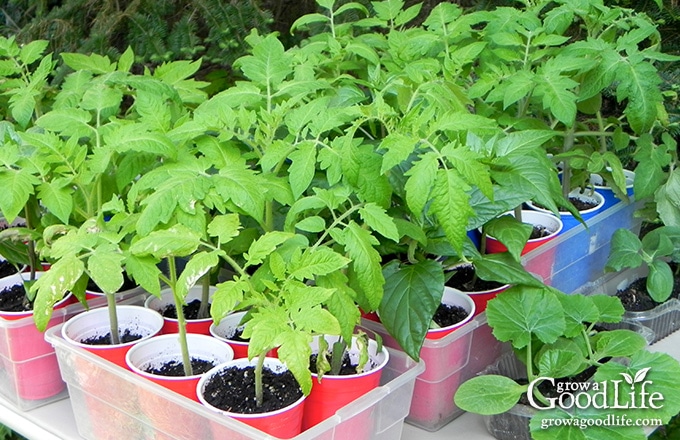
Hardening Off Before Transplanting
If you grow your own tomato seedlings or purchase transplants from a greenhouse nursery, you will need to harden off the plants before transplanting them to avoid shocking your plants. Hardening off is the process of introducing the plants to the outdoors a little at a time so they can adjust to wind, temperature fluctuations, and bright sunlight. You can learn more here: How to Harden Off Seedlings.
Once the weather has warmed to about 60˚F and the danger of frost has passed in your area, you can start hardening off your tomato seedlings.
Place your tomato plants outside in a sheltered location and progressively increase exposure a little at a time. Eventually, allow your tomato transplants to stay outside overnight as long as the nighttime temperatures are at least 50˚F. Prepare your garden beds for planting while your plants are hardening off.
Transplanting Tomatoes
Tomatoes are a warm-season crop and should be transplanted into the garden when nights are warm, and all danger of frost is past. Wait to transplant your hardened off tomato seedling until after your last frost date and when the air temperature is above 50 degrees at night.
Choose a calm, cloudy day to plant your tomato seedlings. If the soil is dry, prepare your holes, and water the bed thoroughly the day before.
Prepare your garden beds ahead of time by removing weeds, amending your soil, and setting up any trellis supports the plant will need.
The spacing between the plants depends on the specific variety of tomatoes, the growth habit of the plant, and the growing conditions. In general, however, tomato plants should be spaced around 18 to 36 inches apart in rows 3 to 4 feet apart.
Determinate tomatoes, which tend to be more compact and bush-like, can be planted closer together, while indeterminate tomatoes, which tend to grow taller and more sprawling, need more space and a trellis to support the tall vines and heavy fruit.
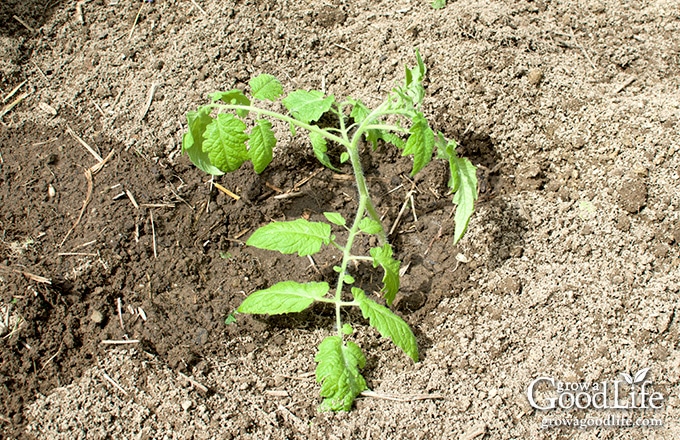
Dig the planting holes deep enough to bury your tomato seedlings up to the second set of leaves from the bottom of the plant. Tomato plants can form roots along parts of the stem if buried under the soil. This helps your plants develop a stronger root system. A healthy root system allows plants to absorb the nutrients, minerals, and moisture it needs to grow and produce fruit. Sturdy roots will also help anchor your plants so they can withstand winds and heavy rain.
Add a generous amount of finished compost to the holes and an organic fertilizer formulated for tomatoes, such as Tomato Tone. Water the planting holes well and let them drain. The compost will add organic matter and nutrients and help the soil retain moisture.
Remove the bottom set of leaves, center the tomato plant in the hole, and gently fill in the area around the root ball with soil. Firm the soil in gently, and water again after planting.
If an unexpected overnight frost is predicted, protect your plants with old blankets, sheets, row covers, buckets, or nursery pots. Remove the covering in the morning.
Growing Tomatoes in Pots
Tomatoes grow very well in containers, making them a great option if you have limited garden space or want to grow food on a patio, deck, or balcony. With the right container, potting mix, and regular care, container-grown tomatoes can be just as productive as those grown in the garden.
When choosing varieties for containers, compact or dwarf tomatoes are often the easiest to manage. Determinate varieties tend to stay smaller and produce their fruit over a shorter period, which works well for container growing. However, indeterminate tomatoes can also be grown in containers if they are given a large pot and sturdy support.
To grow tomatoes in containers successfully, use a large pot with drainage holes and fill it with a high-quality potting mix. Tomato plants in containers need consistent watering, regular feeding, and a support such as a cage or stake.
For step-by-step instructions, recommended container sizes, and the best tomato varieties for pots, see my guide: How to Grow Tomatoes in Containers.

How to Care for the Plants
Once your plants are growing and thriving, it’s important to provide them with proper care to ensure a bountiful harvest of juicy, flavorful tomatoes.
This section covers what you need to know about caring for your tomato plants as they grow, from watering and fertilizing to pruning and pest control. By following these tips, you can help your tomato plants reach their full potential and enjoy a healthy, productive growing season.
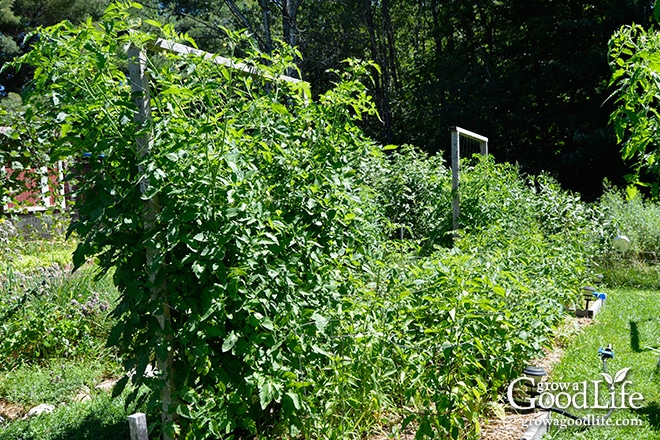
Support the Growing Tomato Vines
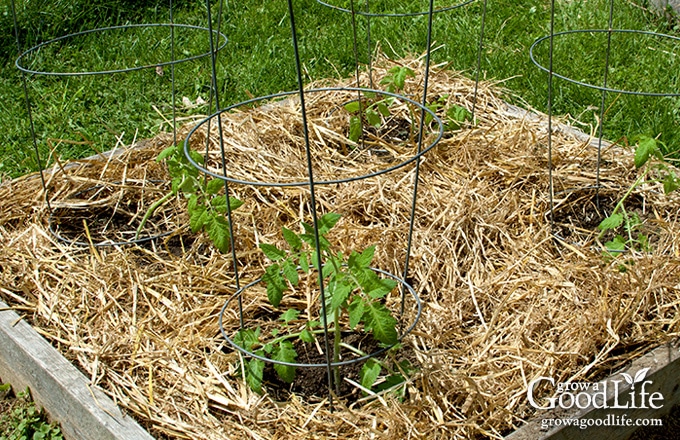
Your tomato plants will grow healthier if offered a cage or support to keep the vines and branches upright. Add a trellis at planting time while the tomato seedling is young.
The type of support you will need for your tomato plants depends on the variety you are growing. Some plants are shorter and easily supported with stakes or tomato cages. Others can grow up to 12 feet and need stronger and taller structures to support the vines and fruit. Check out this article for some creative tomato trellis ideas.
Water Tomatoes Consistently
Tomatoes need consistent moisture to grow foliage, blossom, produce, and ripen fruit. The plant can become stressed if it doesn’t receive enough water. This can leave the plant vulnerable to diseases and unable to absorb and use nutrients sufficiently.
Uneven watering also affects the fruit. Tomatoes may crack if the plant doesn’t have consistent watering. If it rains after a dry period, the fruit may split from the extra shot of moisture. Alternatively, overwatering your tomato plants will lead to saturated soil that suffocates your plants.
The goal is to keep the soil evenly moist. Water your tomatoes when the soil feels dry an inch or two below the surface. Water deeply at the base of the plant so the moisture soaks into the ground and reaches the roots.
Mulch the Soil Surface Around the Tomato Plants
After the soil has warmed and your tomato seedlings have become established, add a generous layer of mulch on the soil surface. Keep the mulch about 3 to 4 inches away from the stems of your plants to prevent smothering.
A generous layer of organic mulch helps protect the soil from erosion, blocks weeds from sprouting, and moderates soil temperature. In addition, mulching is beneficial for tomato plants because it:
- Helps Retain Moisture: Mulch helps keep the soil evenly damp by preventing moisture from evaporating from the soil surface.
- Prevents Soil Splash: A layer of mulch stops soil from splashing onto the leaves, which helps prevent soil-borne diseases. Instead, the water trickles down and is absorbed into the soil.
- You can learn more about using mulch in this article: 5 Ways Organic Mulch Helps Your Vegetable Garden
Keeping Up with the Weeds
Controlling weeds will help your tomato grow stronger and healthier and increase your chances of a bountiful harvest.
Weeds can compete with your tomato plants for nutrients, water, and sunlight, stunting their growth. Unfortunately, weeds can also create a hospitable environment for pests and diseases, making it even more important to keep them under control. By regularly weeding your tomato garden, you can improve airflow, which will help your plants resist fungal diseases.
You can prevent weed seeds from sprouting by covering the soil with an organic mulch. Then routinely pull out any weeds that manage to grow through the mulch. Learn more about natural weed control in this article: How to Control Weeds.
Fertilizing the Plants
Fertilizing your tomato plants throughout the growing season is a great way to provide them with the nutrients they need for healthy growth and a bountiful harvest.
If you amended your soil with compost and added fertilizer at planting time, your tomato plants will be off to a great start.
You can continue to fertilize your tomato plants monthly with additional finished compost or other organic fertilizers, such as Tomato Tone, to provide them with a steady supply of nutrients. But remember, too much fertilizer can lead to excessive foliage growth at the expense of fruit production, so be sure to fertilize your tomato plants in moderation.
Pruning Your Tomato Plants
Removing the bottom branches and any foliage that touches the ground is beneficial for all types of tomato plants. The branches at the bottom of the plant are the oldest and usually the first to show signs of disease if the plant becomes stressed.
Also, because this foliage is close to the ground, it is susceptible to being splashed with soil when it rains or when the plant is watered, leaving it vulnerable to soil-borne and fungal diseases.
Removing the bottom branches helps improve airflow, reduces soil splash, and reduces areas where pests can hide.
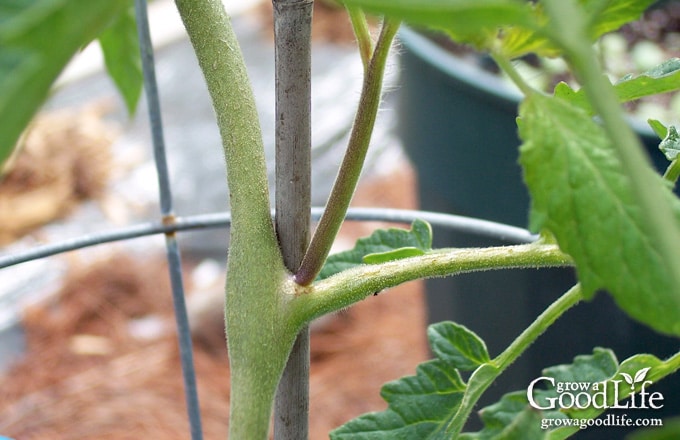
Should you Prune Tomato Suckers?
Tomato suckers are additional branches that sprout at the crotch between the main stem and branches of the tomato plant. The suckers turn into branches and go on to produce tomatoes.
There are two schools of thought in dealing with tomato suckers: One is to let them be. The new branches will generate more tomatoes and give you more fruit to harvest. The other is to prune out extra branches so the plant can concentrate its energy and grow bigger tomatoes.
The way you prune your tomato suckers will depend on the type of tomatoes you are growing:
- Determinate tomato varieties, also called “bush” tomatoes, are bred to grow compact plants that are about 2 to 4 feet tall. Suckers are not really an issue with determinant varieties. However, it is beneficial to remove the bottom shoots to improve airflow. For determinant types, prune the suckers and branches from the base of the plant up to the first flower cluster.
- Indeterminate tomato plants can benefit from pruning some of the suckers. Eliminating some shoots and branches will allow the plant to focus its energy on ripening and growing tomatoes instead of focusing on producing more foliage.
If you want a lot of tomatoes, leave most of the suckers and let them grow and produce more fruit. Just be sure to provide the plant with good support, moisture, and nutrients.
If you are aiming for sizable tomatoes, go ahead and prune out the majority of the tomato suckers so your plant can concentrate its energy on growing and ripening large fruit instead of more foliage.
Prune the suckers starting at the bottom of the plant up to at least the second flower cluster. You may need to prune suckers several times during the growing season.
Did you know you could root tomato suckers for a second crop of fresh and healthy plants? Cloning tomato plants from suckers is quicker than starting a new crop from seed. Try Rooting Tomato Suckers and Grow New Plants.
Troubleshooting Tomato Leaf Disorders, Pests, and Diseases
At least once a week, walk through your garden and examine your tomato plants. Check the foliage for leaf spots and holes, especially the lower leaves. Also, look over the fruit for damage, soft spots, or cracks.
Here are some resources to help you identify tomato fruit and leaf disorders, pests, and diseases:
- Tomato Disorders: The University of Minnesota Extension
- Quick Guide to Insects and Diseases of Tomatoes: The University of Minnesota Extension
- Tomato Insect Pests: Clemson University Cooperative Extension Service
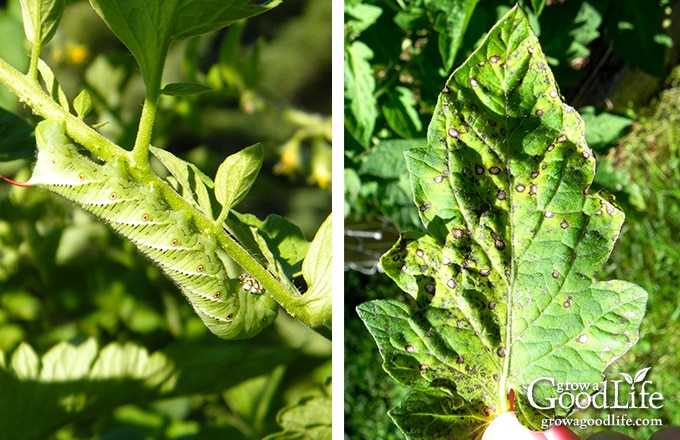
One of the most common pests you may encounter is the tomato hornworm. Hornworms are large green caterpillars that feed on tomato foliage and fruit. Their droppings are easier to spot than the worm. When you see the droppings, check the branches above, and you will likely spot the hornworm. Hand-pick the worms, and drop them into a jar of soapy water.
Tomato plants are susceptible to many bacteria, fungus, and viral diseases. Some are in the soil, waiting to appear when the conditions are right. Some diseases blow in from the wind or are transferred to the plant by insects.
Diseases on the foliage appear as spots, mottling, or yellowing leaves. Others diseases can cause lesions to form on the fruit or stems. Infections can spread from one plant to another by wind, water, insects, and gardening tools.
Some plants can survive while infected with a plant disease. However, some conditions, such as late blight, will kill your plants. Scout your plants often, and remove yellow or brown foliage and any rotten or damaged fruit.
Nutrition Deficiencies
Several nutrition deficiencies can affect tomatoes and impact their growth and development. Here are a few examples:
- Blossom end rot: This is a common disorder that results from a lack of calcium in the developing fruit. It causes the bottom of the fruit to turn brown and mushy. To prevent blossom end rot, ensure the soil has adequate calcium levels and avoid over-fertilizing with nitrogen, which can interfere with calcium uptake.
- Leaf disorders: Tomatoes may develop various leaf disorders due to nutrient deficiencies. For example, yellowing between veins may indicate a lack of magnesium, while brown spots or blotches may indicate a potassium deficiency. To address these deficiencies, apply appropriate fertilizers or soil amendments.
- Wilting: Tomatoes may wilt if they do not receive enough water or the soil lacks nutrients such as nitrogen or potassium. To prevent wilting, ensure the soil is moist but not waterlogged, and fertilize appropriately.
- Stunted growth: If tomatoes are not growing as expected, it may indicate a lack of nitrogen or other essential nutrients. To promote healthy growth, apply fertilizers or compost rich in nitrogen, phosphorus, and potassium.
Monitoring tomato plants regularly and promptly addressing any pests, diseases, and nutrient deficiencies will help to ensure healthy growth and a good harvest.
When and How to Harvest
Harvest tomatoes frequently so the plant can redirect energy to growing and ripening more fruit. Once your tomatoes begin ripening, check the plants daily, pick those almost ready, and let them ripen fully indoors.
We dream of vine-ripened tomatoes, but the reality is the longer the fruit remains on the vine, the more susceptible it is to pest damage and spoiling. Luckily, tomatoes continue to mature off the vine and will have the same flavor as one that ripens on the plant.

It’s better to pick the fruit before peak ripeness to reduce the chances of losing it altogether. Some reasons for harvesting tomatoes when partially ripe include:
- Avoid Pest Damage: A ripe tomato is attractive to many pests. The sweet fragrance and bright colors of ripe tomatoes appeal to insects, birds, chipmunks, and other animals.
- Prevent Splitting: The skin of a ripe tomato may split if the plant receives too much rain quickly. Once the skin has split, the fruit is defenseless against rot, mold, and insects. If you are expecting a rainy period, harvest your partially ripe tomatoes.
- Stop Rotting in Hot Weather: Tomatoes stop ripening when temperatures exceed 85˚F. Therefore, nearly ripe tomatoes may start rotting during a period of hot temperatures. If you expect several hot days in a row, harvest all your almost-ripe tomatoes and bring them indoors to finish ripening.
As a tomato ripens, it changes from green to yellow-green and then to its final color. The color deepens further as the fruit matures. A completely ripe tomato will feel firm but slightly soft. Harvest your tomatoes when they look almost ripe.
Take care not to damage the tomato plant when harvesting. Almost ripe tomatoes will come off the vine with a simple twist, or you can use clippers or a sharp knife.
Bring the tomatoes inside and store them at room temperature on a kitchen counter or anywhere away from direct sunlight. Your tomatoes should fully ripen in 2 to 4 days. Once ripe, use the tomatoes within a few days, or preserve them for later.
You can enjoy freshly harvested tomatoes in a variety of ways! Here are a few ideas:
- Fresh Salads: Slice the tomatoes and mix with chopped lettuce, spinach, cucumbers, carrots, radishes, onions, peppers, and a drizzle of salad dressing, such as Italian Salad Dressing or Strawberry Vinaigrette.
- Italian Salsa Cruda: Chop ripe tomatoes, peppers, and garlic, and combine with fresh Italian herbs, extra virgin olive oil, a bit of red wine vinegar, and salt and pepper. It is perfect for bruschetta, tossed with pasta, or spooned over grilled meat or fish.
- Summer Tomato Sauce: Cook down tomatoes with garlic, onion, and herbs for a flavorful pasta sauce.
- Grilled Tomato Salsa: Grill tomatoes, onions, and jalapeños, then combine with cilantro, lime juice, salt, and pepper for a delicious salsa. Grilling sweetens the vegetables and adds a delightful smoky flavor.
- Sandwich Topper: Layer your favorite sandwiches and burgers with thick slices of tomatoes for extra sweet, juicy flavor.
- Fried Green Tomatoes: Perfect for those end of season fruit that didn’t have time to ripen before frost.
Ways to Preserve Tomatoes
While fresh tomatoes can be enjoyed in many dishes, they can also be preserved for later use through freezing, drying, and canning. Here are several different ways to preserve tomatoes:
Freezing Tomatoes
Freezing tomatoes is one of the easiest ways to preserve your harvest, especially when tomatoes ripen faster than you can use or can them. While frozen tomatoes won’t hold their shape after thawing, they work well in cooked dishes like soups, sauces, stews, and chili, and they can even be canned later in recipes where the tomatoes are cooked down.
Tomatoes can be frozen whole, chopped, or puréed, depending on how you plan to use them later. The simplest method is to wash the tomatoes, remove the stems, and place them directly into freezer bags or containers. There’s no need to blanch or peel them first. Once thawed, the skins slip off easily and the tomatoes soften, making them perfect for cooking.
Freezing tomatoes is also helpful when you want to preserve the harvest now and decide what to do with it later. Whole frozen tomatoes can even be used later for home canning in recipes where the tomatoes are cooked down.
For step-by-step instructions and tips on the best ways to freeze tomatoes, see my guide on how to freeze tomatoes for cooking or canning later.
Drying Tomatoes
Dehydrating tomatoes creates a concentrated, flavorful ingredient that can be used in various recipes. This article explains how to make sun-dried tomatoes utilizing the sun, food dehydrator, or oven: Homemade Sun Dried Tomatoes.
Canning Tomatoes
Canning tomatoes allows for long-term preservation and can be done using a boiling water bath canner or a pressure canner. This way, you can enjoy the taste of fresh, ripe tomatoes all year round. It’s important to follow safe canning guidelines to ensure your tomatoes are safe to eat and will last a long time. We have many safe canning recipes to help you preserve your bounty, including sauces, salsas, whole, crushed, and even pickled green tomatoes:
- Whole or Halved Tomatoes in Water
- Tomato Puree
- Crushed Tomatoes
- Seasoned Tomato Sauce
- Spaghetti Sauce
- Pizza Sauce
- Zesty Salsa
- Tomato-Jalapeno Salsa
- Rotel-Style Tomatoes
- Tomato Vegetable Juice
- Pickled Green Tomatoes
10 Tips to Improve Your Tomato Harvest
Tomatoes are pretty easy to grow and will likely yield a crop even when the growing conditions are not ideal. A few tips will improve the vigor of your plants and the amount of tomatoes they will produce:
- Begin with healthy tomato plants: Grow your own or purchase healthy seedlings from your local garden center.
- Choose the ideal growing location: Select an area that receives full sun with good quality soil, rotate planting beds, so you do not grow plants in the same family, and consider how you will support your plants.
- Harden off your tomato seedlings: Acclimate your transplants slowly before planting, so they adjust to outdoor temperatures, wind, and sunlight.
- Plant your tomato seedlings deep: Tomato plants have the ability to form roots along parts of the stem if it is buried under the soil. This helps your plants develop a stronger root system.
- Support the growing tomato vines: Your tomato plants will grow healthier if they are offered support to keep the vines upright.
- Water tomatoes consistently: Tomatoes need consistent moisture to grow foliage and produce and ripen fruit.
- Mulch the soil surface around the tomato plants: A generous layer of organic mulch helps protect the soil from erosion, blocks weeds from sprouting, and moderates soil temperature.
- Prune your tomato plants: Pruning suckers and removing the bottom branches helps improve airflow, reduce soil splash, and eliminate areas where pests can hide.
- Scout your tomato plants for pests and disease: At least once a week, walk through your garden and examine your tomato plants. Check the foliage, especially the lower leaves for leaf spots and holes. Look over the fruit for damage, soft spots, or cracks.
- Harvest your tomatoes frequently: Harvest tomatoes frequently so the plant can redirect energy to growing and ripening more fruit.
—
No backyard vegetable garden is complete without tomatoes, and for a good reason! So whether you are growing tomatoes for snacks and salads or to preserve as canned tomato sauce and salsa, I hope these tips help you grow healthy plants that will produce a bountiful harvest.
This article was originally published on May 4, 2018. It has been updated with additional information.
Good planning is key to a successful vegetable garden
Whether you are new to growing your own food or have been growing a vegetable garden for years, you will benefit from some planning each year. You will find everything you need to organize and plan your vegetable garden in my PDF eBook, Grow a Good Life Guide to Planning Your Vegetable Garden.

What makes leaves of tomato plants curl up. Does it damage the plant
Alma, There are many reasons why you tomato leaves can curl or roll including insects, stress, disease, and herbicide poisoning. Check out this PDF from Texas A&M AgriLife Extension to see if you can identify the problem: What Makes Tomato Leaves Twist or Curl?
Great tips, thanks for sharing!
I usually amend the soil in fall and if the manure isn’t quite as aged as I would like it to be, I’ve found that adding rock dust and gypsum helps prevent blossom end rot on my tomatoes and squashes.
For the really hot days here in Utah, I plant the tomatoes where they will get some shade in the afternoon to help them pull through.
Perfect refresher at just the right time. Thanks.
This is well written post. Just one thought, where we live, in northern California, every day from now on will be well over 85 degrees, until October. We usually have around 3 months of 100-110+ degrees. I always grow tomatoes. It is challenging, but they do grow over 85 degrees. They need afternoon shade (when the temperature peaks,) and watering twice a night.
Maria, Yes, tomatoes will grow in hot temperatures. The point I made is the fruit stops ripening when it is warmer than 85˚F. The lycopene and carotene pigments can’t form at high temperatures. Why Aren’t My Tomatoes Ripening
Good tips. Planning on going to our Garden Club sale on Sunday to get my seedlings. – Margy