Rotel-Style Tomatoes and Green Chilies Canning Recipe
This post may contain affiliate links, which means that I may receive a commission if you make a purchase using these links. As an Amazon Associate I earn from qualifying purchases.
Rotel is a great pantry staple for spicing up Mexican foods. Learn how to make your own tomatoes and green chilies to suit your taste and preserve them using a pressure canner.

When you think of Tex-Mex or Southwestern food, the first ingredients that come to mind are tomatoes, chili peppers, and cumin. The combination of these flavors is what makes Mexican-style cuisine so unique and delicious.
Rotel is a commercially canned tomato and green chili mix that is a pantry staple for making Mexican-inspired recipes. Cans of rotel are so convenient for adding flavor to dishes like tacos, casseroles, soups, or making salsas or dips.
If you use a lot of diced tomatoes with green chilies in your recipes, try home canning your own with this safe canning recipe. This step-by-step tutorial will show you how to make homemade rotel using fresh ingredients and preserve shelf-stable jars with a pressure canner.
What are Rotel Tomatoes?
Ro-Tel is a commercial brand of canned diced tomatoes and green chilies created by Carl Roettele, who owned a small canning company in Elsa, Texas, in the 1940s. The brand name “Ro-Tel” is a shortened spelling of his last name.
While Ro-Tel was initially created as a shortcut for making chili con queso, it has evolved as a staple ingredient used to spice up Tex-Mex and Mexican recipes. Today, you can find Ro-Tel in most grocery stores across the US.
The ingredients on the label are Tomatoes, Water, Chopped Green Chili Peppers, Salt, Calcium Chloride, Natural Flavor, Citric Acid, and Cilantro.
How to Make Rotel
I have had requests over the years for a home canned rotel-type recipe. While there are no safe canning recipes specifically for diced tomatoes with green chilies, the “Stewed Tomatoes” recipe in the So Easy to Preserve book is very close.
After several rounds of testing and a few safe tweaks, this canning recipe is an excellent replacement for commercial cans of rotel diced tomatoes and chilies. The best thing is, you can make it hot or mild by swapping out the types of peppers used. Here are tips for making homemade rotel:
About the Ingredients
This rotel copycat is made from fresh Roma tomatoes, Anaheim peppers, onions, dried cilantro, salt, garlic powder, and cumin.
As with any preserved product, use good quality vegetables at the peak of ripeness with no signs of rot or disease. Tomatoes should be evenly ripe with firm flesh, and the peppers and onions should have no damage or soft spots.
Tomatoes
For this recipe, you can use any type of tomatoes, but plum or paste tomatoes produce firmer textured pieces after processing. Plum tomatoes are oblong and have thick meaty walls with small gel and seed pockets. Common paste tomatoes include Roma, San Marzano, or Amish Paste.
Peppers
The recipe, as written, produces a close version of the original rotel with tomatoes and long green chilies. You can safely swap the type of fresh peppers in this recipe for different heat levels and flavor, but do not change the total amount of peppers, or the recipe may be unsafe for canning:
- Original: Green chilies such as Anaheim, Colorado, Hatch, New Mexico, or Poblano peppers add a little warmth.
- Mild: If spicy is not your thing, use mild yellow wax or sweet bell peppers instead.
- Medium: Use Serrano or Jalapeno peppers for medium heat.
- Hot: Use hot chilies such as Cayenne, Habanero, Tabasco, or even Ghost peppers for a hot spicy kick.
Onions
You can use any bulb onion, including yellow, white, or red. The commercial cans of rotel don’t have onions listed in the ingredients, so you can leave them out if you want. However, I suggest including them for flavor and the convenience of not having to chop additional onions when preparing meals.
Seasoning
You may alter the amounts of dried seasoning in this recipe. Depending on how you use your rotel, you may want to leave the seasoning out and then season to taste with fresh or dried herbs and spices when you prepare your recipe.
Ways to Use Rotel
Having jars of tomato and green chili mix in your pantry is such a time saver because they are prepped and ready to open and add to your recipes. One of my favorite ways to use rotel is to make taco meat with ground beef, chicken, or turkey:
Ground Beef Taco Meat Recipe
- Heat a large non-stick skillet over medium-high heat.
- Add one pound of ground meat, break it up, and cook until no longer pink, about 5 minutes. Drain off any extra fat if desired.
- Add an 8-ounce jar of tomatoes and green chilies, including the liquid, along with 1 tablespoon of chili powder or taco seasoning and salt and pepper to taste. Stir well to combine and continue cooking until the liquid has evaporated, about 5 to 10 minutes.
- Use for tacos, burritos with homemade flour tortillas, taco salad, or nachos.
Other ways to use homemade rotel tomatoes and chilies are mixed in a quick corn salsa, simmered in a slow cooker chili, as a topping for chicken enchiladas, and even blended into a restaurant-style salsa if fresh vegetables are not available.
Steps for Canning Rotel Tomatoes and Green Chilies
Since this recipe is a tomato-vegetable mix with no added acid, a pressure canner is required to achieve the high temperature necessary to kill organisms that can cause foodborne illness. If you don’t have a pressure canner, you can freeze the mixture instead.
If you need a refresher on how the process works, see my step-by-step guide: Pressure Canning for Beginners, along with the instructions that came with your pressure canner.
For added convenience, I’ve also created a free Home Canning Checklist you can print and keep nearby while working through your canning projects. Grab it here:
Grab your Free copy
Home Canning Checklists
This recipe for rotel is adapted from the “Stewed Tomatoes” recipe from So Easy to Preserve. I doubled the recipe, swapped the peppers for green chilies to replicate the commercial version, and adjusted the seasoning.
You can find the complete, printable recipe at the bottom of this article, but here are the detailed steps to making and canning rotel tomatoes:
Step 1: Gather Your Kitchen Equipment
You’ll need:
- Kitchen scale
- Knife and cutting board
- Gloves for handling hot peppers
- Measuring cups
- Pressure canner with canning rack
- 12 half pint canning jars, or 6 pint canning jars
- Lids and bands (new covers for each jar, bands can be reused)
- Canning tools: jar lifter, canning ladle, funnel, and bubble popper
- Basic kitchen supplies: large prep bowls, a large pot, knife, cutting board, slotted spoon, and clean kitchen towels.
Step 2: Prepare the Vegetables
This recipe calls for chopped tomatoes, peppers, and onions. This means you will peel, seed, and chop your vegetables before measuring using measuring cups.
Prepare the vegetables one at a time so you can measure each accurately. Chop into uniform, 1/2-inch pieces and add to a measuring cup as you go until you reach the required amounts.
Tomatoes
You’ll need about 24 pounds to get 16 cups of peeled, cored, seeded, and chopped tomatoes. Wash the tomatoes well under running water.
To remove the skins, bring a large pot of water to a boil and fill a large prep bowl with ice water. While working in batches, blanch the tomatoes in boiling water until the skins crack, and then plunge them into ice water to stop them from cooking.
While the tomatoes are cooling, empty the water out of the large saucepot, wash with soapy water, rinse well, and dry. Use this pot to heat your tomato mixture before filling the jars.
Once the tomatoes are cool enough to handle, remove the peelings and cores, scoop out the seeds, and chop them into 1/2-inch pieces. Measure the chopped tomatoes and add 16 cups to a large saucepot.

Peppers
Plan on 1 medium or 2 small chilies to get 1/2 cup of chopped peppers. Wash your peppers well under running water. Wear gloves when handling hot peppers and avoid contact with your skin and eyes.
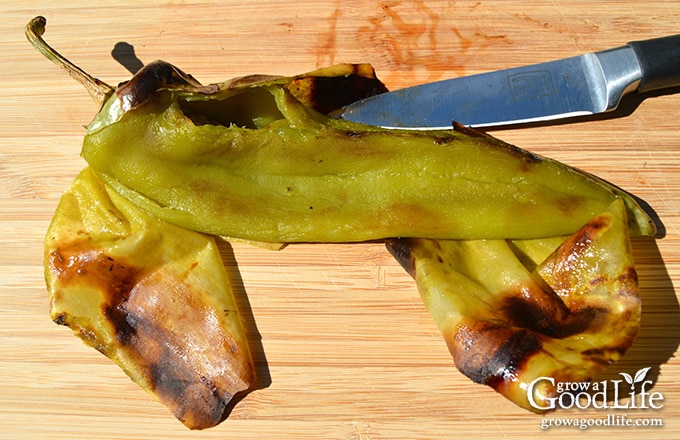
The tough skin of long chili-type peppers such as Anaheim, Colorado, or New Mexican chilies can give an unpleasant texture. Remove the skin first by roasting and peeling before chopping. Thin-skinned peppers, such as bell, banana, Serrano, and jalapeños don’t need to be peeled.
Remove the stems, cut the peppers in half, and scrape out the seeds and membranes with a spoon for less heat if desired. Cut into 1/2-inch pieces. Measure and add 1/2 cup of chopped peppers to the pot.
Onions
Plan on 1 medium or 2 small onions to get 1/2 cup of chopped onions. Remove the skins, use a sharp knife to cut the ends, and then chop into 1/2-inch pieces. Measure and add 1/2 cup of chopped onions to the pot.
Step 3: Prepare the Canning Equipment
Wash the canning jars, lids, bands, and canning tools in hot soapy water, and rinse well. Set the lids and bands aside to air dry until you are ready to use them.
Place the jar rack into the pressure canner. Add water per your pressure canner manufacturer’s instructions: Presto is 3 quarts, Mirro is 2 quarts, and All American is 2 to 3 inches.
Fill the jars halfway with hot water, set the jars in the canner, and simmer for 10 minutes (180˚F). Keep the jars hot until you are ready to fill them.
Step 4: Simmer the Tomatoes and Chilies
Place the pot of prepared tomatoes and chilies on the stove. Add the seasonings, and stir to combine. Bring the pot to a boil over medium-high heat, then reduce the heat to a simmer (180˚F), and cook for 10 minutes. Keep hot as you fill your jars.

Step 5: Can the Tomatoes and Green Chilies
Spread a kitchen towel on the counter. Use the jar lifter to remove a jar from the canner. Pour out the water (save it for washing dishes), and place the jar on the towel. Keep the remaining jars in the canner so they stay hot.
Place the canning funnel on the jar, and ladle the hot tomato and chili mixture into the jar while leaving 1/2-inch headspace. Run the bubble popper through to release any trapped air bubbles. Adjust the headspace again if needed.
Wipe the rim with a damp towel to remove residue. Center a lid on the jar, place the band over the lid, and screw it on until fingertip tight. Place the jar back into the canner, and repeat with the rest of the jars.
Follow the directions for your pressure canner and process the jars for the times indicated in the recipe below.
When the processing time is complete, turn off the heat and let the canner cool naturally, remove the jars, let them cool completely, and test the seals. Then, wash the jars, date, label, and store the canned tomatoes and green chilies in a cool location. Use within 12 to 18 months for the best flavor.

Rotel-Style Tomatoes and Green Chilies Canning Recipe
Ingredients
- 16 cups peeled, cored, seeded, and chopped ripe tomatoes
- 1/2 cup chopped green chili peppers
- 1/2 cup chopped onions
- 1 teaspoon dried cilantro optional for flavor
- 1/2 teaspoon canning salt optional for flavor
- 1/4 teaspoon garlic powder optional for flavor
- 1/4 teaspoon cumin powder optional for flavor
Instructions
Prepare the Canning Equipment:
- Wash the jars, canning lids, and rings in hot soapy water and rinse thoroughly. Set the lids and bands aside until you are ready to use them.
- Place the jar rack into the pressure canner, and fill with water per your pressure canner manufacturer’s instructions: Presto is 3 quarts, Mirro is 2 quarts, and All American is 2 to 3 inches.
- Fill the jars halfway with hot water, and then place them on the rack in the canner. Bring the canner to a simmer for 10 minutes (180˚F). Keep hot until you are ready to fill them.
Simmer the Tomatoes and Chilies:
- Add the prepared tomatoes, peppers, onions, cilantro, salt, garlic powder, and cumin to a large saucepot, and stir to combine.
- Bring the mixture to a boil over medium-high heat, then reduce the heat, and simmer (180˚F) for 10 minutes. Stir occasionally to prevent sticking.
Can the Tomatoes and Green Chilies:
- Lay a towel on the counter. Use your jar lifter to remove a jar from the canner. Pour out the water (save it for washing dishes), and place the jar on the towel. Keep the remaining jars in the canner so they stay hot.
- Use your canning funnel and ladle to fill the jar with the hot mixture, leaving 1/2-inch headspace.
- Remove air bubbles with the bubble popper, wipe the rim to remove any residue, center a lid on the jar, and screw on a band until it is fingertip tight. Use the jar lifter to place the jar back into the canner and repeat with the remaining jars.
- Place the lid on the canner and lock it. Leave the vent open, adjust the heat to medium-high, and bring the canner to a boil. Allow the pressure canner to vent steam for 10 minutes, place the pressure regulator on top of the air vent, and let the pressure rise.
- Once the canner has reached the correct pressure (10 pounds for weighted gauge and 11 pounds for dial gauge pressure canner), set a timer and process half pint and pint jars for 15 minutes at altitudes of less than 1,000 ft.
- Adjust altitude if necessary (see chart below), and regulate the heat as needed to maintain a steady pressure.
- When the processing time is complete, turn off the heat, and let the pressure canner cool down to 0 pressure. Once the canner is depressurized, let the canner cool additional 10 minutes before removing the lid.
- Spread a dry towel on the counter, unlock the cover, and remove it by tilting the lid away from you so that steam does not burn your face.
- Allow another 10 minutes for the jars to adjust to the change in pressure. Then, if the jars are still boiling vigorously, let them sit in the canner for another 5 minutes or until the boiling slows.
- Use the jar lifter to lift jars carefully from the canner and place them on the towel. Keep the jars upright, and don’t tighten bands or check the seals yet. Let the jars sit undisturbed for 12 to 24 hours to cool.
- After 12 to 24 hours, check to be sure jar lids have sealed by pushing on the center. The cover should not pop up. The jar failed to seal if the top flexes up and down. Refrigerate the jar and use it up within a few days.
- Remove the screw-on bands and wash the jars in warm soapy water. Label, date, and store the jars in a cool, dark place for 12 to 18 months. Once the jar is open, refrigerate and use up within a week. Yields 12 half pints or 6 pints.
Notes
- 1,001–2,000 ft. — 11 pounds
- 2,001–4,000 ft. — 12 pounds
- 4,001–6,000 ft. — 13 pounds
- 6,001–8,000 ft. — 14 pounds
- 1,001 ft. and above — 15 pounds
Nutrition
As you can see, it is easy to preserve jars of homemade rotel using fresh ingredients with a pressure canner. You’ll be thrilled to have homemade tomatoes and green chiles on hand whenever you want to make a quick and easy Mexican dish.
You May Also Like:

How long would you process quart jars?
Crystal, Process quart sized jars for 20 minutes at altitudes of less than 1,000 ft.
This looks great- I have eaten Ro-tel tomatoes all my life. Question, though- if you added citric acid, could you can this in a water bath canner? Thanks!
Hi Ann! This recipe is specifically formulated for pressure canning. Just adding lemon juice or citric acid doesn’t make it safe for water bath canning. Without lab testing, there’s no way to be sure of the acidity and safety.
If you’d like a water bath option, you might enjoy this tested stewed tomatoes recipe instead: Stewed Tomatoes for Water Bath Canning. To make it closer to Ro-tel, you can omit the celery, swap in an equal amount of green chile peppers for the bell peppers, and add your favorite dried seasonings. These minor changes will not affect the safety.
That is very helpful, thanks for the quick reply!
Thank you for including a pressure cooker instructions. Most only give a water bath instructions. Sure helps knowing the pressure cooker times/pounds above 1,000 ft👏💙👏
Lynn, You’re very welcome! Yes, this is specifically a pressure canning recipe. Since there’s no added acid, it’s not safe to water bath can — pressure canning is the only safe method for this one. I’m so glad the altitude-specific times and pressures were helpful!