Pickled Red Onions Canning Recipe
This post may contain affiliate links, which means that I may receive a commission if you make a purchase using these links. As an Amazon Associate I earn from qualifying purchases.
Pickled red onions add a vibrant pop of color and bite of acidity to any meal. Learn how to preserve pickled onions into shelf stable jars with this easy canning recipe.

I grow mostly storage onions and they are cured and stored in baskets on shelves in the coolest part of our unheated basement. These usually last until springtime. As temperatures warm, the onions start getting soft and are triggered to begin sprouting.
We ended up with a bunch of red onions last year. There was no way we would use them up before they went bad. I decided to can a few batches of pickled onions so they would last longer. Now that the storage onions are gone, I still have a few jars of pickled onions left to tide us over until the new crop is ready.
Tips for Pickling Onions
This is a simple canning recipe that relies on pure vinegar to preserve the onions. Here are some tips to make the best quality pickled red onions:
Start with healthy firm onions
This recipe uses red onions, but you can pickle any type of onion from sweet Spanish to pungent yellow. Choose firm onion bulbs with no mold or spongy spots. If your onions are soft or sprouting, consider freezing them instead. Plan on about 3 pounds of onions to fill 6 half-pint jars.

Use commercial vinegar with 5% acidity
You can safely swap the type of vinegar used to pickle vegetables as long as the acidity is at least 5%. I found the white vinegar made a sharp flavored pickled onion, apple cider works well too. But our favorite is the red wine vinegar. It has a nice, slightly sweet flavor.
- White vinegar is clear vinegar made by distilling corn and rye. It tastes more sour and acidic, but this may be just what you love about pickled vegetables. Choose an organic brand to avoid genetically modified corn.
- Apple cider vinegar is made from fermented apples. It has a fruity tart flavor that blends well with vegetables. The color is amber brown and may darken your pickles slightly, but the flavor is worth it.
- Red wine vinegar is my favorite vinegar for pickled onions. It is made from fermented red wine, and adds a slightly sweet fruity flavor to the onions.
Some small ingredient changes are safe when canning pickles and relishes. To learn what adjustments are safe and which ones should be avoided, read: How to Safely Modify Pickle and Relish Canning Recipes.
How to cut onions without crying
Slicing into an onion releases an enzyme that turns into a vapor that irritates the eyes. In response, your eyes tear up to flush the irritant out of your eyes. Here are tips for cutting onions without crying:
- Chill the onions: Chilling the onions before cutting to decrease the amount of gas released into the air. Pop the onions in the refrigerator for a couple of hours, or freeze for 30 minutes before slicing.
- Cut the root last: The root end of the onion has a higher concentration of enzymes.
- Protect your eyes: Wear kitchen goggles to shield your eyes from the gas.
- Use a sharp knife: Cutting onions with a sharp knife will release fewer enzymes into the air.
- Use a fan: Cut the onions in a well-ventilated area and run a fan towards your work area to move the air away from your face.
If your eyes are irritated after slicing onions, flush them with cool water and use eye drops. Wash your hands well and avoid touching your eyes.
How to Can Pickled Onions
Preserving pickled red onions is pretty straightforward. You simply slice the onions, heat a simple vinegar brine, fill the jars, and process in a water bath canner for shelf stable jars. This canning recipe is based on the “Vinegared Red Onions” from the Ball Blue Book Guide to Preserving. It has been adapted slightly to add more flavors to the brine with pickling spices.
If you’re new to water bath canning, it may help to review the process before you begin. You can learn the basics in my step-by-step guide: Water Bath Canning for Beginners.
To make your canning project easier, I created a free Home Canning Checklist you can print and keep nearby while you work. It includes safety reminders, prep steps, and space to track each batch. Grab your copy here:
Grab your Free copy
Home Canning Checklists
A more detailed and printable recipe can be found at the bottom, but these are the general steps for making and canning pickled red onions:
Step 1: Prepare the Canning Equipment
You’ll need:
- Water bath canner and canning rack
- 6 half-pint canning jars
- Canning lids and bands (new lids for each jar, bands can be reused)
- Canning tools: jar lifter, canning ladle, funnel, and bubble popper
- Plus basic kitchen supplies such as a large saucepan, large prep bowl, liquid measuring cup, kitchen towels, tongs, mandoline, or knife and a cutting board.
Wash your jars, lids, bands, and canning tools in warm, soapy water. Rinse well, and set the lids, bands, and tools aside to air dry until you are ready to use them.
Setup your water bath canner with the canning rack on a large burner of your stove. Place the jars upright in the canner, and add water to cover. Bring the canner to a simmer (180˚F) for 10 minutes, and keep the jars hot until you are ready to fill them.
Step 2: Prepare the onions
Cut off the stem end of the onions and peel off the paper skins. Using a mandolne, or sharp knife, cut the onions into 1/4-inch slices. Freeze the root end and trimmings to use for making homemade stock.
Step 3: Heat the pickling vinegar
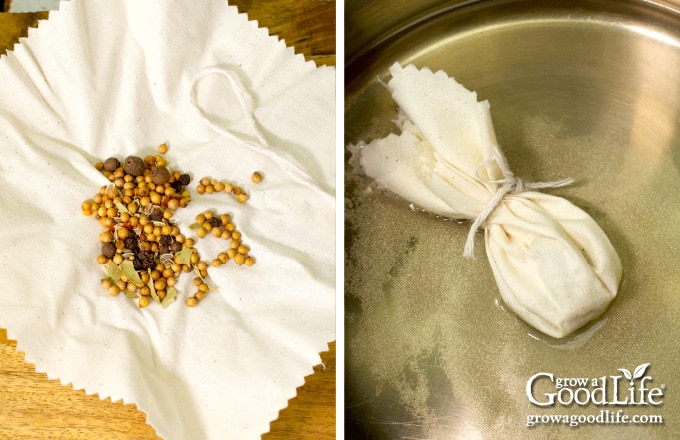
Bundle the pickling spices in a spice bag or coffee filter and tie with kitchen string. If you don’t have pre-mixed pickling spice, you can mix up a batch with this homemade pickling spice recipe, or simply combine 1 teaspoon mustard seeds, 1 teaspoon coriander seeds, 1 teaspoon dill seeds, 1 teaspoon black peppercorns, 2 allspice berries, 1 bay leaf, and a pinch of red pepper flakes.
Since this is an all vinegar pickle recipe, you can safely alter the herbs, spices, and even add a little sugar to adjust the flavor to your liking. Feel free to include any dried or fresh herbs and spices, such as oregano, rosemary, fresh ginger, cumin seeds, crushed cinnamon, or star anise. Your spice mixture doesn’t have to be perfect. You just want to infuse the vinegar with extra flavor.
Add the vinegar, crushed garlic cloves, and spice bag to a medium sauce pan. Bring to a boil over medium-high heat, reduce the heat, and simmer (180˚F) for 5 minutes. Add the prepared onions, cover, and simmer for 5 minutes. Remove the garlic and spice bag and fill your jars.
Step 4: Can the onions
Lay a kitchen towel on the counter. Use the jar lifter to remove a jar from the canner, drain, and place on the towel. Keep the remaining jars in the canner, so they stay warm.
Use tongs to pack the sliced onions into the warm jar. Add two sprigs of thyme on top, and pour hot pickling liquid over the onions leaving 1/2 inch headspace. Run the bubble popper through the jar to remove trapped air and compress the onions so they are submerged in the liquid. Remove any that stick out, and adjust the headspace again if needed.
Note: The addition of thyme in this recipe is a safe modification. According to Penn State Extension: “A few sprigs of fresh herbs can also be added to canning recipes with no effect on the safety of the process.” This includes herbs like thyme, dill, rosemary, or basil added for flavor. ~ Penn State Extension – Let’s Preserve: Ingredients Used in Home Food Preservation

Wipe the rim with a damp towel to remove residue. Center a lid on the jar, place the band over the lid, and screw it on until fingertip tight. Place the jar back into the canner, and repeat with the rest of the jars. Adjust the water level so it is covering the jars by two inches, bring the canner to a boil, and process the jars for the times indicated in the recipe below.
Once processing time is complete, remove the jars, and let them cool undisturbed for 12 to 24 hours. After cooling for at least 12 hours, test the seals. Refrigerate any that did not seal, and use up within a week.
Wash the jars with warm soapy water, dry, label and date the jars, and store in a cool, dark location for 12 to 18 months. Wait several weeks for the onions to develop its flavor before opening a jar.
Ways to Use Pickled Onions
Pickled red onions can be enjoyed in so many ways. The sharp flavor of onion mellows when it is pickled, making it a tasty pairing to most savory recipes. The onions add a nice pop of color, and bite of acidity balances out the flavors of a rich, heavy meal.
- Sandwich Topping: Try layering your favorite sandwich with a fork of pickled onions. Add them to burgers, wraps, roast beef, and barbecue pulled pork sandwiches.
- Mexican Dishes: Pickled onions add acidity and texture to your favorite Mexican and Tex-mex style dishes, such as tacos, quesadillas, enchiladas, tostadas, nachos, burritos, and fajitas.
- Fresh Salads and Salsas: Garnish a leafy green salad with bright pink pickled onions for a pop of color and mild onion flavor. Pickled onions also combine well with mayonnaise-based foods, adding zing to your summer potato salad, macaroni salad, coleslaw, and pasta salads. Chop and add to fresh salsas such as this Italian salsa cruda, grilled salsa, or corn salsa.
- Meat and Seafood: Add a spoonful of pickled onions over roasted and barbecued meats and seafood, such as chicken, pork, steak, fish, or shellfish.
- Save the Pickling Liquid: You can use the mild onion-flavored vinegar in any recipe that calls for vinegar. Try drizzling a spoonful of the vinegar on roasted vegetables and oven-baked fries. You can also turn the pickling liquid into tasty vinaigrette that can be used to marinade meat or as a salad dressing.


Pickled Red Onions Canning Recipe
Ingredients
- 3 pounds red onions
- 3 tablespoons pickling spices
- 4 cups vinegar at least 5% acidity
- 1 clove garlic crushed
- 12 sprigs fresh thyme optional
Instructions
Prepare the canning equipment:
- Wash your jars, lids, screw bands, and canning tools in hot soapy water. Rinse thoroughly to remove all suds. Set aside to air dry on a clean kitchen towel.
- Place the jar rack into water bath canner, place jars in the canner, and add water to cover. Bring the canner to a simmer (180˚F) for 10 minutes, and keep the jars hot until you are ready to fill them.
Prepare the onions:
- Peel the onions and remove the root and stem ends. Cut the onions into 1/4-inch slices. Break apart to separate the segments. Set aside.
Heat the pickling brine:
- Add the 3 tablespoons of pickling spice to a spice bag or coffee filter and tie with kitchen string.
- Add the vinegar, crushed garlic clove, and spice bag to a medium sauce pan. Bring to a boil over medium-high heat, reduce the heat, and simmer (180˚F) for 5 minutes.
- Remove the garlic and spice bag, then add the prepared onions. Cover and simmer for 5 minutes, then fill your jars.
Can the onions:
- Lay a dry kitchen towel on the counter. Use the jar lifter to remove a jar from the canner. Drain the water back into the canner, and place on the towel. Keep the remaining jars in the canner so they stay hot.
- Using tongs, fill the jar with the onions, add two sprigs of thyme, then ladle hot pickling liquid over the onions leaving a 1/4-inch headspace.
- Run the bubble popper through the jars to release air bubbles. Wipe the rim to remove any residue, center a lid on the jar, and screw on a band until it is fingertip tight. Use the jar lifter to place the jar back into the canner, and repeat with the remaining jars.
Process in a boiling water bath canner:
- Once all the jars are in canner, adjust the water level so it is two inches above the jar tops.
- Cover the canner and bring to boil over high heat. Once water boils vigorously, continue boiling for 10 minutes at altitudes of less than 1,000 feet. Adjust processing time for your altitude if necessary (See Notes).
- When processing time is complete, turn off the heat, and let the canner cool down and settle for about 5 minutes.
Cool and store:
- Spread a dry kitchen towel on the counter. Remove the cover by tilting lid away from you so that steam does not burn your face.
- Use the jar lifter to remove the jars from canner and place on the towel. Keep the jars upright, and don't tighten bands or check the seals yet. Let sit undisturbed for 12 to 24-hours to cool.
- After 12 to 24-hours, check to be sure jar lids have sealed by pushing on the center of the lid. The lid should not pop up. If the lid flexes up and down, it did not seal. Refrigerate jar and use up within a week.
- Remove the screw on bands and wash the jars. Label, date, and store in a cool, dark place for 12 to 18 months. Let the pickled onions stand for about a week before opening for the flavors to develop.
- Use home canned jars within 12-18 months. Refrigerate the jar after opening.
- Yield: Makes about 6 half-pint jars of picked red onions.
Notes
Nutrition
You May Also Like:
- Bread and Butter Pickles
- Kosher Dill Pickle Spears
- Sweet and Sour Zucchini Pickles
- Make Refrigerator Pickles with Any Vegetable

I found that 4 cups of vinegar was not nearly enough to cover 3 pounds of onions. I had to make more vinegar brine, which made the whole process longer: I canned the filled jars, and had to do a second batch with the extra brine.
Hi Emily, I am sorry you ran into trouble. This recipe has been tested thoroughly and is one I use often. 4 cups of vinegar is enough to cover 3 pounds of onions when prepared as directed. If you ran short on brine, something may have changed during preparation: the onions may have been cut differently or packed too loosely, or the brine may have boiled too long, causing some liquid to evaporate.
Making more brine using the same recipe ratio was the correct fix. For more details on why this can happen and what to do if you run out of pickling brine, see this guide: What to Do If You Run Out of Pickling Brine.
I have been making refrigerated pickled onions and can’t wait to try this recipe, to be able to have for a longer time.
Dawn, It’s nice to grab a jar when you need it. I hope you enjoy the recipe.
Hello, im wondering if I could use pint side jars instead and how much I would need to adjust the processing time? would it be safe? thanks
Hi Samantha! Great question. Since this recipe is adapted from Ball’s tested half-pint recipe, there is no approved processing time for pint jars. Without a tested time, we can’t assume it’s safe to simply increase the processing time—larger jars can change heat penetration in ways that aren’t predictable. For safety, the best option is to stick with half-pints. I know that’s probably not the answer you were hoping for, but staying with the tested jar size keeps the recipe safe. 😊
Salt??
Henry, The recipe doesn’t call for salt, but you can add some for flavor if you’d like. For 6 half-pint jars of pickled red onions, about 1–2 teaspoons of salt in the brine works well. If you’d like to learn more, here’s a helpful post on how to safely adjust pickle recipes: How to Modify Pickle and Relish Canning Recipes Safely.
Thanks for the recipe. I have to share a funny…as I was doing the post canning dishes, I swapped the lyrics of the Queensryche song ‘Silent Lucidity’ for ‘At least 5% acidity”.
Joy, Haha, that’s hilarious! I love it! Now I won’t be able to can pickles without singing “At least 5% acidity” either. Thanks for the laugh!
Is it possible to can pickled red onions without the seasoning?
Sharon, Yes, you can absolutely omit the seasoning! The vinegar in the recipe is what preserves the onions, so you’re welcome to skip the pickling spice, garlic, and thyme if you’d prefer a simpler flavor.
My wife and I love these pickled red onions. We enjoy eating them right out of the jar. What would it take to make them a little sweeter? How much sugar do you think would be advisable to add?
Dave, I’m so glad to hear that you and your wife are enjoying the pickled red onions! To make them a little sweeter, you can definitely add sugar to the brine. I recommend starting with 1/2 to 1 cup of sugar, depending on how sweet you’d like them to be. Just mix it into the brine until it’s fully dissolved before pouring it over the onions. Enjoy!
So my wife and myself used this recipe as a test for our plunge into canning. And seeing as how we love pickled red onions and they are expensive this was a must try. Easy to follow but we got a much higher yield then the 6 1/2 pint jars. We ended up with 8 1/2 pints and 1 full pint. I double checked the bag on onions and it was 3lbs. I also made sure the onions were packed in the jars.
Thank you!
Carsten, Thank you for sharing your experience! It’s great to hear that you and your wife enjoyed the recipe for your first canning adventure. Yields often vary, especially with pickled vegetables, due to factors like the size, slice thickness, and packing density. As long as you followed the recipe and processed the jars properly, your extra jars are perfectly safe. Welcome to the world of home canning—I’m glad this recipe was a hit for you both!
This recipe is on my list. Thank your the tip about using a coffee filter for spices. That tip comes in so handy for many applications. I really appreciate it.
When canning these onions do the onions stay crisp after time or do they get soft and limp?
Sandy, No, the onions do not stay crisp because they are cooked during the canning process. If you prefer a bit of crunchiness, I would recommend trying this recipe for refrigerator pickled vegetables instead. Just use all onions instead of mixed vegetables.