Kosher-Style Dill Pickles Canning Recipe
This post may contain affiliate links, which means that I may receive a commission if you make a purchase using these links. As an Amazon Associate I earn from qualifying purchases.
These kosher-style dill pickles have a well-rounded briny flavor that is a delicious balance between sweet and tart. They are crisp, crunchy, and infused with dill, garlic, and enough saltiness to satisfy your pickle cravings.
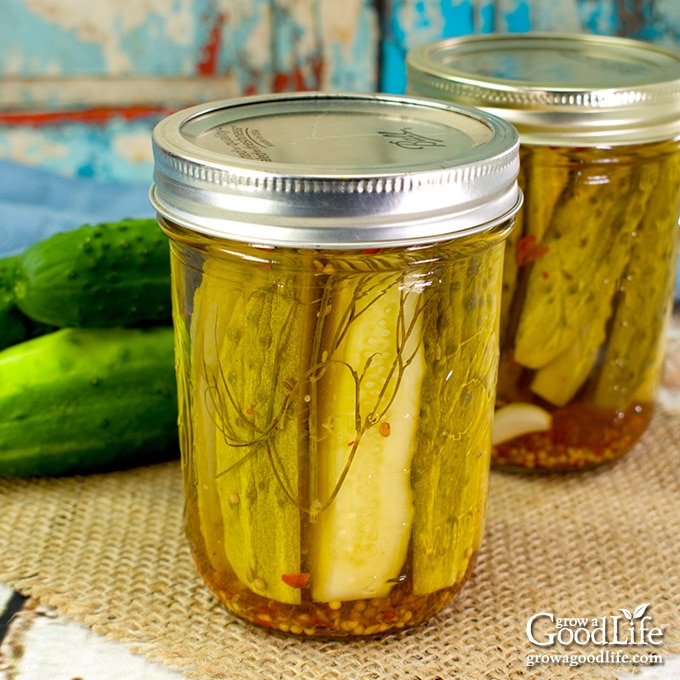
Come harvest time, our classic bread and butter pickles canning recipe is one of the most popular articles here at Grow a Good Life. Turning an abundant harvest of cucumbers into shelf-stable jars of pickles is such a great way to preserve them.
However, not everyone likes a sweet pickle. In fact, most prefer the addicting briny taste of dill pickles.
This is a fresh pack, kosher-style dill pickle recipe with a vinegar brine flavored with pickling spices, lots of dill, a hint of garlic, and spicy kick of red pepper flakes. Enjoy these pickles with your favorite sandwiches, as a side to meals, and chop them up to add savory zest to salads.
Tips for Making Dill Pickles
Starting with freshly harvested small pickling cucumbers are your key to preserved jars of dill pickles with a whole lot of crunch. Here are more tips for canning a great batch of kosher dill pickles:
Use freshly harvested pickling cukes
Pickling cucumbers are short, stout, thin-skinned cucumbers that are primarily grown for pickling. Skip the waxed cucumbers at the grocery store. The wax prevents the pickling liquid from penetrating the cucumber.
You will get the best results if you pick the cucumbers and make the pickles the same day. Harvest in the morning while the temperatures are cool to help prevent a bitter flavor. If you purchase from a farm stand, find out if the cucumbers were picked that day.
Harvest small cucumbers that are no larger than 4-inches. The firm flesh and smaller seed cavity help the cucumbers stay crisp when pickled. Use larger or more mature cucumbers for relishes and bread-and-butter style pickles.
You’ll need about 8 pounds of pickling cucumbers to fill 6 to 7 pint sized jars. The exact amount will vary depending on the size of your cucumbers and if you keep them whole, cut into spears, or slices. You will be able to fill wide mouth jars with more spears or whole cucumbers than regular mouth jars.
Use pickling salt
Table salt contains iodine and anti-caking agents that can darken pickles and cause cloudiness in your jars. Instead, use pickling salt, which is also called canning salt.
Use commercial vinegar with at least 5% acidity
- Apple cider vinegar is made from fermented apples. It has a fruity tart flavor that blends well with vegetables. The color is amber brown and may darken your pickles slightly, but the flavor is worth it.
- White vinegar is clear vinegar made by distilling corn and rye. It tastes more sour and acidic than apple cider vinegar, but this may be just what you love about pickles. Choose an organic brand to avoid genetically modified corn.
Use good quality water
Most city tap water is filled with chemicals that can affect the pickles. Filter your water or use purchased distilled water to make your pickles.
Generously flavor the pickles
Part of the reason these pickles are so addicting is the depth of flavor. First we infuse the pickling brine by simmering it with pickling spices, making a pickle tea of sorts. If you pickle a lot of vegetables, you may want mix your own homemade pickling spice.
Then we will add extra dill and mustard seeds, crushed garlic, and red pepper flakes to the jars with the cucumbers give them lots of flavor. Bay leaves add flavor and tannins to help keep the pickles crisp.
Don’t worry if you don’t have fresh dill flower heads or foliage. The main flavor of dill pickles comes from the dill seeds, so you can skip the fresh dill if you don’t have it.
Follow the recipe
When canning pickles, it is important to use a recipe that has been scientifically tested. Cucumbers contain very limited acidity and typically have a pH of 5.12 to 5.78. Clostridium botulinum can grow in improperly canned, pickled foods with a pH higher than 4.6. It is important to use scientifically tested recipes for home canning pickles to ensure their safety.
Feel free to experiment with dried herbs as flavorings, but keep the proportions of the vinegar, water, and salt the same to ensure the proper chemistry to can your pickles safely.
Steps for Making Dill Pickles
If you are new to canning, it may be helpful to review this article on water bath canning at the National Center for Home Food Preservation website.
This canning recipe is the “Kosher-Style Pickles” from the Ball Blue Book Guide to Preserving.. A more detailed and printable recipe can be found at the bottom of this article, but these are the general steps for making and canning dill pickles:
Step 1: Gather your canning gear
- Water bath canner and canning rack
- 7 pint sized canning jars
- Canning lids and bands (new lids for each jar, bands can be reused)
- Canning tools: jar lifter, canning ladle, funnel, and bubble popper
- Plus basic kitchen supplies such as a large sauce pot, large bowl, small pot, towels, knife, and a cutting board.
Step 2: Prepare the canning equipment
Wash your jars, lids, bands, and canning tools in warm, soapy water. Rinse well, and set the lids, bands, and tools aside to air dry until you are ready to use them.
Setup your water bath canner with the canning rack on a large burner of your stove. Place the jars upright in the canner, and add water to cover. Bring the canner to a simmer (180˚F) for 10 minutes, and keep the jars hot until you are ready to fill them.
Step 3: Make the pickling brine
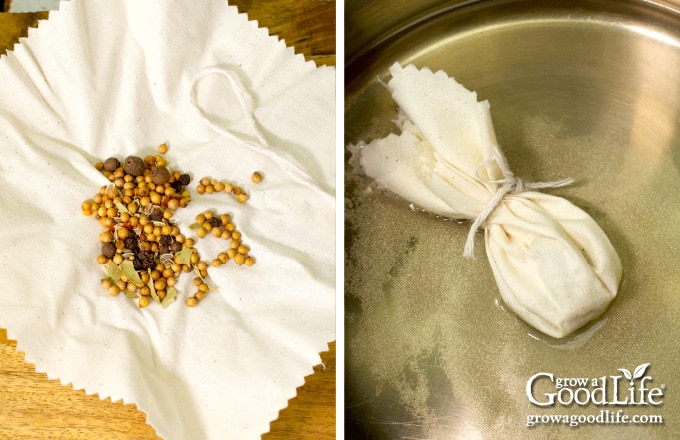
Add the 3 tablespoons of pickling spice to a spice bag. If you don’t have a spice bag, use cheesecloth or a coffee filter to make a pouch and tie with thread or kitchen string.
If you don’t have pre-mixed pickling spice, substitute 2 teaspoons mustard seeds, 2 teaspoons coriander seeds, 2 teaspoons dill seeds, 2 teaspoons black peppercorns, and 4 whole dried allspice berries. Add this to your bag and tie it off.
In a large saucepan, combine the vinegar, water, sugar, pickling salt, and the pickling spice bag. Bring the mixture to a boil and stir to dissolve the sugar and salt.
Reduce heat to low and simmer for 15 minutes. Remove the spice bag and keep the brine warm until you are ready to use it.
Step 4: Prepare your cucumbers
Rinse the cucumbers under running water to remove dust and soil. Run your fingers along the fruit to remove the spines.
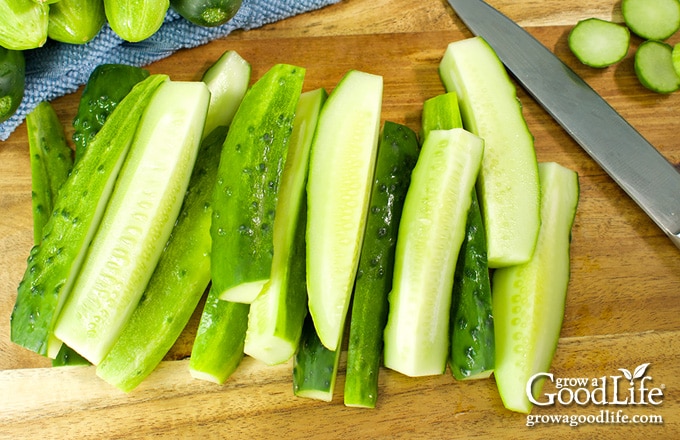
The stem and blossom end of cucumbers contain enzymes that can cause bitterness and limp pickles. Cut off 1/8-inch from each end. Leave the cucumbers whole, cut them into spears, or slice them into coins.
Step 5: Fill the jars
Lay a kitchen towel on the counter. Use the jar lifter to remove a hot jar from the canner, drain, and place on the towel. Keep the remaining jars in the canner, so they stay warm.
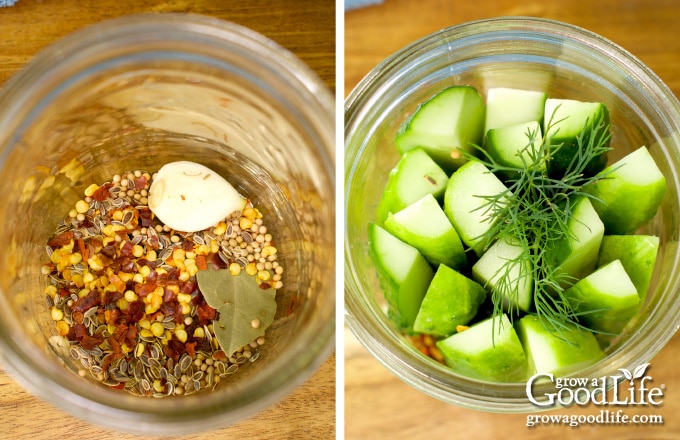
Add the following to each jar: 1 bay leaf, 1 sprig of dill foliage or flower head, 1 clove crushed garlic, 1/2 teaspoon mustard seeds, 1/2 teaspoon dill seeds, 1/2 teaspoon red pepper flakes.
Pack the cucumbers vertically into the jar. It may help to turn the jar on its side, and stack the spears inside. Try to pack the cucumbers as tightly as you can. Place the jar upright, add the canning funnel, and pour hot pickling brine over the cucumbers while maintaining a 1/2-inch headspace.
Run the bubble popper through the jar to release any trapped air bubbles. Make sure all the pickles are submerged under the brine. Remove any that stick out, and adjust the headspace again if needed.
If you are canning cucumber slices, add the slices to the jar, fill the jar half way with the brine, and then give the slices a stir with the bubble popper. This will help separate the slices and combine them with the brine. Top off with more brine while maintaining 1/2 inch of headspace.
Wipe the rim with a damp towel to remove residue. Center a lid on the jar, place the band over the lid, and screw it on until fingertip tight. Place the jar back into the canner, and repeat with the rest of the jars.
Step 6: Can the pickles
Once the jars are filled and in the canner, adjust the water level so it is covering the jars by several inches, bring the pot to a boil, and process the jars in a hot water bath canner for the times indicated in the recipe below.
Let the jars cool, test the seals, label and date the jars, and store the dill pickles in a cool, dark location. Let the pickles stand for about 4 weeks before opening for the flavors to develop.
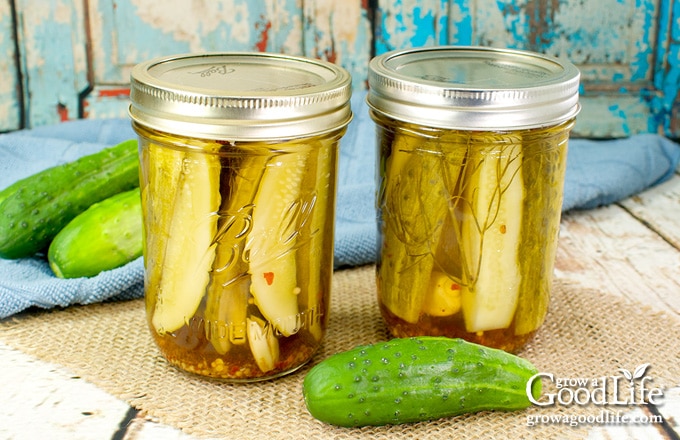
Kosher-Style Dill Pickles Canning Recipe
Ingredients
Brine:
- 4 cups apple cider vinegar 5% acidity
- 4 cups water
- 3/4 cup sugar
- 1/2 cup pickling salt
- 3 tablespoons pickling spices
Pickles:
- 8 pounds small pickling cucumbers 3 to 4-inches long
- 7 bay leaves 1 per jar
- 7 dill flower head or sprig of dill foliage, 1 per jar
- 7 cloves garlic peeled and crushed, 1 per jar
- 3 1/2 teaspoons mustard seeds 1/2 teaspoon per jar
- 3 1/2 teaspoons dill seeds 1/2 teaspoon per jar
- 3 1/2 teaspoons red pepper flakes 1/2 teaspoon per jar
Instructions
Prepare your canning equipment:
- Wash your jars, lids, screw bands, and canning tools in hot soapy water. Rinse thoroughly to remove all suds. Set aside to air dry on a clean kitchen towel.
- Place the jar rack into water bath canner, place jars in the canner, and add water to cover. Bring the canner to a simmer (180˚F) for 10 minutes, and keep the jars hot.
Make the pickling brine:
- Add the 3 tablespoons of pickling spice to a spice bag, or coffee filter and tie off.
- In a large saucepan, combine the apple cider vinegar, water, sugar, pickling salt, and the pickling spice bag. Bring the mixture to a boil and stir to dissolve the sugar and salt.
- Reduce heat to low and simmer (180˚F) for 15 minutes. Remove the spice bag and keep warm until you are ready to use.
Prepare your cucumbers:
- While the brine is simmering, rinse the cucumbers under running water. Run your fingers along the fruit to remove the spines.
- Cut off 1/8-inch from each end. Leave whole, or cut into halves, spears, or slices.
Can the dill pickles:
- Spread a kitchen towel on the counter. Use your jar lifter to remove a warm jar from canner. Drain and place on the towel.
- Add the following to each jar: 1 bay leaf, 1 dill flower head, 1 clove crushed garlic, 1/2 teaspoon mustard seeds, 1/2 teaspoon dill seeds, 1/2 teaspoon red pepper flakes.
- Raw pack the cucumbers vertically into the jar leaving 1/2-inch headspace.
- Use your canning funnel and ladle to add hot brine over the pickles maintaining 1/2 inch of headspace. Make sure all the pickles are submerged under the brine. Remove and trim any that stick out, and adjust the headspace again if needed.
- Remove air bubbles with the bubble popper and wipe the rim. Center a lid on the jar, and screw on a band until it is fingertip tight. Use your jar lifter to place the jar back into the canner, and repeat with the remaining jars.
- Once jars are all in canner, adjust the water level so it is 2-inches over the tops of the jars.
- Cover the canner and bring to boil over high heat. Once water boils vigorously, continue boiling, set the times, and process pickles for 15 minutes at altitudes of less than 1,000 feet. Adjust processing time for your altitude if necessary (See Note).
- When processing time is complete, turn off heat and allow the canner to cool down for 5-minutes.
- Spread a dry kitchen towel on the counter. Remove the cover by tilting lid away from you so that steam does not burn your face.
- Use the jar lifter to remove the jars from canner and place on the towel. Keep the jars upright, and don't tighten bands or check the seals yet. Let the jars sit undisturbed for 12 to 24-hours to cool.
- After 12 to 24-hours, check to be sure jar lids have sealed by pushing on the center of the lid. The lid should not pop up. If the lid flexes up and down, it did not seal. Refrigerate jar and use up within a month.
- Remove the screw on bands and wash the jars. Label and date the jars. Store in a cool, dark location. Allow 4 to 5 weeks for the pickles to develop their flavor. Use home canned jars within a year. Makes 6 to 7 pint jars of dill pickles.
Notes
Nutrition
Canning Resources
- Ball Blue Book Guide to Preserving
- Storing Home Canned Goods – National Center for Home Preservation
- Causes and Possible Solutions for Problems with Canned Foods – National Center for Home Preservation
You May Also Like These Canning Recipes:
40+ Meals in a Jar Pressure Canning Recipes
In this eBook, you will find 50 pressure canning recipes, including 44 meals, along with homemade stocks and bone broths. Recipes include soups, stews, chilis, beans, beef, pork, and poultry. Explore the world of preserving delicious home-cooked meals for all seasons.

Hi Rachel, I just made these, and once again the jars are sealing beautifully, and I feel like I finally know what I’m doing when it comes to preserving! So thank you!
I halved this recipe since I was running out of cucumbers (once again, medium cucumbers from my neighbour’s garden) so I had 4 lbs. I expected this to produce 3 1/2 pint-sized jars but I ended up with 6 pint jars. Luckily I had a few extra jars heating in the canner, and I had made double the brine since it didn’t seem like enough, so again, just a heads up to others, this recipe made more than expected, unless it’s just me lol.
Hi Nancy! I’m so happy to hear that your jars sealed beautifully and that you’re feeling confident with your preserving—what a great accomplishment! 😊 Thank you for sharing your experience with halving the recipe. It’s not unusual for yields to vary, especially with homemade pickles. Factors like the size, shape, and how tightly the cucumbers are packed can all affect the final number of jars. Medium cucumbers might take up a little more space than expected. I’m glad you had extra jars and brine on hand—always a good canning practice! It’s definitely helpful to make a bit more brine, just in case. Thanks for the heads-up to others who may be following the recipe, and I’m so happy your pickles turned out well!
Hi I feel like mine are to salty. I did the slices is that why? Maybe the thicker pickles are better?
Jeanine, This kosher-style dill pickle recipe is developed to have a well-rounded briny flavor, so the pickles are naturally quite salty. If you find the pickles too salty, it might be worth trying a different recipe. For a less salty version, check out the Reduced Sodium Sliced Dill Pickles recipe on the NCHFP website.
Could this same recipe be made using less salt? This recipe is 8 tablespoons of salt to 8 pounds of cucumbers. I have a recipe that calls for 2 tablespoons for 3lbs. Could I just reduce the salt in your recipe?
Amy, Yes, you may safely reduce the salt in tested quick-process pickle recipes.
These are the most delicious canned pickles. They rival Claussen pickles from the grocery store. I tasted them after sitting for a month, and I’m going to have to keep myself from eating the whole batch. I will make these every season going forward! The ACV really does do something special!
Theresa, Thank you so much for your fantastic feedback! I am thrilled that you found our bread and butter pickles to be so delicious and that they rival store-bought ones. I can completely relate to the challenge of trying to resist eating the whole batch – they’re just that good! We’re honored that you plan to make them every season going forward. Enjoy your homemade pickles, and feel free to explore more of our canning recipes.
Can I omit the spice bag and use white vinegar instead?
Teresa, Yes, you can omit the spice bag and use white vinegar in this recipe.