How to Can Green Chile Peppers
This post may contain affiliate links, which means that I may receive a commission if you make a purchase using these links. As an Amazon Associate I earn from qualifying purchases.
Whether you have a bumper crop from your garden or decided to buy in bulk, roasting and canning peppers is a great way to preserve them. Learn how to can green chiles with this easy recipe.

Home canned chile peppers are handy to have available to add to your favorite chilies and Mexican inspired meals. The jars can be stored on dark pantry shelves, so they don’t take up a lot of space in the refrigerator or freezer.
Tips for Canning Chiles
Any type of pepper can be pressure canned with this method, including Anaheim, New Mexico, Hatch, jalapeño, Poblano, and Serrano. Feel free to mix and match peppers. I use mostly Anaheim for canning and like to include one jalapeño in each jar to add a little heat and flavor. This seems to work well for our favorite recipes. Here are more tips for canning green chilies:
Use a Pressure Canner
Peppers are a low acid food and can only be canned safely using a pressure canner. Pressure canners processes at a high temperature necessary to eliminate the risk of food borne bacteria. This cannot be achieved with a water bath canner.
One of the first investments I made when I began gardening was a 16-quart pressure canner. It has served me very well for preserving low acid foods such as carrots, green beans, and other harvests. It works in my small kitchen, fits under the stove hood, and I can lift a full canner load off the stove without help.
Select Healthy Peppers
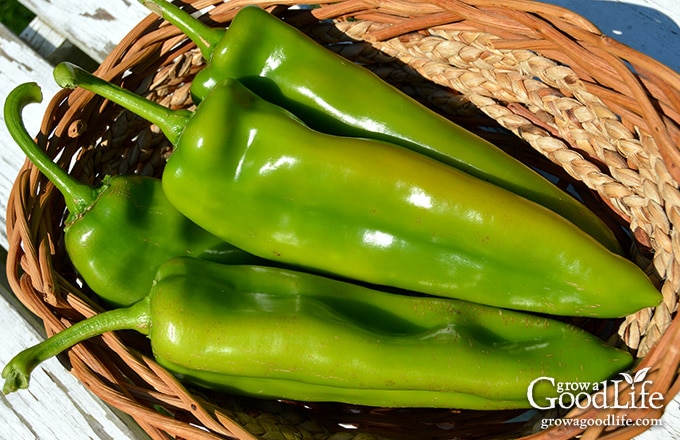
Choose fresh, bright green, and firm chiles with no blemishes, soft spots, or bruises. Plan on about a half-pound of peppers per half-pint jar, or a pound per pint jar.
Protect Skin from Hot Pepper Juice
Capsaicin, the active ingredient in hot peppers, can be irritating on the skin and cause burning pain and redness. Wear gloves when handling hot chiles and avoid contact with your skin and eyes. If you should accidentally get hot pepper oils on your skin or in your eyes, try these tips to stop the burn.
Steps for Canning Chiles
If you’re new to pressure canning, this guide explains the equipment, preparation, and safe processing steps: Pressure Canning for Beginners.
For extra help staying organized during canning day, download my free Home Canning Checklist. It includes preparation reminders, safety notes, and space to record your batches. Get it here:
Grab your Free copy
Home Canning Checklists
This is a safe caning recipe from the USDA Complete Guide to Home Canning. A more detailed and printable recipe can be found at the bottom of this article, but these are the general steps for pressure canning green chiles:
Step 1: Prepare the Canning Equipment
Gather your canning and kitchen equipment, prepare the jars, setup the pressure canner, and organize your work area.
You’ll need:
- Pressure canner with canning rack
- 6 pint sized canning jars or 12 half-pint canning jars
- Canning lids and bands (new lids for each jar, bands can be reused)
- Rubber gloves
- Canning tools: jar lifter, canning ladle, funnel, and bubble popper
- Plus basic kitchen supplies such as a knife, cutting board, large pot, large bowl, tongs, and clean kitchen towels.
Wash your canning jars, lids and bands, and canning tools with warm, soapy water and rinse well. Look them over carefully, and eliminate any with chips and cracks. Set lids and bands aside until you are ready to use them.
Place the pressure canner on the stove, and insert the canning rack. Add water per your pressure canner manufacturer’s instructions: Presto is 3 quarts, Mirro is 2 quarts, and All American is 2 to 3 inches.
Fill the clean jars halfway with hot water, and then place them on the rack in the canner. Bring the canner to a simmer for 10 minutes (180˚F). Keep hot until you are ready to fill them.
Fill a large pot with fresh, clean water and bring to a boil. This is the water you will use to fill your jars.
Step 2: Prepare the Peppers
Rinse the peppers well with plain water and place on a kitchen towel. Slash several slits in each pepper to allow steam to escape, and either roast and peel skins, or blanch in boiling water using one of these two methods:
Tough skinned peppers:
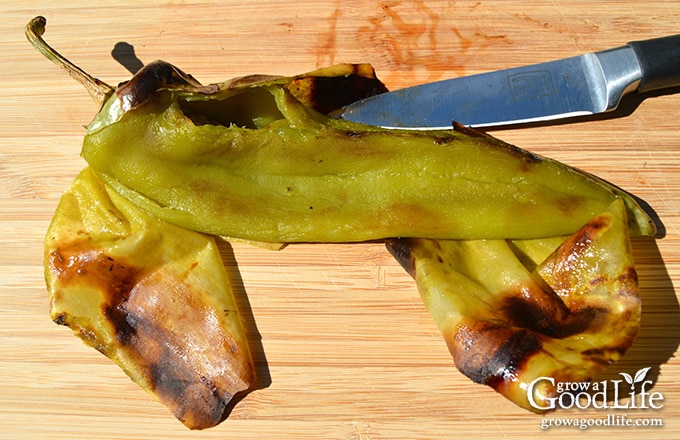
Long green chile peppers, such as Anaheim, Hatch, Poblano, and New Mexico have a tough outer skin that should be removed before canning. The skin can taste bitter, add unwanted texture, and is difficult for some to digest.
To peel, first blister by grilling or broiling. Place the chiles on a hot grill or under a 400˚F broiler until the skin blisters and separates from the flesh, about 8 minutes. Turn to char evenly. Remove from the heat and place in a covered glass bowl to steam. When the peppers are cool enough to handle, put on your gloves and remove the skins, stems, cores, and seeds. Leave whole, cut into quarters, or dice into 1-inch pieces.
Thin-skinned peppers:
Small hot peppers, such as Jalapeño, Serrano, and other small chiles can be canned without peeling. Blanch in boiling water for 3 minutes, or roast in a 400˚F oven for 6 minutes to pre cook. When cool enough to handle, put on your gloves and remove the stems, cores, and seeds. You can leave small peppers whole or cut into smaller pieces.
Step 3: Can the Peppers
Spread a kitchen towel on the counter. Use the jar lifter to remove a jar from the canner. Pour out the water (save it for washing dishes), and place the jar on the towel. Keep the remaining jars in the canner, so they stay hot.
Fill the jar loosely with the prepared chiles. Flatten whole peppers before packing into the jar. If you are using salt, add up to a 1/4 teaspoon salt per half-pint, and up to a 1/2 teaspoon of salt to each pint jar. Fill the jar with boiling water and maintain a 1-inch headspace.
Wipe the rim of the jar with a damp towel to remove any residue. Center a lid on the jar, place the band over the lid, and screw it on until fingertip tight. Immediately place the jar back into the canner, and repeat with the rest of the jars.
When the processing time is complete, turn off the heat and let the canner cool naturally, remove the jars, place them on a kitchen towel. Keep upright, and don’t tighten bands or check the seals yet. Let the jars sit undisturbed for 12 to 24-hours to cool. Check the seals, date, label, and store in a cool location for 12 to 18 months.

Use in place of canned green chiles in your favorite dishes. You will find that home canned peppers taste so much better than store-bought. Try this chicken enchiladas with green chile sauce, fresh tomatillo salsa, slow cooker chili, and white bean chicken chili.
Canning Green Chile Peppers
Ingredients
- 12 pounds Anaheim or chile peppers of choice
- canning salt (optional)
Instructions
Prepare the Canning Equipment:
- Wash the jars, lids, bands, and canning tools in hot soapy water and rinse thoroughly. Set the lids and bands aside until you are ready to use them.
- Place the jar rack into the pressure canner, and fill with water per your pressure canner manufacturer's instructions: Presto is 3 quarts, Mirro is 2 quarts, and All American is 2 to 3 inches.
- Fill the jars halfway with hot water, and then place them on the rack in the canner. Bring the canner to a simmer for 10 minutes (180˚F). Keep hot until you are ready to fill them.
- Fill a large pot with fresh, clean water and bring to a boil.
Prepare the Peppers:
- Rinse the peppers well with plain water. Make a small slit in the side of each pepper to allow steam to escape.
- For tough skinned peppers: Char the skins by placing the on a hot grill or under a 400˚F broiler until the skins crack and separate from the flesh, about 8 minutes. Once evenly charred, place in a covered glass bowl to steam. Remove the skins, stems, cores, and seeds. Leave whole, cut into quarters, or dice into 1 inch pieces.
- For thin-skinned chiles: Blanch in boiling water for 3 minutes, or roast in a 400˚F oven for 8 minutes to pre cook. Remove the stems, cores, and seeds. Leave small peppers whole, or cut into smaller 1-inch pieces.
Can the Peppers:
- Spread a kitchen towel on the counter. Use the jar lifter to remove a jar from the canner. Pour out the water, and place the jar on the towel. Keep the remaining jars in the canner, so they stay hot.
- Use your canning funnel and raw pack the peppers loosely into the jars. If you are using salt, add up to a 1/4 teaspoon per half-pint, and up to a 1/2 teaspoon of salt to each pint jar. Leave a 1-inch headspace.
- Ladle hot water over the peppers and fill the jar leaving a 1-inch headspace.
- Run your bubble popper through to remove air bubbles, add more water to maintain the 1-inch headspace if needed, and wipe the rim. Center a lid on the jar, and screw on the band until it is fingertip tight.
- Use your jar lifter to place the jar back into the pressure canner, and repeat with the remaining jars.
- Close the pressure canner and secure the lid. Leave the vent open, adjust the heat to medium-high, and bring the canner to a boil. Allow the pressure canner to vent steam for 10 minutes, then place the pressure regulator on top of the air vent, and watch the pressure rise.
- Once the canner has reached the correct pressure (10 pounds for weighted gauge, and 11 pounds for dial gauge canners.), set a timer, and process half-pint and pints for 35 minutes at altitudes of less than 1,000 ft.
- Follow the directions for your pressure canner, regulate the heat as needed to maintain a steady pressure, and adjust altitude if necessary (see chart below).
- When processing time is complete, turn off the heat, and let the pressure canner cool down to 0 pressure on its own. Once the canner is depressurized, let the canner cool additional 10 minutes before removing the lid.
- Spread a kitchen towel on the counter, unlock the cover, and remove it by tilting the lid away from you so that steam does not burn your face.
- Allow another 10 minutes to adjust to the change in pressure. If the jars are still boiling, let them sit in the canner for another 5 minutes, or until the boiling stops.
- Use the jar lifter to remove the jars from canner and place on the towel. Keep the jars upright, and don't tighten bands or check the seals yet. Let sit undisturbed for 12 to 24-hours to cool.
- After 12 to 24-hours, check to be sure jar lids have sealed by pushing on the center. The lid should not pop up. If the lid flexes up and down when the center is pressed, it did not seal. Refrigerate the jar and use up within a few days, or transfer to a freezer container and freeze for up to 6 months.
- Remove the screw on bands and wash the jars. Label and date the jars, and store in a cool, dark place (50 to 70 degrees F). Use within 12 to 18 months for the best quality. Yields 6 pint jars of green chiles, or 12 half-pints.
Notes
- 1,001–2,000 ft. — 11 pounds
- 2,001–4,000 ft. — 12 pounds
- 4,001–6,000 ft. — 13 pounds
- 6,001–8,000 ft. — 14 pounds
- 1,001 ft. and above — 15 pounds
Nutrition
Additional Ways to Can Peppers:
If all you have is a water bath canner, there are other safe canning recipes that you can use to can peppers. These recipes combine peppers with other ingredients to alter the acidity enough to make them safe for water bath canning:
- Tomato Jalapeno Salsa
- Pickled Jalapeno Pepper Rings
- Roasted Tomatillo Salsa
- Pickled Roasted Red Bell Peppers
Resources and further learning:
- Safe Canning Resources: Trusted Guides for Home Food Preservation
- Evaluating Canning Recipes: How to Tell if a Canning Recipe is Safe
- Safe Tweaks for Pressure Canning Vegetables
You May Also Like:
40+ Meals in a Jar Pressure Canning Recipes
In this eBook, you will find 50 pressure canning recipes, including 44 meals, along with homemade stocks and bone broths. Recipes include soups, stews, chilis, beans, beef, pork, and poultry. Explore the world of preserving delicious home-cooked meals for all seasons.

I used larger peppers the first time I canned and had removed the skins, seeds and core. I followed safe canning practice methods. in the end every jar that I opened was super bitter. do you know why this would happen and what I could do to prevent it in the future if I were to try again?
Brenda, I’m sorry to hear that you encountered bitterness in your canned peppers. To better understand what might have gone wrong, could you please provide some additional details? 1) Did you follow this recipe specifically, or was it a different one? 2) What type of fresh peppers did you use for your canning? This information will help me offer more specific advice and insights to prevent bitterness in the future.
I have roasted pepper and would like to get them out of my freezer can they be canned? If so do I need heat them up before canning?
Koni, Unfortunately, frozen peppers would not turn out well using this recipe. Once the peppers are frozen, the cells break down. The pressure canning process will turn frozen peppers into mush. However, you can use previously frozen peppers in sauces and salsa canning recipes. Just be sure to weigh the peppers while frozen to get the proper amount, and then simmer them with the other ingredients as described in the recipe. Here are some recipes for frozen peppers: Tomato Jalapeno Salsa, Zesty Salsa, and Hot Pepper Sauce.
Does it affect the chilis if I keep the seeds in while canning?
Also, does change the heat of the chili. I mean with keeping the seeds will it make a difference to the heat of the chilis?
All the safe canning resources I have say to remove the seeds. It is unknown how the seeds may affect the heat penetrating the jar. According to the National Center for Home Preservation, small peppers can be left whole, but it is still recommended that stems, and seeds be removed.
I found chilies got pretty mushy soft from pressure canning them. Any suggestions?
Mike, yes, the chiles can get soft from the canning process. Thicker walled peppers hold up a little better than thin walled chiles, but they still will be soft. Use the canned peppers for making sauces or in chili if they are too soft.
Because life is busy I didn’t get to roasting and canning my chilies right away. Is it okay to use them if they are a little soft or should I throw them out and start with a fresh batch?
Suzan, A little soft is ok. I would proceed as long as they are not rotting.
Could this be refrigerated instead of canned and if so, for how long?
Lindsay, Refrigerating isn’t a long term way to preserve peppers. Consider freezing instead. If you refrigerate you should use it up within 3 days.
When using your homemade chilis in recipe that calls for a can of green chilis do you drain them first or use the liquid
Jill, Go ahead and include the liquid unless the recipe specifically says to drain the liquid. It is infused with chile pepper flavor.
MUST TRY THIS. i LOVE THEM. Thanks for sharing.
So timely! Have some pablanos and a few jalapenos and been wondering how to pressure can them. Now I am motivated! Thanks!