
How to Store Potatoes for Winter: Harvest, Cure, and Store
This post may contain affiliate links, which means that I may receive a commission if you make a purchase using these links. As an Amazon Associate I earn from qualifying purchases.
Learn how to store potatoes for winter, including the best storage conditions, when to harvest, how to cure potatoes, and how to keep them fresh for months.

Potatoes can last for months in storage under the right conditions, making them one of the most reliable crops for feeding your family through the winter. Knowing when to harvest, how to cure, and where to store potatoes makes all the difference between a harvest that spoils quickly and one that stays firm and usable well into spring.
Before modern supermarkets, potatoes were traditionally grown or purchased in fall and stored in root cellars, cool, dark, and humid spaces designed to keep food from freezing or drying out. While most of us don’t have old-fashioned root cellars anymore, the same principles still apply, and they can be adapted to our modern homes with great success.
I grow potatoes in my Maine garden every year and store the harvest in an unheated corner of our basement that stays dark, cool, and relatively humid. It isn’t a fancy setup, but it works well enough to keep many of our potatoes fresh through winter.
With a little planning, many homes have a space that can work just as well. Consider any area that stays cool, dark, and above freezing, such as a basement, insulated garage, crawlspace, or spare closet.
This guide walks you through how to store potatoes for winter, including choosing a storage area, selecting good storage varieties, harvesting mature potatoes, curing them properly, and checking them through winter. If you’re looking for a complete overview of planting, growing, and harvesting potatoes, see How to Grow Potatoes: A Complete Guide for Home Gardeners.
Can You Store Potatoes at Home Without a Root Cellar?
You don’t need an old-fashioned root cellar to store potatoes for winter. The goal is to find a place in your home that mimics root cellar conditions as closely as possible: Cool, dark, humid, well-ventilated, and protected from freezing.
The best storage spot will depend on your home. Look for an area that stays consistently cool through fall and winter, but does not freeze. Good options may include an unheated basement corner, insulated garage, crawlspace, enclosed porch, cool pantry, or spare closet on an outside wall.
I store potatoes in an unheated corner of the basement. It stays dark, cool, and relatively humid through the winter, which is enough to keep many of our potatoes firm and usable for months. It isn’t perfect root cellar storage, but it has worked well for our homegrown potato harvest year after year.
Your storage area doesn’t have to be perfect. If the space is warmer or drier than ideal, your potatoes may not last all winter, but they can still keep for several weeks or months if they are cured properly, kept in the dark, and checked regularly.
Before you harvest or buy a large amount of potatoes for winter storage, take a little time to evaluate your storage area. Choose the coolest, darkest, most stable place you have, and avoid spots near furnaces, wood stoves, sunny windows, appliances, or exterior walls that may freeze.
Best Conditions for Storing Potatoes Long Term
Potatoes store best in a location that is cool, dark, humid, and well-ventilated. These conditions help keep the tubers dormant, prevent shriveling, slow sprouting, and reduce the risk of rot.
Here are the most important things to look for when choosing a storage area:
- Cool temperatures: Potatoes store best around 45˚F to 50˚F. Cooler temperatures help slow sprouting and decay, but the area should stay above freezing. If potatoes get too cold, the starches can convert to sugars, which may change the flavor and cause the potatoes to darken when cooked.
- Complete darkness: Keep potatoes away from light. Exposure to light can cause the skins to turn green and develop a bitter flavor. Store potatoes in covered boxes, bins, paper bags, or another container that blocks light while still allowing airflow.
- High humidity: Potatoes contain a lot of moisture and can shrivel if stored in an area that is too dry. A slightly damp basement or cool storage area is often better than a dry heated room. If your storage area is very dry, the potatoes may not last as long.
- Good ventilation: Potatoes are still living after harvest and need airflow while in storage. Avoid sealing them in plastic bags or airtight containers. Use cardboard boxes, crates, baskets, paper bags, or bins with ventilation holes so air can circulate.
- Protection from freezing: Any storage area you choose should stay above freezing. Potatoes that freeze become soft and watery when thawed and should not be stored.
- Separation from onions and fruit: Store potatoes away from onions and ethylene-producing fruits such as apples and bananas. Fruit can encourage sprouting, and onions prefer drier conditions than potatoes, so they are best stored separately.
Don’t worry if your storage area isn’t perfect. Most homes don’t have ideal root cellar conditions, but you can still store potatoes successfully for a period of time by choosing the coolest, darkest, most stable spot available and checking the potatoes regularly.
Best Potato Varieties for Storage
Some potato varieties naturally keep longer in storage than others. If you are growing potatoes specifically for winter food storage, look for varieties described as good keepers or long-season storage potatoes.
Some varieties for long-term storage includine Elba, Katahdin, Red Chieftain, Yukon Gold, Burbank Russets, German Butterball, Yukon Gem, Rose Finn Apple Fingerling, Russian Banana Fingerling, Red Pontiac, All Blue, and Kennebec.
I usually grow two varieties of potatoes in my garden: Dark Red Norland and Kennebec. Both are useful in the kitchen, but they don’t store the same. Kennebec potatoes last much longer for us, often keeping for up to 6 months in our basement storage area. The Dark Red Norland potatoes usually begin softening and sprouting sooner, so we use the red potatoes first.
If you are purchasing potatoes from a farmers’ market in fall or winter, ask the grower which varieties they recommend for storage. It also helps to ask when the potatoes were harvested and whether they have already been cured.
Don’t worry if your potato variety isn’t on the list. Many types will still keep for at least a month or two if they are mature, cured properly, and stored in a cool, dark place. Just plan to use shorter-storage varieties first and save the best keepers for later in winter.
When to Harvest Potatoes for Storage
Potatoes can be harvested at two different stages, depending on how you plan to use them. New potatoes are dug early while the plants are still green and actively growing. They have thin, delicate skins and are best enjoyed fresh from the garden because they don’t store well.
Late season potatoes grown for winter storage need more time. Let the tubers mature fully in the ground so the skins can thicken and toughen before harvest. This helps protect the potatoes from bruising, moisture loss, and decay during storage.
If you want potatoes for winter meals, wait for mature storage potatoes instead of digging the crop too early.
Let the Plants Die Back
Storage potatoes are ready to harvest once the foliage yellows, dies back, and the skins have firmed up. At this point, stop watering and let the plants finish naturally. During this time, the potato skins continue to thicken underground, which helps them store longer.
I know it can be tempting to dig right away, especially once the plants start looking tired, but giving the potatoes a little more time in the ground helps improve their storage quality. I usually wait until the tops have died back completely before harvesting our main storage crop.
Avoid digging storage potatoes while the plants are still green unless you need to harvest early because of disease, pests, or weather. Immature potatoes have thin skins that bruise easily and won’t last as long in storage.
Check the Skins Before Digging
You can check your crop by digging up a few potatoes from the edge of the bed. Rub the skin gently with your thumb. If the skin is thin and slips off easily, the potatoes need more time. Leave them in the ground for several more days, then check again.
The potatoes are ready to harvest when the plants have died back and the skins no longer rub off easily.

How to Harvest Potatoes for Storage
Once your potatoes are mature and the skins have firmed up, harvest them carefully so they go into storage in the best condition possible. Bruises, cuts, and damaged skins can shorten storage life, so handle the tubers gently from the time they come out of the ground.
Choose a warm, dry day to harvest, ideally after several days without rain. Dry soil is easier to sift through and brush away, while wet soil clings to the tubers and can make them harder to cure properly.
Use a digging fork or garden fork to loosen the soil several inches away from the plant, then lift gently from underneath. Once the soil is loose, sift through with your hands and gather the tubers.
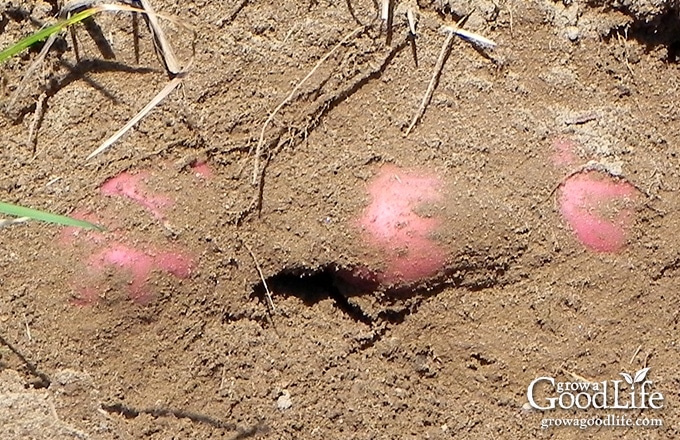
I try to take my time when digging potatoes because even a small nick from the garden fork can shorten storage life. Any potatoes that are cut or bruised get set aside for meals right away instead of going into the winter storage boxes.
Place the potatoes carefully into buckets, baskets, or bins as you harvest. Try not to toss or drop them because bruised potatoes are more likely to spoil in storage
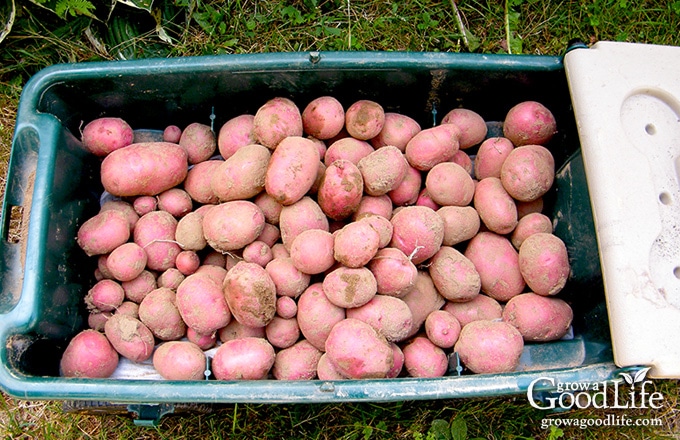
Keep freshly harvested potatoes out of direct sunlight. If you are harvesting on a sunny day, place your buckets or bins in the shade as you fill them. There is no need to wash the potatoes after harvesting. Just keep them dry, shaded, and protected from light until you are ready to sort and cure them.
5 Steps to Storing Potatoes for Winter
Once your potatoes are harvested, the next step is preparing them for storage. The goal is to sort out any damaged tubers, cure the healthy ones, pack them in breathable containers, and check on them regularly through winter.
These are the same basic steps I follow each year when storing potatoes from our Maine garden in the basement. The setup is simple, but it works because the potatoes are cured properly, kept dark and cool, and checked often enough to catch any problems early.
Step 1: Sort and Remove Damaged Potatoes
Before curing your potatoes, sort through the harvest and set aside any tubers that are cut, bruised, cracked, soft, or damaged by insects or rodents. These potatoes should not go into long-term storage because they are more likely to rot and can affect the rest of the crop.
Every year, I find a few potatoes with vole damage or accidental fork marks. These don’t go to waste if the damage is minor. I trim away the bad spots and use them first in soups, roasted potatoes, or skillet meals.
Use damaged potatoes first after trimming away any bad spots. Discard any potatoes that are soft, moldy, leaking, or badly damaged.

Step 2: Cure the Potatoes
Curing potatoes is an important step that helps prepare them for long-term storage. During curing, the skins toughen and small cuts or scuffed areas have a chance to heal. This protective layer helps reduce moisture loss and allows the potatoes to keep longer.
To cure potatoes, spread the unwashed tubers in a single layer in seedling trays, shallow boxes, screens, or on newspaper in a protected area.
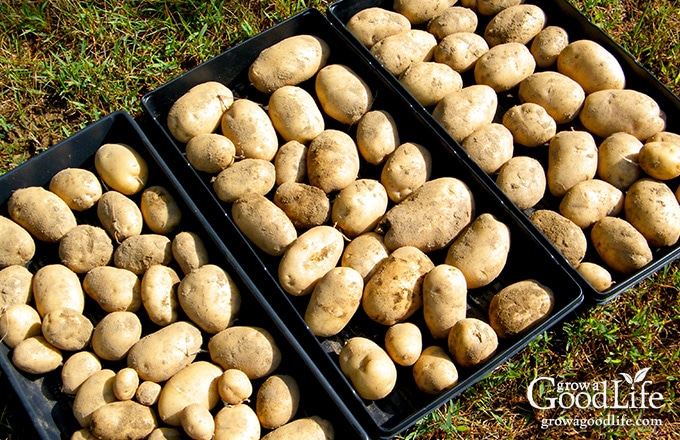
Choose a dark, well-ventilated spot that stays around 50˚F to 60˚F. Cover the potatoes with a dark towel or newspaper to block light, but leave enough space for air to circulate. Let the potatoes cure for about two weeks. If your curing area is cooler, they may need a little more time.
I usually cure my potatoes in shallow trays before packing them away. This gives me a chance to inspect them again once the skins have firmed up and the soil has dried. It is much easier to spot potatoes that should be used first before they end up buried in a storage box.
Do not wash potatoes before curing. Moisture can encourage mold and rot. Once the potatoes are cured, gently brush off loose, dry soil before packing them for storage.
Step 3: Prepare Your Storage Area
While the potatoes are curing, prepare the area where you plan to store them for winter. Choose the coolest, darkest, most stable place you have that stays above freezing.
Clean the area if needed, make room for the boxes or bins, and check that there is some airflow. If your storage space is completely still, a small fan set on low nearby can help keep air moving.
This is also a good time to gather your storage containers and shred up some paper. Cardboard boxes, wooden crates, bushel baskets, paper bags, or bins with ventilation holes can all work well. Avoid sealed plastic bags or airtight containers because trapped moisture can lead to mold and rot.

If you have a thermometer, place it near the storage area so you can keep an eye on the temperature through winter. Potatoes store best around 45˚F to 50˚F, but any cool, dark, above-freezing space can help extend their storage life.
Step 4: Pack Potatoes for Winter Storage
After the potatoes are cured, look them over carefully one more time before packing them away. Remove any potatoes with soft spots, deep cuts, bruises, mold, insect damage, or other signs that they may not keep well.
Pack only firm, healthy potatoes for long-term storage. Small potatoes and any with minor blemishes should be set aside and used first.
If you grow more than one variety, sort the potatoes before packing. Since some varieties store longer than others, sorting makes it easy to use the shorter-storage potatoes first. In our house, the Dark Red Norland potatoes usually get used before the Kennebecs because they tend to soften and sprout sooner.
I store my potatoes in recycled paper boxes nestled in shredded paper from bills and other paperwork. I cut a few holes in the sides of the boxes for air circulation, add a layer of shredded paper, spread out the potatoes, cover with more shredded paper, and continue layering until the box is full.
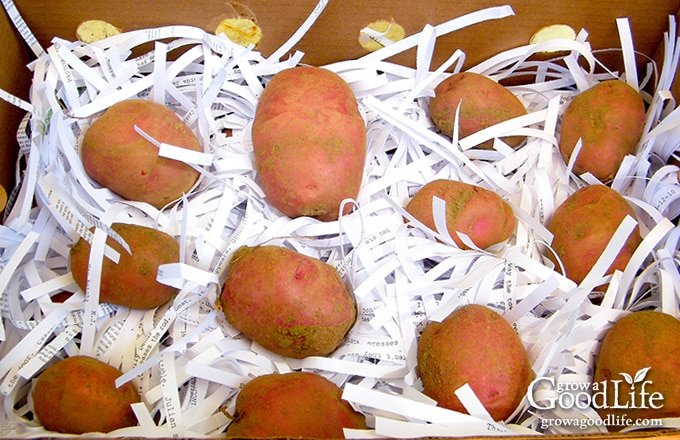
The goal is to block light while still allowing air to circulate. Once the boxes are full, cover them to keep out light, label them by variety, and move them to your cool, dark storage area.
Store potatoes away from onions, bananas, apples, and other fruits that give off ethylene gas. Ethylene can encourage potatoes to sprout sooner. I like to keep my potatoes in their own area of the basement, separate from other stored crops.

Step 5: Check Stored Potatoes Through Winter
Once your potatoes are packed away, check them every few weeks. Stored potatoes are still living, and even under good conditions, some may begin to soften, sprout, or spoil over time.
Often, you will notice a bad potato by smell before you see it. If you detect a musty, sour, or rotten odor, sort through the box and remove the spoiled potato right away so it doesn’t affect the others.
Remove any potatoes that are soft, moldy, leaking, or badly shriveled. If a potato has a small bruise or blemish but is still firm, trim away the damaged area and use it soon.
Small sprouts are common as storage potatoes age. Potatoes with short sprouts are still safe to eat as long as the potatoes are firm. Simply remove the sprouts before cooking. If the potatoes are soft, shriveled, or heavily sprouted, it is better to discard them.
Also watch for green skin. A small green spot can be peeled or trimmed away, but if the greening is widespread or goes deep into the potato, throw it out. Green potatoes can taste bitter and may cause illness if eaten in large amounts.
Keep a thermometer near your potato boxes so you can monitor the temperature through winter. If the storage area dips too cold, the starches in the potatoes may convert to sugars. This can make the potatoes taste sweeter and cause them to darken when cooked. If this happens, move the potatoes to a slightly warmer location for a week or two before using them.
Under good storage conditions, potatoes can remain fresh for 3 to 6 months or longer, depending on the variety and your storage environment. In our basement, the Kennebec potatoes often last well into spring before they begin sprouting.
Can You Store Grocery Store Potatoes Long Term?
You can store grocery store potatoes for a while, but they may not last as long as freshly harvested and properly cured storage potatoes.
Commercially grown potatoes are harvested, cured, and held in storage before they are shipped. After that, they may be sorted, packaged, boxed, transported to warehouses, and trucked to your local grocery store. During this time, the potatoes may be exposed to changing temperatures and light, and they may already be closer to breaking dormancy by the time you bring them home.
That doesn’t mean you can’t store them. If you buy potatoes in bulk from the grocery store, remove them from plastic bags, sort out any soft or damaged potatoes, and store the rest in a cool, dark, well-ventilated place.
For longer storage, I prefer homegrown potatoes or potatoes purchased from a local farm in fall. Local growers can often tell you which varieties store best, when they were harvested, and whether they have already been cured.
Other Ways to Preserve Potatoes
Storing whole potatoes is the easiest way to preserve a large harvest, but it isn’t the only option. If your storage space is too warm, too dry, or too limited, you can preserve some of your crop another way.
Potatoes can also be:
- Pressure canned: Potatoes are a low-acid vegetable and must be processed in a pressure canner using a tested recipe. Home-canned potatoes are convenient for soups, stews, skillet meals, and quick side dishes.
- Frozen: Potatoes can be frozen after blanching or cooking. They don’t freeze well raw, but prepared potatoes such as blanched cubes, mashed potatoes, or homemade frozen fries can be useful for quick meals. See How to Freeze Potatoes for more info.
- Dehydrated: Potatoes can be dried for pantry storage after they are properly prepared and blanched or cooked. Dehydrated potatoes can be used in soups, casseroles, hash browns, and other cooked dishes.
If you are looking for more options, I’ll also be adding a complete guide to Ways to Preserve Potatoes (coming soon) to help you choose the best method for your harvest.
Frequently Asked Questions About Storing Potatoes
This article was originally published in 2014, and over the years, I’ve received many questions from readers trying to figure out the best way to store potatoes in their own homes.
The biggest challenges usually come down to finding a storage area that stays cool without freezing, keeping potatoes from sprouting too soon, and protecting the harvest from mice or other rodents.
Here are answers to some of the most common questions about storing potatoes for winter:
Making the Most of Your Potato Harvest
Storing potatoes for winter is one of the simplest ways to make the most of a good harvest. Once you understand what potatoes need, cool temperatures, darkness, humidity, airflow, and protection from freezing, you can often adapt a space in your home to keep them fresh for months.
Start with mature, healthy potatoes, cure them before storage, pack them in breathable containers, and check them regularly through winter. Even if your storage area isn’t perfect, these steps can help extend the life of your potato harvest and give you homegrown potatoes to enjoy long after the garden has been put to bed.
This simple basement storage method has worked well for us for many years, and it is always satisfying to open a box of potatoes in the middle of winter and know they came from our own garden. With a little care after harvest, your potatoes can continue feeding your family for months to come.
This is a GREAT article! You answered all of my question fully.
Thank you very much.
Will be doing this soon.🙏🏽
Jennie, Thank you so much! I’m glad the article answered your questions and was helpful. I hope storing your potatoes for winter goes well!
lived in Germany and in the Fall we would buy potatoes and dust them with some sort of white dust that helped keep them from spoiling in the basement. any idea what that might have been???
Carol, The white dust you remember might have been diatomaceous earth (often abbreviated as DE). It’s a natural powder made from fossilized algae and is commonly used in food storage to help control moisture and deter pests like insects. It’s sprinkled on root vegetables like potatoes to extend storage life and prevent rot or insect damage.
Another possibility is lime (calcium hydroxide) or wood ash, which have also traditionally been used in some regions to preserve root crops by creating a dry, alkaline environment that discourages spoilage.
If you’re thinking about trying something similar today, just be sure any product used is food grade and safe for storing with vegetables.
I stored my potatoes in a wood crate in the basement. Worked great until mice found it. Never had mice in the house until this. Suggestions? Don’t want more mice!
Kris, I’m sorry to hear about the mice issue. Here are a few suggestions to help keep mice away:
1. Secure storage containers: Consider lining your storage crates with hardware cloth to keep the mice out, but allow the potatoes to breathe. This will make it harder for mice to access the food.
2. Prevent access: Seal any entry points in your basement and use traps or deterrents designed for mice. If the problem persists, consulting a professional pest control service can provide tailored solutions.
Best of luck in keeping your basement mice-free!