How to Grow Green Onions
This post may contain affiliate links, which means that I may receive a commission if you make a purchase using these links. As an Amazon Associate I earn from qualifying purchases.
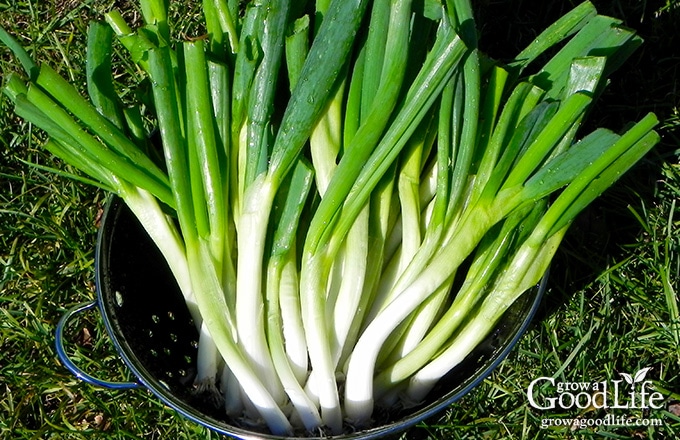
Green onions are a tasty veggie that makes almost any meal delicious! The best part about them is how easy they are to grow. Read on for more information on how to grow green onions.

Scallions, bunching onions, green onions: whatever you call them, there’s no denying that they make a delicious addition that elevates any dish!
The bulbs have a mild and sweet onion flavor and can be eaten raw in salads and cooked in chowders, soups, stir-fry, and any recipe that calls for onions. Use the greens as a garnish to add a pop of color to any dish.
Green onions are great to keep around the kitchen but buying them fresh every week at the grocery store really adds up. By learning how to grow green onions, you can have an unlimited supply that will last you all year long.
About Green Onions
Green onions (Allium fistulosum), also referred to as bunching onions, spring onions, scallions, and Welch onions, are an evergreen perennial crop originally native to Asia. Unlike regular onions, scallions don’t grow rounded bulbs but instead form a skinny bulb with long, flavorful green leaves. They have a much more mild onion flavor and can be eaten raw.
Also, unlike bulb onions, green onions are very rapid growers. It only takes 50 to 60 days to grow from seed to a harvestable size, whereas regular onions take between 100 to 175 days to mature. They are not daylight sensitive either. So you can sow seeds any time during the growing season.
Green onions are perennial in USDA zones 6 through 9, where the weather tends to be warmer and the winters milder. Every part of the green onion is entirely edible, including the flowers.
Green onions are indeed an incredibly interesting allium, but what makes them a star is how easy they are to grow! Keep reading for in-depth details about how to grow green onions in the garden, in containers, and indoors.
Types of Green Onions
There are a wide variety of green onions, including some that are cold-hardy, some that have red skins, and some that mature quickly. All grow mild flavored bulbless straight stalks and green foliage. Here are some types of green onions (Allium fistulosum) to consider:
- Crimson Forest Scallions have bright green foliage and a deep red stem that adds a nice pop of color to salads and stir-fries. The red color gets lighter when growing in warm temperatures. This heirloom variety is ready to harvest in 60 days.
- Evergreen Long White bunching onion is one I have relied on for many years. It is an heirloom variety that produces a long white bulb and 14-inch tall green stalks. Start seeds early, and it is ready to harvest in about 30 days after transplanting and 60 days for direct sowed seeds. Evergreen is very cold-hardy and overwinters very well.
- Ishikura Bunching Onions is a Japanese variety that can grow up to two feet tall. It will develop longer white bulbs by mounding the soil up around the plant as it grows. Plant this variety early and begin harvesting in about 50 days. This tender and tasty scallion is also heat tolerant and can be overwintered.
- Parade Bunching Onions is an open-pollinated variety that grows uniform-sized upright plants with white stems and dark green foliage. The crisp and mild scallions are ready to harvest in 70 days.
- Tokyo Long White is a Japanese scallion with long, slender, and mild-tasting bulbs and blue-green tops. If you mound the soil as the scallions grow, it will produce a long white stalk. Grow Tokyo as an annual because this variety doesn’t overwinter very well, but it will withstand heat like a champ and matures in 65 days.
- Warrior Bunching Onions is a quick-growing scallion that produces uniform slender white stalks and deep green leaves. If you start seeds indoors, Warrior is ready for harvesting in just 30 days after transplanting into the garden and direct sowed seeds in 60 days.

Tips for Growing Green Onions
You can grow green onions from seed, purchase transplants, regrow from scraps, or divide clumps of overwintered scallions already in your garden.
When to Grow
Onions are a cool-season crop and can tolerate temperatures below freezing. Unlike bulbing onions, scallions are not daylight sensitive and can be planted and harvested any time during the growing season.
However, the earlier you plant, the quicker you’ll be able to have a summer harvest. So the ideal time to grow your green onions is in early spring after the danger of heavy frost is past and once the soil has drained and is warm enough to be worked.
Start seeds indoors 8 to 10 weeks before your last spring frost date, and transplant seedlings to the garden after your last frost date. Or direct sow seeds in early spring after the danger of heavy frost is past. You can find your last frost date by contacting your local extension office (search for “extension office near me”) or enter your zip code here at PlantMaps.com.
Also, unlike bulbing onions, green onions don’t finish growing. Instead, they will continue to grow and maintain their health throughout the growing season, ready to harvest as needed for meals.
Most varieties also overwinter very well. Even in my USDA Zone 5 garden, cold temperatures kill the greens, and the bulbs go dormant, but the plants grow fresh greens the following spring. See tips for overwintering below.
How to Prepare the Garden Bed
The first step in preparing the garden bed is selecting an ideal location to grow your green onions.
Scallions prefer full sunlight to thrive but can also grow in partial shade. Choose an area with at least 6 hours of full sun per day. They will grow more slowly in the shade, but afternoon shade can help keep the plants cool from blistering summer temperatures.
Also, choose an area where no alliums have grown for the past 3 years. Rotating your crops helps keep nutrients from being depleted in the soil and prevents pests and diseases from infecting the plants year after year. Learn more about crop rotation and how it helps maintain healthy soil.
The ideal soil for green onions is rich, sandy, loamy soil with good drainage and a pH balance that is slightly acidic to neutral, around 6.0 to 7.0.
Prepare the garden bed as soon as the ground can be worked in early spring by cleaning up plant debris and weeds. Next, add several inches of aged compost, and work it in about 6 to 8 inches deep. If the weather has been dry, prepare and water the bed well the day before you sow seeds or transplant seedlings.
How to Start Seeds Indoors
Onion seeds are only viable for a short time, so be sure to sow all your seeds within a year or two after purchasing for the greatest germination rate. After planting my main crop, I like to scatter extra seeds in the corners of my raised beds, interplant with tomatoes, peppers, herbs, and even in the flowerbed. Avoid planting onions near beans or peas because it is believed that onions may stunt the growth.
Sow seeds about 8 to 10 weeks before your last frost date to have good-sized transplants ready to plant in the garden in early spring. This article provides more details on how to sow onion seeds and grow them indoors under lights: How to Grow Onions from Seed.

Direct Sowing Seeds in the Garden
Green onion seeds can be sowed right in the garden in early spring as soon as the soil can be worked. Onion seeds will germinate at temperatures above 40˚F. However, the optimum soil temperature for germination is around 75˚F.
Before sowing, prepare the beds as described above. Once you’ve prepared the perfect garden bed for your green onions, it’s time to sow your seeds. Sow seeds 1/4 inch deep, 2-inches apart, and space each row 12 to 18 inches apart from one another. For square foot gardens, I like to sow 16 seeds per square.
Water well and maintain moist soil while waiting for the sprouts to emerge. It typically takes between 7 to 14 days for the seeds to germinate.
Transplanting Seedlings
If you start seeds indoors or purchase transplants from a greenhouse, they will need to be hardened off before transplanting, so they adjust to the outdoor environment. The hardening-off period gives your plants time to adapt to the sun, wind, and chilly nights they will experience in the garden. Follow the steps detailed in this article: How to Harden Off Seedlings.
After your seedlings are hardened off properly, they are ready to be transplanted into their permanent location in the garden.
First, get your garden bed ready for planting. If the weather is dry, soak the soil very well with water the day before you transplant your green onion seedlings.
Choose a cloudy day with no wind and transplant in the late afternoon or evening to give your plants time to adjust without the additional challenge of the sun.
To transplant, carefully remove the seedlings by first squeezing the container to loosen the edges. Then while holding your hand over the seedlings, turn the container upside down, and tap gently until the soil plug falls into your hand. Next, flip it over and place it on the ground.
Poke holes in the soil spaced about 2-inches apart. Place one seedling in the plant and lightly firm the soil around the plant. I use a fork or small garden trowel to transplant onion seedlings. I pull the soil forward, place the plant in the hole, and then push back the soil, no patting or tamping in.
Water well after translating and keep the soil evenly moist until the plants become established.

Propagating by Divisions
Scallions can multiply by forming perennial evergreen clumps. Over time, the bulbs split and grow new plants alongside the old ones. These can be divided and replanted for a fresh crop of healthy green onions.
Dig up the plants carefully using a digging fork to preserve the roots. Use a knife to slice apart the roots so that each bulb has a good clump and replant, spacing each scallion about 4 inches apart. Firm in the soil, and keep moist until the plants become established.
How to Regrow Green Onions from Scraps
If all you need is the green parts of your scallions, you can regrow the stem as long as most of the roots are still intact!
Cut off the green parts leaving about 1 to 2 inches of the stem and root system. Fill a small glass jar with water. Place the onion cuttings into the water, with the roots submerged.
Place the glass in a location that receives bright light and watch as your green onions come back to life. Change the water every few days, replacing it with warm water, so you don’t shock the roots. You should see some roots forming within a week and fresh greens growing from the top.
You can leave the green onions in the glass jar and harvest them as needed, transplant them to the garden, or repot them into containers to grow outside or indoors on a sunny windowsill. Either way, they will continue to grow and produce healthy green shoots.

How to Care for the Plants
Green onions need little care once the plants are established. However, there are a few things that you can do to help keep them healthy and productive.
Watering
Keep your green onions consistently moist with regular watering, so there is no interruption in growth. While mature green onion plants are drought tolerant, a lack of water makes the bulb smaller and more pungent. Plants that are stressed from lack of water are also more vulnerable to disease and insects.
Green onions have a shallow root system, so most of their roots live close to the soil’s surface. As soil gradually dries out from evaporation, the top layer dries first. Check the soil moisture once a week by poking your finger in the ground about 1-inch deep. When the top inch of soil feels dry, you should water well to rehydrate your onions.
Mulching
As your green onions grow, I recommend layering mulch around the plants. Since scallions like consistently moist soil, mulching will help slow down the process of evaporation, keeping your plants hydrated longer.
Mulch can be any organic material: dried pine needles, straw, grass clippings, or shredded leaves. Mulching has multiple benefits, including moisture retention, temperature control, and weed suppression. Learn more about how organic mulch helps your garden.

Weeding
Keep the bed well weeded so the scallions don’t have to compete for space or nutrients. While mulching will help prevent weeds, some will manage to sprout through. Work through your garden weekly and pull weeds by hand as they pop up. Then, add an extra layer of mulch to cover any bare soil.
Fertilizing
Green onions are heavy feeders and will benefit from additional fertilizer throughout the growing season. Select a fertilizer that has higher nitrogen content to produce healthy green growth.
Following the directions on the package, feed your plants with an organic fertilizer part way through the growing season. For example, side dress the plants with composted chicken or poultry manure or use an organic nitrogen fertilizer such as blood meal or feather meal.
Overwintering Green Onions
Green onions are hardy to USDA zones 6 through 9. In these zones, the winters are mild enough to grow green onions throughout the year. Those of us in colder areas can overwinter green onions.
After the ground freezes in fall, apply a heavy layer of mulch to cover the bulbs of your green onions. The scallions will go dormant through winter and grow fresh greens again in spring once the soil warms. Since onions are biennial, overwintered plants will bolt or produce seeds the following year.
Saving Onion Seeds
Green onions that are stressed or have overwintered will eventually bolt or send up a seed stalk. This stem will produce a beautiful white globe-shaped flower blossom. I like to leave these for the bees and other pollinators. Flowering does not change the bulb’s flavor, unlike other alliums, but the remaining leaves will wilt. Eventually, the flower will form seeds. If you are growing an open-pollinated heirloom variety, let the seeds dry on the plant, then collect, and save for next year’s crop.
Growing Scallions in Containers
Green onions have shallow roots and upright growth, making them ideal for growing in pots and containers alone or planted with other vegetables and herbs.
The roots don’t need a lot of depth, so choose a container that is at least 6-inches deep and holds 1 to 3 gallons of potting mix, and follow the tips in this article on How to Grow Vegetables in Containers.
Troubleshooting Growing Problems
Although scallions are generally a healthy crop, several pests and diseases common to most allium crops occasionally affect the plants:
- Common pests include bulb mites, cutworms, leaf miners, onion maggots, and onion thrips. While a severe infestation will ruin the crop, most pests that feed on the leaves won’t kill the plants, but they may destroy some of the foliage and spread fungal diseases. You can use row covers to prevent the pests from finding your plants. If you do see signs of damage, remove affected leaves.
- The most common diseases that affect onions include botrytis, downy mildew, pink root, purple blotch, and white rot. Once infected, the disease will kill your onions. Destroy any infected plants and avoid planting alliums in that garden bed for at least 2 years. To help prevent fungal diseases, improve airflow by adequately spacing the plants, controlling weeds, and growing in healthy soil that drains well in full sun to partial shade.
When and How to Harvest
You can harvest green onions as soon as they reach a viable size in as little as 30 days after transplanting or roughly 60 days for a more mature size.
The ideal time is when the bulbs have turned white and are roughly the same thickness as a pencil. Thinner onions will have a milder flavor, whereas thicker, more mature onions have a more robust flavor and are better suited for cooking.
The beauty of green onions is they don’t finish growing. Instead, they continue to get larger and produce fresh greens from the stem. So keep them in the garden until you are ready to harvest them.
You can harvest as needed by digging up the entire plant, but if you just need the tops, cut a few from the outside of the plants, and the scallion will regenerate and continue to grow more greens.
Storing Green Onions
After harvesting, rinse your green onions well under clean running water and air dry. Wrap the stalks in a paper towel, place the bundle in a plastic zipper bag or reusable container, and store it in the crisper drawer in the refrigerator. The paper towel will absorb moisture and prevent the green onions from becoming slimy. Green onions can last about one week in the fridge when stored properly.
Freezing green onions is a great way to preserve their delicious flavor, though their texture will soften when thawed. Ensure your green onions are cleaned and dried before freezing.
I like chopping my green onions and keeping them in a freezer bag in the freezer. Then, whenever I need to pull them out for a garnish, I simply take what I need and put the rest away. Very convenient!
If you own a dehydrator, you can dry your extra green onions until they are brittle and can easily snap in half. Then, grind those scallions with a food processor to create homemade green onion powder.
Ways to Use Green Onions
Scallions are so versatile in the kitchen and can be used in various dishes. You can use the bulb in any recipe that calls for onions. Unlike bulb onions, the mild onion flavor won’t overpower a dish.
- Garnish: Use the tops to add a mild onion flavor and pop of color to any meal, including salads, chicken enchiladas, baked potato skins, and fajitas.
- Stir-Fries: Green onions are essential for Asian recipes, including beef and string beans, fried rice, and sweet and sour meatballs.
- Soups: Scallions make a great addition to soups, stews, and chilies such as turkey noodle soup, fish chowder, beef stew, and white bean chicken chili.
In addition, the greens can be chopped and added to rice, quinoa, mashed potatoes, and so many dishes where you want a mild onion flavor.
—
I think we can all agree that green onions are delicious! Learning how to grow your own green onions is so easy that you’ll never go back to store-bought scallions ever again!
Having fresh scallions on hand is the secret weapon in anyone’s kitchen, and now you don’t have to worry about remembering to put them on your shopping list every week.
You May Also Like:
- Over 30 Vegetables that Grow in Partial Shade
- 8 Easiest Vegetables to Grow in Your Garden
- Fast Growing Vegetables for Spring

When hardening off before planting into the garden, do I bring the seedlings back under lights after being outside?
Thank you for your excellent information!
Lottie
Hi Lottie! That’s a great question. During the hardening off period, especially if you’re just beginning and gradually exposing your seedlings to outdoor conditions, it’s a good idea to bring them back under the lights after their outdoor stint. This ensures they continue to receive sufficient light each day, which is crucial for their healthy growth.