How to Grow Peppers
This post may contain affiliate links, which means that I may receive a commission if you make a purchase using these links. As an Amazon Associate I earn from qualifying purchases.
Growing peppers is fairly easy and doesn’t require too much space. With some patience and this growing guide, you can learn how to grow peppers in your own backyard.

There is nothing that can quite compare to the flavor of a ripe, fresh, garden-grown pepper. Peppers come in all shapes, sizes, and tastes, but they all have a few things in common: they have a long growing season and thrive in warmer weather.
With peppers being tropical plants, many people think it is hard to grow them in other environments. However, with the right guidance, you can grow almost any variety of peppers in your vegetable garden or patio container.
Peppers are a great vegetable to grow, as they are relatively easy to care for and can produce an abundant harvest. If you grow your own peppers, you will discover they come in many varieties not found in the grocery store. In addition, pepper and chiles range from sweet to spicy, so there is something for everyone’s taste.
About Peppers
Peppers (Capsicum) are members of the Solanaceae, or nightshade family, which also includes eggplant, potatoes, and tomatoes. They are a warm-season vegetable native to Central and South America, but varieties have been cultivated and adapted to many areas across the globe.
Types of Peppers to Consider Growing
Peppers are divided into two groups: sweet peppers and hot peppers. There are hundreds of varieties within each group in various sizes, shapes, colors, and heat levels.
Sweet peppers have a mild, sweet flavor when ripe. Varieties range from the familiar blocky bell pepper to sweet, thick-walled pimiento peppers to bull-horned peppers that are great for grilling or frying.
Sweet peppers include many types of bell peppers, such as California Wonder, King of the North, Yolo Wonder, and Purple Beauty. Sweet peppers also include varieties great for grilling, frying, or stuffing, such as Carmon, Marconi, Corno di Toro Pepper, Jimmy Nardello, and Sweet Banana Peppers.
Hot peppers are often called chile or chili peppers and are spicy hot because of a chemical compound called capsaicin. The chile peppers’ heat level is measured using the Scoville Heat Index, developed by Wilbur Scoville in 1912. The higher the number on the Scoville scale, the hotter the pepper.
Examples of hot peppers are Anaheim, Cayenne, Hungarian Yellow Wax, Jalapeno, and Serrano Chile Peppers. In addition, some Banana and Cherry peppers come both sweet and hot.
Tips for Growing Peppers
I wasn’t a big fan of peppers when I was growing up. My family grew only one type of pepper in their garden, and that was some sort of bell-shaped green pepper. What I didn’t know back then was green peppers were immature fruits. Depending on the variety, green bell peppers change to red, yellow, or orange when fully ripe. Once bell peppers ripen, their flavor develops from pungent and slightly bitter to a sweet, almost fruity taste. Our short growing season didn’t allow time for most of the bell peppers to mature fully.
Since then, I have learned that you can grow a wide diversity of peppers even if you garden in cooler climates with a short growing season. There are so many different sizes, shapes, colors, and flavors of peppers that I can’t resist trying different varieties and discovering which ones succeed in my zone 5 growing area.
Peppers are tropical perennial plants, meaning they thrive in the heat. They also have a long growing season, so getting the plants started as early as possible is essential, so the fruit matures fully. This may seem a little challenging, but by using our tips and tricks, you’re sure to be successful at growing peppers.
Garden Site Selection and Preparation
When choosing the best place to grow peppers in your garden, remember that they are tropical plants that prefer full sun, 6 to 8 hours of direct sunlight a day. Peppers also do best when planted in nutrient-rich, well-draining soil with a pH of 6 to 6.8. You can grow peppers in containers, raised garden beds, or the ground.
In most areas, choosing a sunny spot with good-quality soil is perfect for growing peppers. With that being said, if peppers get too hot, they will drop their flowers, leading to less fruit production. If you live in a hot climate, consider growing your peppers in an area that receives full sun in the morning and partial shade during the hottest part of the day to avoid this.
Once the soil has drained in the spring, prepare your garden beds by removing all the weeds, large clumps, and rocks. Next, add a generous amount of aged compost to your soil, and work it in about 6 to 8 inches deep. Then wait until the soil is warm enough to transplant your peppers.
Starting from Seeds Indoors
Since peppers prefer warmer weather for their long growing season, it is best to start seeds early indoors. However, the time to start seeds will depend on your area’s estimated last frost date. You can find your last frost date by contacting your local extension office (search for “extension office near me”) or enter your zip code here at PlantMaps.com.
Once you have this date, start pepper seeds at least 6 to 8 weeks before your last frost date, and transplant seedlings outdoors after all danger of frost is past and once the soil has warmed to at least 60˚F.
Here, you can learn how to make a seed-starting schedule unique to your growing environment: How to Develop a Seed Starting and Planting Schedule. Plus, learn more about starting seeds in this article: 10 Steps for Starting Seeds Indoors. In addition, this article will help you set up a DIY Grow Light Shelf.
Sowing Seeds
To start growing peppers indoors, you’ll need seed-starting trays and good quality seed-starting soil. Seed starter is a soil that is very light and doesn’t contain nutrients, making it perfect for starting seeds.
Fill your trays with damp seed-starting soil. Sow seeds 1/4 inch deep, placing 2 seeds in each hole to increase the germination rates. Cover the seeds with soil and lightly water them, using a spray bottle or other method, but avoid flooding the seeds.
Use a humidity dome to help hold in moisture, and spray with water as needed to keep the soil moist. The seeds don’t need light yet, so you can also opt to keep them in a warm area until they sprout. A heat mat will encourage the seeds to germinate and emerge from the soil faster.
Most pepper seeds sprout in about 7 to 10 days at a temperature of 70 to 80˚F. Germination will take longer at cooler temperatures. You could also try pre-sprouting your pepper seeds for quicker germination and then transplant the sprouted seeds to your growing medium and place them under lights. Learn How to Pre-Sprout Seeds for Quicker Germination.
Once the seeds emerge from the soil, remove the humidity dome and place the growing trays under the grow lights. Position the lights about 2 inches above the seedlings, and adjust them as the plants grow. Set a timer and keep the lights on for 16 hours and off for 8 hours.
Common advice on growing peppers suggests keeping them in a warm location throughout their seedling stage. Contrary to that advice, I start my peppers in our cool basement. The plants grow slowly in this environment, but they are healthy, stocky, and will adapt quickly to the outdoors. Add a week or two to your seed-starting schedule if you grow pepper transplants in cooler temperatures.

Fertilizing the Seedlings
Since the seed starting mix doesn’t contain any fertilizer, you will need to feed your seedlings with an organic fertilizer once the true leaves develop. Begin a fertilizing regimen using half-strength, organic liquid fertilizer such as fish emulsion or worm-casting tea. Each brand is different, so follow the instructions on the label for the best results.
Potting Up into Larger Containers
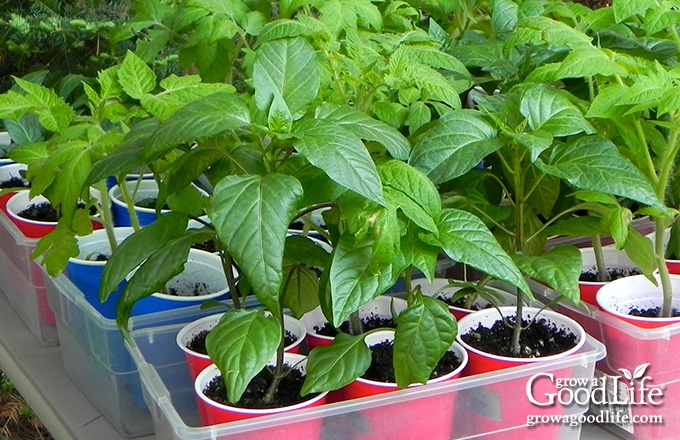
Once the plants have sprouted at least one a set of true leaves, you can pot up the seedlings into larger containers. I like using recycled party cups with holes drilled into the bottom to give the roots plenty of space to develop.
Use a good quality potting soil mixed with some organic fertilizer. If two seedlings are growing in the same cell, thin the seedling to the strongest plant by cutting one at the soil surface with scissors or carefully separate the plants and replant them into separate containers.
Water well to keep the soil evenly moist until the plants begin to show new growth, and then reduce watering to once or twice a week when the soil surface is dry about 1/2 to 1 inch.

Hardening Off Your Seedlings
After temperatures have warmed outdoors and the risk of frost has passed in your area, you can start hardening off your pepper plants. This process involves bringing your plants outside for an hour or two every day for a week and increasing the time each week for up to four weeks. You can learn more in this article: How to Harden Off Seedlings.
Wait until nighttime temperatures are in the high 50˚F before leaving them out overnight. I aim to transplant peppers to the garden 2 to 3 weeks AFTER our average last frost date.
Transplanting Pepper Seedlings
Once your plants are hardened off and the soil temperature has warmed to at least 60˚F, you can safely transplant the pepper seedlings into your chosen outdoor space. If you haven’t yet, go ahead and prepare your garden area for planting as described above.
Whether you grow your own seedlings or purchase pepper starts from a garden center, choose a cloudy day to transplant the peppers to the garden. This will help the plants adapt without the additional challenge of the sun. If the soil is dry, water the bed very well the day before.
Depending on the variety, space the peppers 18 to 24 inches apart to give them enough room to grow and provide airflow between the plants. Allow about one square foot per plant if growing peppers in containers or square-foot gardens. Close planting helps provide a leaf canopy to shade the fruit protecting it from sunscald.
Dig your holes and set the transplants in a little deeper than the top of the root ball to encourage additional root growth at the base of the stem. Lightly compress the soil around your pepper seedlings and water them well. I like to form a little basin around each space that can hold water to help it soak down into the roots. Stake or use a tomato cage to help support the heavy fruit.

How to Care for the Plants
Peppers are relatively easy to grow when planted in a sunny spot with well-draining soil, and with the right care, you can keep your plants healthy and productive. Here are tips to help you care for peppers:
Pinch off Early Blooms
You may be excited to see early blooms on your pepper plants even before you transplant them into the garden. However, if you pinch these off, you will allow the pepper plant to focus its energy on growing healthy roots and branches rather than fruit. This will pay off in the long run. Healthy plants will yield healthier and more abundant peppers.
Water When Needed
Pamper your transplanted peppers in the beginning until they adjust to their new environment. Keep them well-watered until the plants begin to sprout new leaves. Once the plants are established, reduce watering to once or twice a week when the soil feels dry on the surface.
Aim for about 1 inch of water per week during early summer, and double that during hot spells. Water at the base of each plant and let the moisture soak in to encourage the roots to grow deep.
Mulch to Conserve Moisture
Wait until the soil is warm before mulching your peppers. After the pepper plants are well established, mulch the soil surface with shredded leaves or straw to help hold in soil moisture and suppress weeds.
Keep the mulch a few inches away from the stems, so it doesn’t stifle the plants. Learn more about How to Use Mulch in Your Vegetable Garden.

Weed Regularly
Weeds compete with your pepper plants for water, nutrients, and space. Ensure your garden bed is weed-free before planting and stay ahead of weeds throughout the season. Gently pull weeds by hand to avoid disturbing the roots of your pepper plants. Learn more about How to Control Weeds Naturally.
Fertilize if Needed
Adding a good dose of finished compost at planting time will provide a good, slow feeding to your peppers throughout the season. However, if your soil is poor, fertilize at planting time and again when the plants begin forming fruit.
Choose a balanced organic fertilizer, such as 5-5-5 or 10-10-10, or one that has less nitrogen (N) than phosphorus (P) and potassium (K), such as Epsoma Garden Tone or Tomato Tone. Too much nitrogen will make your peppers focus on producing leaves instead of fruit. Follow the instructions on the label for the best results. If the leaves of your peppers look dark, they may be getting too much nitrogen. The leaves should be a light or lime green color.
Troubleshoot Pests and Diseases
Like all plants, peppers can be susceptible to various pests and diseases. Here are some of the most common issues you may encounter when growing peppers, along with some tips on how to deal with them:
- Aphids are tiny insects that suck the sap from the pepper plant’s leaves, causing them to wilt and become stunted. To control aphids, you can spray the plants with a strong stream of water to dislodge them or use insecticidal soap.
- Cutworms are caterpillars that feed on the stems of young pepper plants, often causing them to wilt and die. To prevent cutworms, you can place collars made of cardboard or paper around the stems of the plants.
- Tomato hornworms are large, green caterpillars that feed on the plant’s leaves, stems, and fruits, causing significant damage. While the name suggests they attack only tomatoes, they can also target peppers. To control tomato hornworms, you can handpick them from the plants and drop them into a jar of soapy water.
- Pepper weevils are small beetles that feed on the flowers and developing fruits of pepper plants. Infested fruits will have holes and may have a bitter taste. To control pepper weevils, you can handpick infested fruits, use pheromone traps to capture the adults, and practice crop rotation to disrupt the life cycle.
- Blossom end rot is a common problem with peppers, especially during periods of drought. It’s caused by a calcium deficiency in the plant, which leads to the development of black or brown spots on the fruit. To prevent blossom end rot, ensure the plants receive adequate water so the plant can metabolize nutrients properly.
- Bacterial leaf spot is a disease that causes circular, water-soaked spots on the leaves of pepper plants. The spots eventually turn brown and may cause the leaves to drop off. To prevent bacterial leaf spot, make sure the plants are not overcrowded and avoid splashing the leaves when you water the plants. If the disease is already present, remove infected leaves and dispose of them in the trash to prevent spreading.
- Powdery mildew is a fungal disease that causes a white or gray powdery coating on the leaves and stems of the pepper plant. It can lead to stunted growth and reduced yields. To prevent powdery mildew, ensure the plants are not overcrowded and have adequate air circulation.
By following good gardening practices, such as regular watering, proper fertilization, and maintaining good soil health, you can reduce the likelihood of pest and disease problems in your pepper plants. Regularly inspecting your plants for signs of damage or disease and promptly addressing any issues can also help keep your pepper plants healthy and productive.
Peppers are susceptible to similar pests and diseases as other crops in the Solanaceae family, such as potatoes, tomatoes, and eggplant. So it is best to rotate these crops and avoid planting them in the same growing area for 1 to 2 years to reduce pests and disease buildup in the soil.
Tips for Growing Peppers in Colder Climates
Growing peppers is possible even if you garden in cooler climates. The key is to select varieties that are adapted to colder temperatures with early maturity dates, so they grow and ripen before the first fall frost kills the plants.
Here are some tips on growing peppers in colder climates:
- Select Quick Maturing Peppers: Choose pepper varieties that mature quickly and are adapted to cool temperatures so they ripen before the end of the season before your first frost. For sweet bell peppers, try growing New Ace, Lady Bell, and King of the North. For hot peppers, choose Early Jalapeno. I have had great success growing all of these varieties in my zone 5 garden.
- Start Pepper Seedlings Early: I generally start peppers seed earlier than recommended, about 12 weeks before my last frost date. Peppers grow slowly and won’t outgrow the lights too quickly.
- Select Your Pepper Location: Peppers love heat. Choose a well-drained planting bed that receives at least 6 to 8 hours of sunlight per day. Prepare the bed ahead of time by removing any weeds and mixing in some finished compost to help the soil retain moisture and add some nutrients.
- Wait for Warm Temperatures: Peppers are heat-loving plants that cannot take cold temperatures. Moving your seedlings from indoors under lights to outdoors too soon can stunt the plants, and it may take them a while to recover, reducing yields. Waiting until the weather has warmed is the best way to get your pepper plants off to a great start.
When and How to Harvest
Some varieties of peppers mature in as little as 60 days, while some hotter types can take up to 100 days to fully mature. Peppers can be harvested at any stage of growth, but their flavor doesn’t fully develop until maturity. Pick the first two peppers on each plant when they reach a usable size. This will allow the plant to devote more energy to produce more fruit during the most ideal growing part of the season.
Harvest when the peppers turn to their final expected color, such as yellow, red, or orange. Peppers that have partially changed color will finish ripening if you leave them at room temperature for a few days.
Always harvest peppers by using shears or a sharp knife. Breaking peppers off by hand can cause entire branches to snap off the plant. Instead, cut the pepper at the stem, leaving a short stub.
If your peppers are still producing fruit late in the fall, be sure to harvest all of your peppers before the frost hits. Frost will kill your pepper plants, and any remaining fruit will go bad.

Ways to Preserve Peppers
There are several ways to preserve peppers to enjoy their delicious taste and nutritional benefits all year round. These methods are a great way to preserve the bounty of fresh peppers during peak season so that you can enjoy their flavor and nutrition throughout the year:
- Freezing: Peppers can be frozen whole or chopped and stored in the freezer for up to a year. Blanching the peppers before freezing can help preserve their color and texture. Visit the following article to learn more and for a complete step-by-step tutorial on How to Freeze Peppers.
- Drying: Peppers can be dried in an oven, dehydrator, or hung to air dry. Once dried, they can be stored in an airtight container for up to a year. Learn how to dehydrate peppers for food storage here: How to Dry Peppers.
- Canning: Peppers can also be preserved by pressure canning them plain, or pickled in a vinegar-based brine and canned into shelf-stable jars using a water bath canner. There are many safe home canning recipes for preserving peppers here at Grow a Good Life, including salsas, sauces, relishes, and pickled peppers: Ways to Preserve Peppers.
Each preserving method has unique benefits, and by trying out a few different approaches, you can find the one that works best for your needs.
—
Whether you want to grow a few pepper plants for fresh eating or a large crop for preserving for winter, growing peppers is a fun and rewarding experience for any gardener.
Peppers come in so many shapes, sizes, and flavors not found in the grocery store. In addition, you can use peppers in so many ways to add flavor to recipes. I hope this article teaches you what you need to know to begin cultivating a bountiful harvest of fresh, vibrant peppers.
This article was originally published on June 6, 2016. It has been updated with additional information, photos, and video.
Good planning is key to a successful vegetable garden
Whether you are new to growing your own food or have been growing a vegetable garden for years, you will benefit from some planning each year. You will find everything you need to organize and plan your vegetable garden in my PDF eBook, Grow a Good Life Guide to Planning Your Vegetable Garden.

The growing season for peppers here is February and March or July to September in central Florida and north Florida. In southern parts of the state, August to September is the best month for planting.
Iris, that is very interesting. I am sure growing peppers in Florida is very different than growing them in Maine or other cold areas in the North since our warm gardening season is so short. Thanks for sharing. I’ll be sure to include this information in a new article I am writing on growing peppers.
I grew peppers from a cut of a pepper I bought. I transferred to outside in a container in Late June. . I am in the Chicago Area. I now have lot of green peppers growing but had to move the plant inside due to a frost last night.
We are expecting warmer temps this week: 60’s and up to 70F. I know they will be fine during the day. My question is, can I continue to grow these inside in order to harvest them going forward? They are quite small now.
Thank you. Eileen
Eileen, Yes, you can grow peppers inside. Most pepper plants are actually bi-annual or perennials. If you can keep them alive all winter, they will continue to produce next year. Here are tips on caring for peppers indoors from my friend, Amy: https://getbusygardening.com/overwintering-peppers/
I only have one issue in northern WI. After the initial spring growth I have a 14 inch plant with a few peppers. The plant stays healthy, but does nothing until the days get shorter. Then it explodes with new peppers, but stays small. In late fall I may get some more new peppers but most new growth gets killed by the first frost. Are there strains that will grow in the long daylight (17 hours) that we get up here?
Tom, Peppers are day-neutral plants, so I don’t think it is related to day length. What kind of peppers have you tried growing? How much sunlight do the plants receive each day? When were they transplanted into the garden?