How to Pre-Sprout Seeds for Faster Germination
This post may contain affiliate links, which means that I may receive a commission if you make a purchase using these links. As an Amazon Associate I earn from qualifying purchases.
Wondering whether your garden seeds will sprout? You can eliminate some of the wait time by germinating seeds before they are planted. Learn how to germinate seeds in a paper towel with this tutorial.
One of the most frustrating things about starting vegetables from seeds is waiting for them to emerge from the soil. Germinating seeds in a paper towel is a great method for the impatient gardener, because it lets you see your seeds sprout before they are covered with soil.
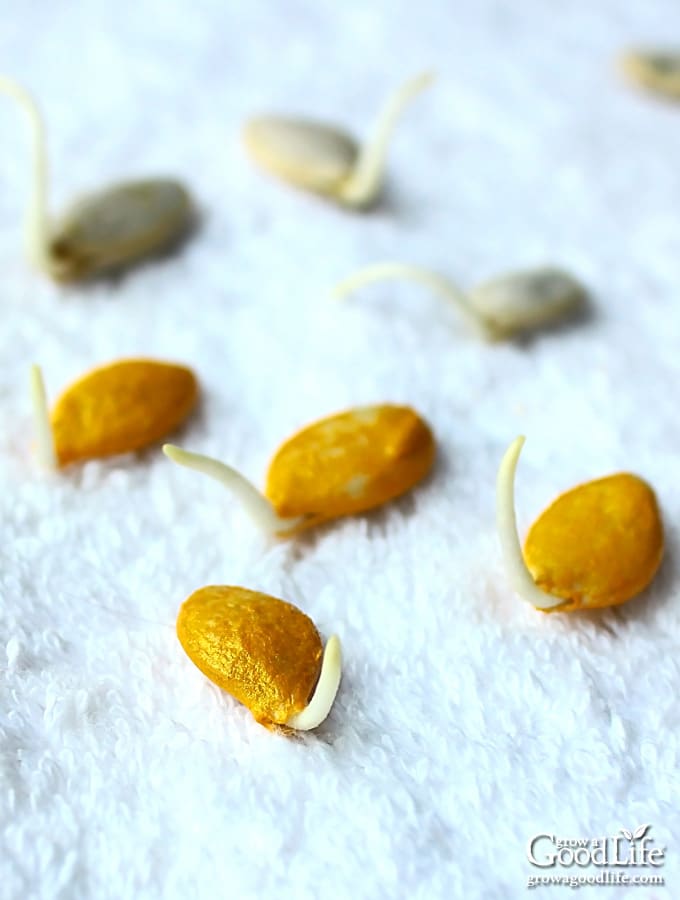
I had pepper seeds that were several years old. I hated to throw the package away without checking to see if they were still good. I checked the viability of the seeds by doing a seed germination test using a damp paper towel in baggies.
About half the old seeds sprouted, a 50% germination rate, and the rest were duds. I planted the sprouted seeds and watched the seedlings carefully to see if they would grow. I didn’t expect much from them, but they did grow into healthy transplants that were eventually planted into the garden.
After experiencing how easy it was to see which seeds germinated using paper towels, I decided to pre-sprout more of my indoor vegetable seeds. Now, I routinely germinate tomato seeds, peppers, eggplants, Swiss chard, cabbage, melons, cucumber, broccoli, squash, cilantro, spinach, and kale on damp paper towels before planting.
How to Germinate a Seed
The seeds of all plants are dormant or inactive until the conditions are right for their germination. A seed begins germinating once it is exposed to warmth and moisture.
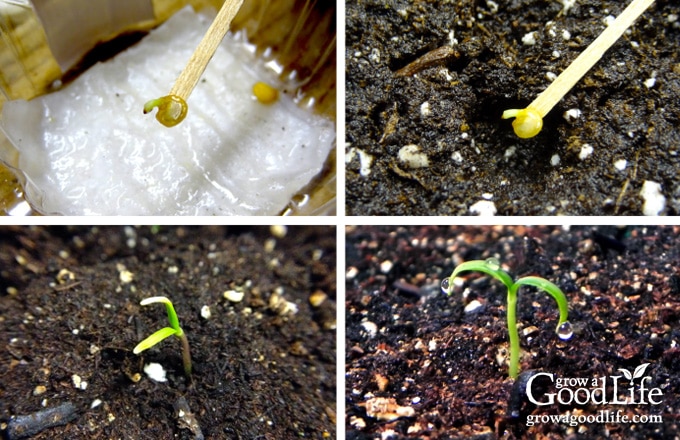
First, the seed absorbs moisture and oxygen, which triggers the embryo to wake up. Next, it begins to swell as it breaks down the seed coat, absorbs larger amounts of water and oxygen, and sprouts roots or radicle, followed by the shoot that forms into the stem and foliage.
Benefits of Pre-Sprouting Seeds
Normally, you sow a seed into a growing medium, such as damp seed starting mix or peat pots. You plant the seed, cover with soil, water, place in a warm spot, and wait for the seed to sprout and break through the soil surface.
The paper towel method of starting seeds lets you germinate the seeds first, and then you can place the sprouted seed with the root into a seedling container to grow. You can see the seed and don’t have to wonder if it is doing anything under the soil. Other advantages of pre-sprouting your seeds include:
- Saves money: Instead of throwing away older seed packages, you can germinate seeds in paper towels to see if some of the old seeds are still viable.
- Conserves space: You don’t have to sow a whole tray of seeds hoping that at least half will germinate. Instead, you sprout the seeds in a small container, and only plant the ones that germinate. You don’t even need a seedling heat mat.
- Saves time waiting for seeds to sprout: Pre-sprouting accelerates germination because the seeds can be given ideal moisture, air, and temperature conditions indoors.
- Excludes the bad seeds: You only plant the seeds that geminate. Simply throw away the duds.
- Eliminates the need to thin out seedlings: With pre-sprouting, there is no need to toss three or four seeds into a pot and hope at least one will germinate only to have all four seeds sprout forcing you to thin out the extras.
How to Germinate Seeds in a Paper Towel
Pre-sprouting seeds is a method used to germinate seeds on a damp paper towel before they are planted. It is a great gardening hack that speeds up germination by providing the seeds with perfect moisture, air, and temperature conditions indoors.
It may be helpful to review this article on 10 Steps to Starting Seedling Indoors to get your seed starting area setup, and then follow the steps to pre germinate your seeds:
Materials needed:
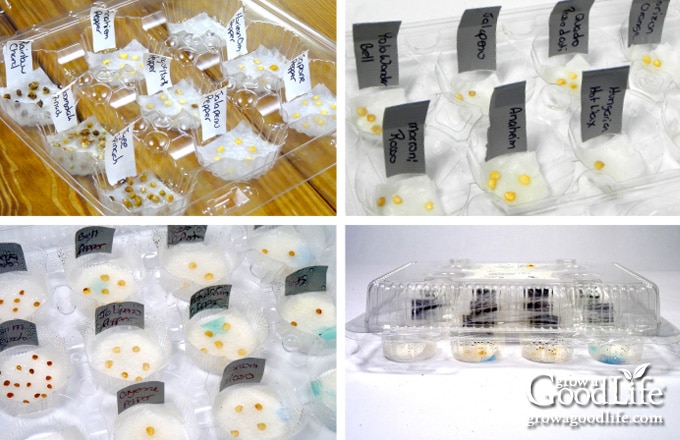
- Containers or plastic bags: Any container or zipper bag will work. My favorites to use for pre-sprouting are the plastic see through mini muffin bakery containers or egg cartons. These are divided into small cells that are ideal for organizing and labeling individual seeds. The cover can be snapped closed to keep in moisture. Since the containers are clear, you can check on the seeds without opening the cover.
- Paper towels: A damp paper towel will help deliver consistent moisture to your seeds without drowning them. Too much moisture will cause your seeds to mold or rot. Coffee filters can also be used, but they are not as absorbent as paper towels, so you’ll need to check the moisture level more frequently.
- Water resistant labeling material: I cut strips of white duct tape.
- Permanent marker: Sharpies work well and will not wash away if splashed with water.
- Spray bottle: A spray bottle filled with water is the easiest way to moisten the paper towels without soaking them.
- Seeds of choice: Larger seeds seem to work best. Try pre-germinating tomatoes, peppers, eggplants, Swiss chard, melons, cucumber, squash, cilantro, spinach, and cole crops.
Directions for Germinating Seeds
Before you begin, get your growing containers prepared for planting. Make up several seedling trays or small pots of moist seed starting mix ahead of time so you will be ready to transfer seeds when they sprout.
Step 1: Line your container with a paper towel
I like several layers of paper towels to keep the seeds damp, so I fold them in thirds and cut to fit. If you are using plastic bags, fold and cut your paper towels to fit.
Step 2: Label your containers
Use a water-resistant marker to label your containers or bags.
Step 3: Dampen your paper towels
Spray the paper towels with your spray bottle. You are aiming for the paper towels to be damp, not dripping. If you notice the water pooled in your container, the moisture level will be too high. Dump out the extra.
Step 4: Add your seeds
Spread your seeds on top of the damp paper towel. If you are using containers, simply close the cover. If you are using plastic bags, fold the paper towel over the seeds and place in the bag.
Step 5: Place the seeds in a warm area
Locate your seed containers in a warm area out of direct sunlight and away from drafts, such as near a heater, or on top of the refrigerator. Moderate heat will help your seeds germinate quicker. Room temperature or up to 75 degrees F is average for most seeds. Choose an area where the containers will not be knocked over or forgotten.
Step 6: Check the seeds daily
Examine your seeds each day for germination and to make sure the towel stays damp. Spray the towel if needed.

Step 7: Planting germinated seeds
Some seeds will sprout quicker than others. As soon as a seed shows tiny roots it is ready to plant. Carefully transfer seeds to your prepared seedling containers using a toothpick or tweezers.
Place the sprouted seed on top of your growing medium, cover with dry seedling mix, mist with the spray bottle, and place under the growing lights.
Be very careful not to damage the root. If you do, the sprout will die. If the root has grown into the paper towel, snip around it and plant paper towel and all. Also, don’t remove the seed coat before transplanting, it will come off on its own when the first leaves, also called cotyledons start to unfurl.
Step 8: Keep your seedlings warm and moist
Use your spray bottle to keep the soil surface moist, allow for good airflow, and continue caring for your seedlings as described from step 5 on in this article: 10 Steps to Starting Seedlings Indoors.
—
Germinating seeds with damp paper towels is a great gardening hack that speeds up sprouting by providing the seeds with ideal environment. Plus you can see the seeds germinate and not have to wonder what is happening under the soil.
This article was originally published on March 5, 2014. It has been updated with additional information, photos, and video.
You May Also Like:
- How to Set Up a Seed-Starting Grow Light Shelf
- 10 Steps to Starting Seedlings Indoors
- Troubleshooting Seed Starting Problems
- How to Make a Seed Starting Schedule

Should I put holes in the baggie for the seeds to get air, or leave the bag open? Thank you
Cheryl, No holes needed. The seeds will get fresh air each time you open the bag to check on them, so you can keep it sealed to maintain humidity.
Hi
I just found your article. I have sprouted my chile seeds in a wet kitchen paper towel and in a zip lock bag. Including the root my seedling are .75 inch long. Shall I transplant place them in soil. I wish I could upload an image of my seedling.
Humera, It sounds like your chile seeds are off to a great start! Yes, you should transplant them into soil as soon as possible. Be very gentle with the seedlings to avoid damaging the delicate roots. If the root has grown into the paper towel, snip around it and plant the paper towel along with the seedling. The paper will break down in the soil. Good luck with your seedlings, and I hope they thrive!
This may sound strange but when I sprout the seeds which part goes down in the soil. The seed or the sprout looks like the root to me. I have noticed when zi just plant seeds in ground the seed part come out of ground. I have asked gardeners and nobody can answer the question. Thank you
Cheryl, When a seed sprouts, the first part to emerge is the root. This root anchors the seedling in the soil and starts absorbing water and nutrients. As the root establishes itself, the shoot (stem and leaves) starts to grow upward toward the light. Sometimes you may notice the seed part being pushed out of the ground by the emerging shoot. This is a natural process where the seedling emerges from the soil to begin growing into a mature plant. If you’re unsure which way to plant the pre-sprouted seed, generally placing the seed with the root part facing downward will help it penetrate the soil easily. I hope this helps clarify the process for you!
Great article. Thank you. It will be helpful to me for a homeschool co-op lesson I’m doing this week- happy kids in the dirt!
Have you ever tried growing rosemary? I have tried twice and so far I haven’t much luck getting the seeds to germinate. (I live in Ontario, Canada where it’s quite chilly.) Any suggestions on how to get rosemary seeds to germinate?
Vicki, Rosemary is not the easiest herb to grow from seed. It is the one plant that I will buy in at the garden center instead of starting from seed. The germination rate is low and it can take four to six weeks before the seeds sprout. Pre-sprouting can help, but you should use a lot of seeds for a better chance of germination.
I know this is an older article, but I just found it and have a question. I live in Minnesota, zone 4b. I normally start my seeds in my basement under lights with a grow mat. It is really cold this year and the temps down there are 55-65 degrees on my enclosed shelf with lights and a heat mat. I want to start my peppers early because I always have trouble with them but it’s so cold I’m afraid they won’t germinate. Could I use this pre sprouting method upstairs where it’s warm, and then after they germinate, plant the seeds in seed starting mix and then move them down under the lights?
Hi Deb, Yes, that will work. It is exactly what I do every year. 🙂 I pre-sprout the seeds in a warm area upstairs, and then plant them in my seed starting area in the basement. Keep them on the heating mat until the plants emerge from the soil and form their first leaves, and then you can move them off the heat.
That’s the best way I found too. Thanks