How to Build a Square Foot Garden
This post may contain affiliate links, which means that I may receive a commission if you make a purchase using these links. As an Amazon Associate I earn from qualifying purchases.
Do you want to grow a vegetable garden, but don’t have a lot of room? Square foot gardening is a great way to grow vegetables. You don’t have to worry about digging a garden because the raised beds are placed on top of the ground.
Mel Bartholomew developed the square foot garden concept in 1976. He published his Square Foot Gardening book in 1981, and it has been revised several times through the years. We built our first square foot gardens after reading All New Square Foot Gardening in 2009.
The theory of square foot gardening is to use a bottomless raised bed filled with a soil blend of equal amounts of peat moss, vermiculite, and finished compost from many different sources to add a diverse amount of nutrients.
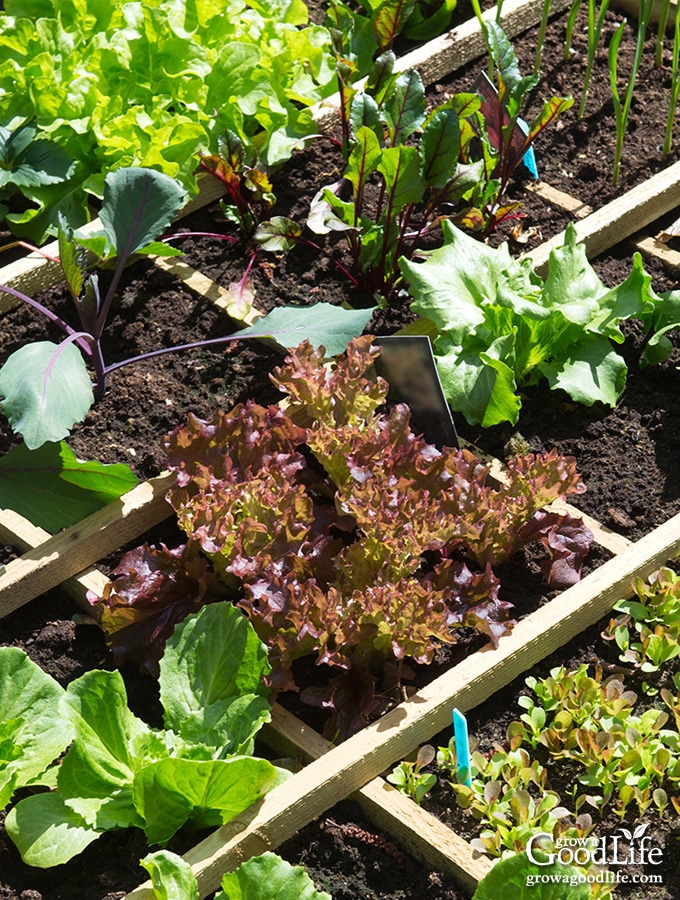
Instead of planting in rows, the bed is divided into one-foot sections, and each square is planted in grids according to the spacing recommended on the seed packet and described in the book.
Building a square foot garden is a quick and easy way to begin or expand your garden. The method is also simple to understand, organized, and makes it easy to plan your growing beds. You can learn more about the benefits of square foot gardening in this article:
Steps to Building a Square Foot Garden
We started out building three 4×4 square foot garden beds the first year and placed them to the south end of our garden area. We found the 4×4 size simple to build with standard lumber, and the beds lined up well with our existing garden space.
One of the benefits of raised bed gardening is you will never compact the soil by walking on it. So you want to build the beds so you can reach into the garden on all sides from the outside the garden. We left about 3 feet in between the beds, which is plenty of space to walk and maneuver a wheelbarrow and manual lawn mower to keep the grass paths trimmed.
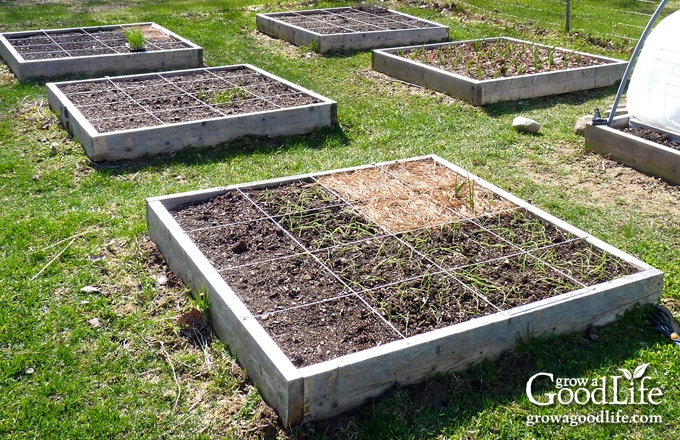
We added three more 4×4 square foot beds the following year. Each year we built, filled, and planted three beds in just one weekend. Here is how we did it:
Step 1: Source the material
You will need the following for each 4×4 square foot garden:
- Two 8-foot long 2×6 boards
- A box of 6-inch exterior wood screws
- Power drill
- Recycled cardboard or newspaper
- 3 cubic feet peat moss (or coconut coir or other soil less growing medium of choice)
- 3 cubic feet vermiculite
- 3 cubic feet of blended compost made from at least 5 different sources
- String and small nails to make the grid
- Tarp or garden cart to mix the soil
- Plus basic gardening tools such as a shovel, rake, and garden hose with spray nozzle.
Wood for Raised Bed Gardens: The wood that you use to build your square foot garden is going to be constantly in contact with damp soil, so it will rot over time. Use untreated lumber for building raised beds. Treated lumber may leach chemicals into the soil. Also avoid recycled wood when you don’t know the origin because it too may contain unwanted chemicals.
Cedar and redwood are naturally water-resistant, but can be pricey and difficult to find. Fir and pine are the least expensive, but you may need to replace it after several years of use. We started out with pine. Once the pine rotted, we rebuild our gardens using rough hemlock from a local lumberyard. It’s been 8 years and the hemlock is just beginning to deteriorate. Ask the lumber company if they can cut the wood into 4-foot pieces for you.
Square Foot Garden Soil Mix: You will need about 8 cubic feet of soil (0.3 cubic yards) to fill one 4×4-foot box at 6-inches high. If your boxes are a different size, you can figure out how much soil will be needed by multiplying the widths of the box, and divide that number by 2. For example, a 4×8 foot box that is 6-inches high would be (4×8)/2 = 16 cubic feet.
The classic soil mix for square foot gardening is equal parts peat moss, vermiculite, and compost.
Peat Moss or Coconut Coir: Peat moss is partially decomposed remains scraped from the surface of peat bogs in the northern US and Canada. Peat is commonly used as a soil amendment to lighten the soil, hold moisture, and improve soil structure. Peat doesn’t contain any nutrients. Although peat moss is recommended for garden soil mixes, it isn’t a resource that is renewable. Peat bogs can take at least 25 years to renew.
Coconut coir has emerged as a more sustainable replacement for peat moss in potting mixes and garden soil. Coconut coir is a byproduct of the coconut processing industry and is made from the outer husks of coconuts that are grown for food. The husk is ground into a lightweight fiber that provides the same benefits as peat moss, including improving soil structure and moisture retention. Coconut coir is sold in compressed blocks that expand when wet.
Vermiculite: Vermiculite is a natural mineral that is mined out of the ground. Once the rock is collected, it is ground into pieces that are and heated until they explode just like popcorn forming nooks and crannies that hold moisture. Vermiculite is used to improve aeration and texture in the square foot garden mix.
Compost: Finished compost is decomposed organic matter, and it is the best material to grow your plants. Compost will provide nutrients, improve soil structure, and help retain moisture in the soil mix. Compost also feeds earthworms and other microbial life in the soil. The worms will tunnel through the soil to improve aeration and drainage while leaving behind their castings to increase soil fertility.
The best compost is one that you make yourself using organic matter from kitchen scraps, garden debris, grass clippings, and other natural waste. If you need to purchase compost, the book recommends combing organic compost made from at least 5 different sources to provide a wide range of nutrients for your plants. For example, combine decomposed farmyard manure with fish and seafood compost, bat guano, mushroom compost, and mixed compost made from forest products.
Instead of mixing your own square foot garden soil, you can also purchase good-quality pre-mixed raised bed garden soil in bulk from your local garden center.
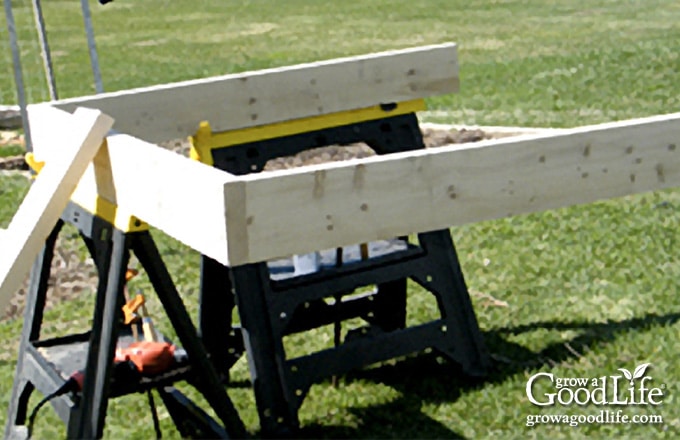
Step 2: Build the square foot garden boxes
Measure and cut the boards to 4-foot sections. Pre drill 3 holes on one end of each board. Position the boards end to end into a square, and screw them together using 6-inch wood screws.
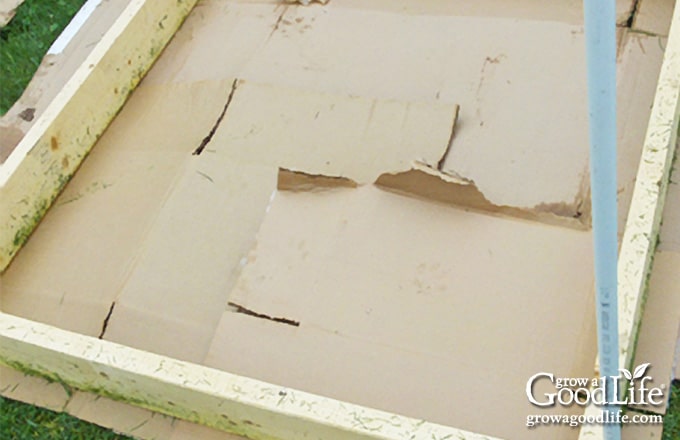
Step 3: Position the raised beds
Trim the grass low with a lawnmower or weed whacker, and position the boxes in your garden area. Place a layer of newspaper or cardboard beneath the boxes on top of the ground. The cardboard will kill the grass and decompose over time helping to eliminate weeds from growing in the new garden beds.
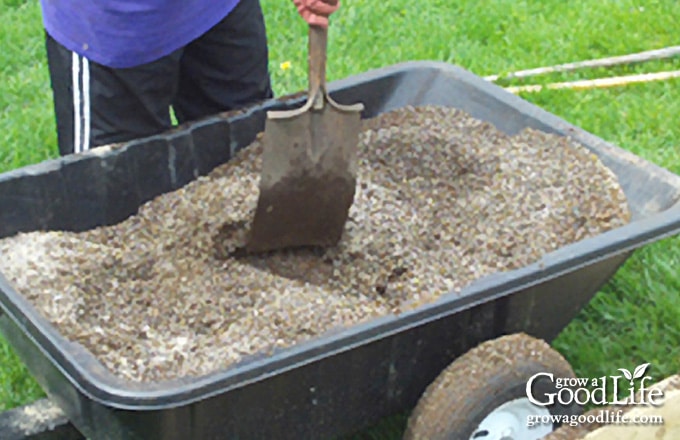
Step 4: Mix a batch of garden soil
The classic square foot garden soil mix is made from 1/3 peat moss, 1/3 vermiculite, and 1/3 finished compost from several different sources. Measure by volume, not weight. We used a 5-gallon bucket to measure out equal amounts of each ingredient.
Combine the three ingredients in a wheelbarrow, garden cart, or on a large tarp. The dry ingredients are very dusty. It is a good idea to wear a mask so you don’t breath it in. Mist with a garden hose to keep the dust down, but don’t saturate the soil until it is in the boxes.
Step 5: Fill the beds with the soil mix
Add the blended soil mix to your raised beds. As you add the soil, hose it down several times so the entire mixture is well saturated. When the boxes are full, give them a final soaking to ensure the mix is hydrated.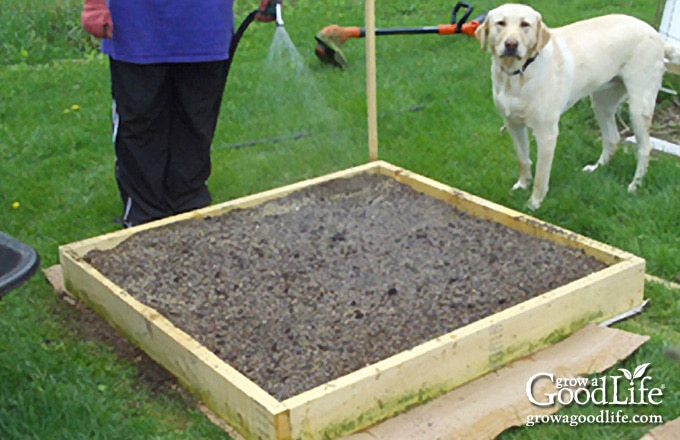
Step 6: Add your grids
Divide the bed into one-foot sections and add a permanent grid. I have used string and small nails to make the grid. You can also use mini blinds, wooden dowels, wood laths, or any thin strips of wood to make your grid.
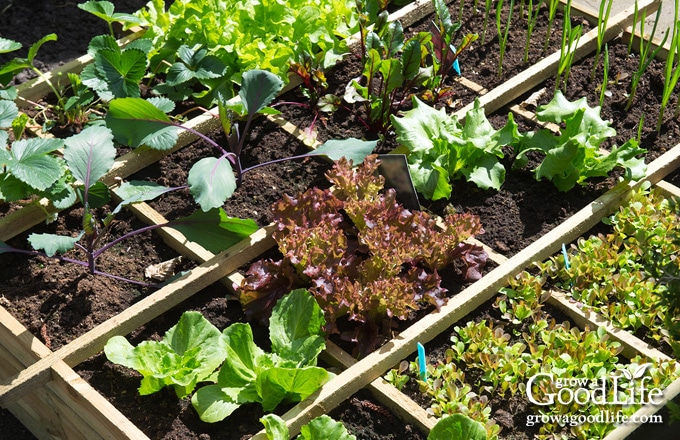
Step 7: Plant your square foot gardens
Your garden is now ready for planting. If you haven’t yet, plan out your garden by drawing a garden map so you know where everything will go.
As you plot out your square foot garden, use the spacing recommended in the book, All New Square Foot Gardening and map out the number of plants in each square. Remember to place tall plants along the north side of your beds, so they don’t shade the shorter plants.
If you don’t have the book, you can determine the plant spacing using the directions on the back of the seed packet. Refer to the distance required for thinning. This distance then determines whether you are going to plant 1, 4, 9, or 16 plants in a square. For example, “thin to 6 inches apart” is the same as spacing as 4 plants per square.
Instead of scattering seeds and thinning a lot of extra plants, sow only 2 to 3 seeds and space in a grid format, and thin extra plants with scissors to let the strongest seedling mature.
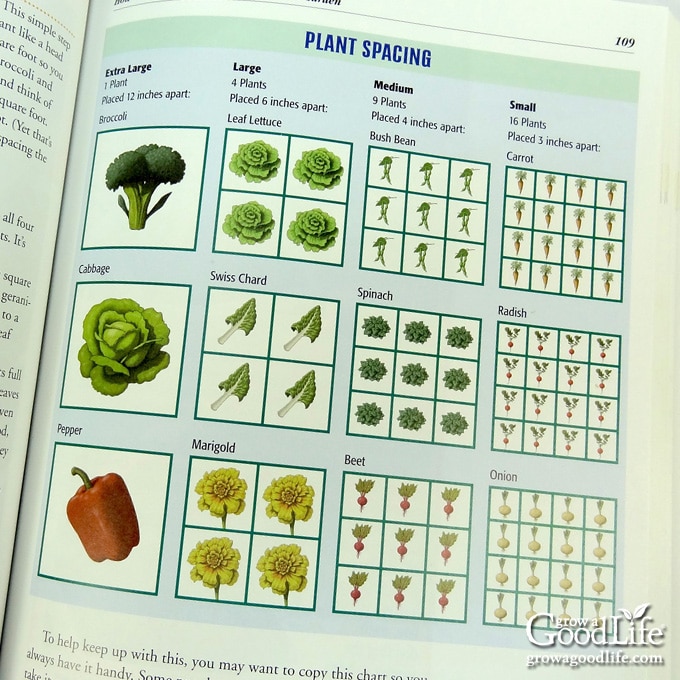
Square foot garden plant spacing:
- Extra Large = 1 plant per square (12 inches apart)
- Large = 4 plants per square (6 inches apart)
- Medium = 9 plants per square (4 inches apart)
- Small = 16 plants per square (3 inches apart)
Check out this article for an example of a salsa garden layout out using a 4×4 square foot garden with a trellis: How to Grow a Salsa Garden in a Square Foot Garden.
Additional Square Foot Gardening Tips
It has been over 10 years since we built our first square foot garden beds, and we still continue to use the square foot gardening method today. Here are some things we learned along the way:

Mulch the Soil Surface: Mulching is the best way to prevent your garden beds from drying out. Once the plants begin to sprout and grow, mulch the soil to conserve moisture and prevent weed seeds from taking hold. Learn more about garden mulch here:
Grow Vertical: You can add a trellis to the north side of the bed to grow vining crops such as pole beans, indeterminate tomatoes, or cucumbers. Growing vegetables vertically will help save space in the garden.
Extend the Growing Season: Make a dome to extend your growing season by growing under protection. Crisscross two PVC pipes and drape the beds with garden fabric or even a painting drop cloth. Just remember to vent on warm days. This is also a great way to protect your plants from an unexpected frost.
Build Healthy Soil: If you are starting out with a good quality soil with lots of compost from several different sources, you won’t have to worry about fertilizing the garden the first time you plant it. However, maintaining healthy soil and fertility is an ongoing process.
When it comes time to plant something new, add some finished compost to the square before planting. Plan on adding compost to the garden every time you plant a new crop. Learn more about healthy soil in this article:
—
The Square Foot Gardening method is worth considering if you are just starting a garden or want to expand quickly with no digging or tilling required. The method is simple to understand and makes it easy to plan your growing beds. Simply build the beds, fill them with soil, and plant according to the charts in the book.
This article was originally published on May 10, 2009. It has been updated with additional information, photos, and video.
More Vegetable Gardening Tips:
- How to Develop a Seed Starting Schedule
- 10 Steps to Starting Seeds Indoors
- Garden Planning: Mapping the Garden Beds
- Homemade Seed Mats for Square Foot Gardens
Good planning is key to a successful vegetable garden
Whether you are new to growing your own food or have been growing a vegetable garden for years, you will benefit from some planning each year. You will find everything you need to organize and plan your vegetable garden in my PDF eBook, Grow a Good Life Guide to Planning Your Vegetable Garden.

I live in zone 9 in Texas. The soil is mostly clay so I plant in containers. This idea for a 4×4 raised garden is something I will try. My only concern is the depth of soil only being 6 inches. Is 6 inches really enough for root growth?
Carol, I’m gardening up in Maine, so my growing environment is quite different from yours in Texas—especially when it comes to heat and soil type. I totally understand your concern about the soil depth.
The original Square Foot Gardening method does use a 6-inch deep raised bed filled with a light, rich growing mix, and it works surprisingly well for many shallow-rooted vegetables like lettuce, spinach, radishes, and even bush beans. But in warmer climates or with heavy feeders like tomatoes, deeper soil can be beneficial, especially when dealing with heat and rapid evaporation.
If you’re growing in containers or raised beds in Zone 9 with clay soil underneath, I’d recommend making the beds at least 8–12 inches deep if possible. That extra depth gives roots more room to grow, helps retain moisture, and reduces heat stress. You can also place your raised bed directly on the ground (rather than a hard surface) so roots can extend into the clay if needed.
I wonder if the lumber frame and plywood bottom will rot. I used pine wood.
Harlén, Yes, pine wood will rot, but you should be able to get a season or two out of it. I covered this in the article under “Wood for Raised Bed Gardens” and suggested some longer-lasting alternatives. Plywood should be avoided because it contains chemical adhesives that can leach into the soil. It also degrades quickly when exposed to moisture.
Hi! Thanks for your reply. I am new to gardening, so don’t know a lot. I only have a very shady ground spot for one bottomless sfg. I ‘ll try there, but am afraid because of the lack of direct sunlight. What would you recommend?
That’s great that you’re eager to try gardening, even in a shady spot! While direct sunlight is ideal for most crops, plenty of vegetables and herbs can thrive in partial shade. I’d recommend checking out two articles on my website that cover this topic: “Over 30 Vegetables that Grow in Shade” and “13 Culinary Herbs that Grow in Partial Shade.” These resources can provide you with valuable insights and options for planting in your shaded area.
Also, I wonder if the rotting pine wood will have a negative effect on the soil (Mel’s Mix) and the vegetables.
What should I put on the ground and under the frame? Newspaper? Cardboard?
Thanks!
The pine wood degrading over time won’t adversely affect your soil mix or veggies. Just remember to amend your garden soil with compost or organic matter each time you replant your garden to replenish nutrients and ensure healthy plant growth. You can place a layer of cardboard at the bottom, which helps suppress weeds.
If I cant find vermiculite is there a substitute I can use?
Brittany, You could substitute perlite for vermiculite. However, vermiculite is better at holding moisture, and it lasts longer. Perlite tends to float to the top of the beds when it rains, and then it can blow away. So you may need to refresh your square-foot gardens with more perlite in a year or so. You should be able to find vermiculite at your local garden center, hardware store, farm and feed store, and online. Even my local Walmart carries it.
Hi! Loved the very informative post. I am really wanting to start a garden like this, but am terrified because I don’t have a green thumb, YET! My heart sure does, though. So maybe I’ll get it worked out soon to be able to start.
Michelle, Please don’t be terrified. Starting a garden can be intimidating, but the only way to truly learn is to do it. Square foot gardening is a great way to start because you begin with good-quality soil and the proper spacing for your plants.
Growing your own vegetables can be a rewarding experience that increases your knowledge of the food you eat and gives you a sense of pride in providing for yourself. The thing with gardening is that no matter your experiences, you will have successes and failures. So focus on the successes, learn from the losses, and keep growing.
I have the book and have NOT gardened in 15 yrs. Have now taken over my son’s raised gardens, which are 4’x4′(5) of them. Have 1 planted and working on the others. Hoping this works. Have to get the vermiculite and peat moss. Don’t know how much to buy.
Marianne, You’ll need about 8 cubic feet of the square foot garden soil mix to fill one 4×4-foot box at 6-inches high. You’ll need a little less since the beds are partially filled. Once it is all mixed it you should be off to a great start this season.
This is such an awesome idea! I don’t think I could ever be this organized, but I would love to try these beds!
This is great!! We use raised beds in our front yard and I love them!
What a helpful post -I have some raised beds, but have never tried planting according to this square foot method. I am pinning this to try it next year – and may even add a new bed or two!