6 Tips to Prepare for Canning Season
This post may contain affiliate links, which means that I may receive a commission if you make a purchase using these links. As an Amazon Associate I earn from qualifying purchases.
Are you ready for canning season? It can be overwhelming when your vegetable garden harvest comes in all at once. Here are six tips to help you gather the proper canning supplies and equipment to prepare for the canning season.

One of my favorite things about summer is the abundance of fresh, organic vegetables available. The advantage of home gardening is that you can harvest and enjoy your vegetables when they are at peak flavor and nutrition.
My goal each year is to try to grow enough food for fresh eating and to preserve for winter. Since our growing season is short, this means that the majority of the harvest all comes in around the same time.
If you grow a vegetable garden, you know how crazy it can get when the harvest begins.
Some of the harvest can be cured and stored on shelves in our cool basement over winter. The garlic and onions are cured and stored in baskets, the potatoes and other storage crops will be harvested later in the fall and added to the storage shelves.
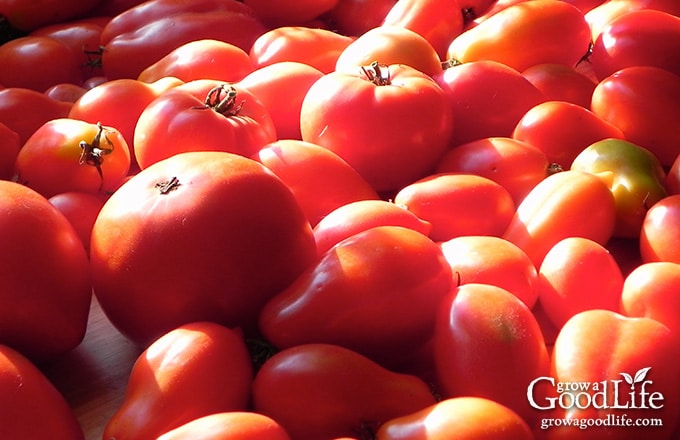
Late summer finds the kitchen counters piled high with tomatoes waiting to be turned into canned tomato sauce and salsa. The refrigerator’s crisper draws are crammed with green beans and carrots ready to be pressure canned. And the cucumbers are accumulating daily and desperately need to be turned into relish and pickles.
Yup, it is officially canning season.
How to Get Ready for Canning Season
Even though I have canned for years, I always find the first canning project of the season awkward and clumsy. It takes me a few sessions to find a rhythm.
A smooth and stress-free canning season starts with preparation. Before the harvest comes in and the kitchen fills with baskets of garden harvests, now is the perfect time to get organized, check your equipment, and ensure you have everything you need.
Taking a little time now to inspect your canners, stock up on supplies, and plan your recipes will help you avoid last-minute surprises, such as missing lids, outdated canning books, or a pressure canner that needs a new gauge.
This guide walks you through six essential steps to get ready for the canning season ahead, from checking your canners to organizing your jars and tools and stocking up on ingredients. You’ll also find links to helpful resources, including choosing the right canners and recommended safe canning books to keep your food preservation on track.
Here are tips to get everything set for a successful canning season:
1. Check Your Canners
Before the canning season begins, pull out your water bath canner and pressure canner and take time to inspect and clean them to ensure they are in good working condition and ready to go.
Water Bath Canner
Wash your canner and rack with hot, soapy water, rinse well, and allow it to dry completely. A little rust or mineral buildup is harmless, but you can remove calcium deposits with a vinegar soak if needed. Mix about one tablespoon per gallon, pour it into the canner, bring the canner to a boil, and let it cool. Scrub with a non-abrasive sponge, then rinse well.
Look over the canner and make sure it is ready for the season. Inspect for any cracks, chips, or severe rust that could weaken the canner. Ensure the handles are secure and sturdy enough to support a full load of jars.
Once dry, place a paper towel or crumpled newspaper inside the canner to absorb moisture and store it with the lid ajar.
Time for a New Canner? If your canner is severely damaged, consider repurposing it as a garden planter and upgrading to a new one. Find my recommended pots for water bath canning here.

Pressure Canner
Wash the inside and outside of your pressure canner with hot, soapy water. If you have a dial gauge canner, be careful not to get any water in the gauge. If you have an aluminum canner with discoloration, remove mineral buildup by boiling a solution of 1 tablespoon of cream of tartar per quart of water until deposits disappear.
Check over the canner well for damage. Make sure it isn’t severely pitted or warped. Pitting occurs when moisture is left inside the canner, causing corrosion. Dry the canner completely, store it with a paper towel to absorb moisture, and place the lid ajar to prevent this. Warping can happen if the canner was dropped, stored improperly, if it ran dry on the stove, or overheated (above 12,000 BTUs). A warped canner should be replaced.
- Inspect the Gasket and Seals: If your canner has a rubber gasket, check for cracks, brittleness, or wear. These should be replaced every two to three years. Order an extra replacement now to have on hand.
- Check the Pressure Plug, Vent, and Weights: Ensure that all parts are clean and free of obstructions.
- Test the Dial Gauge (If Applicable): If your canner uses a dial gauge, have it tested for accuracy through the manufacturer or your local extension office (look yours up here). An inaccurate gauge can lead to unsafe canning conditions.
Need a New Pressure Canner? If your canner is no longer safe to use, invest in a new one. Find my top pressure canner recommendations here.

Do a Test Run Before Canning Season
I also think it is a good idea to do a trial run with each canner with water-filled jars to make sure everything functions correctly. This helps you:
- Familiarize yourself with the canner and refresh your memory of the process.
- Check for seal leaks or malfunctions before using real food.
- Estimate the time needed for your stove to heat the canner, come to a boil, build pressure, process, and cool down naturally, so you can plan your upcoming canning projects.
Review your canners’ manuals to refresh your memory of the canning process. Set up your canner on the stove, and do a practice run with each canner using jars filled with water. You don’t have to use lids unless you want to can water.
2. Inspect and Organize Your Canning Jars
Before canning season begins, sort through your empty jars and organize them by size. This will make it easier to find what you need when it’s time to start preserving.
- Check for Damage: Carefully inspect each jar for nicks, cracks, scratches, and chips, especially around the rim. Set aside damaged jars for non-canning uses, such as dry food storage or crafts.
- Store Jars Safely: Hold on to the original boxes for storage, or invest in plastic totes to protect jars from dust and breakage. Storing jars upside down can help prevent debris from settling inside.
- Take Inventory and Watch for Sales: Make a rough count of your empty canning jars, so you know what you have on hand. If you’re running low, keep an eye on sales at local stores and online retailers, especially in early spring and summer when jars tend to be more readily available.
In recent years, many unfamiliar mason jar brands have appeared on the market due to shortages. Unfortunately, reports from canning communities suggest that some of these jars have quality issues, leading to breakage and wasted food.
For reliable results, I recommend sticking with trusted brands tested for home canning: Ball, Kerr, Bernardin (Canada), and Golden Harvest (Soon to be discontinued, so you may find great deals!).

Understanding Jar Sizes and Mouth Openings
Home canning jars come in several standard sizes and two different mouth openings. The most common sizes are:
- 32-ounce quarts: Ideal for canning larger portions of vegetables, fruits, and broths.
- 16-ounce pints: Versatile size for sauces, salsas, and pickles.
- 8-ounce half-pints: Perfect for jams, jellies, and relishes.
Pint and quart jars are also available in wide-mouth and regular-mouth options. Wide-mouth jars have a larger opening, making them easier to fill and clean, while regular-mouth jars work well for liquids and smaller food items. Most canners keep a mix of both sizes on hand to accommodate different recipes.
- Ball Regular Mouth Quarts
- Ball Wide Mouth Quarts
- Ball Regular Mouth Pints
- Ball Wide Mouth Pints
- Ball Half Pints
3. Stock Up on Canning Lids
Purchase plenty of new canning lids early in the season. You don’t want to run out when elbow-deep in tomato sauce. Check over all your rings and discard the distorted, dented, or rusty ones.

Just like the canning jars, an upsurge of generic canning lids is flooding the market. Unfortunately, some of these are not good quality and will not seal properly or buckle when processed. So again, I suggest sticking to well-known brand lids, such as Ball, Kerr, and Bernardin (Canada).
4. Review Your Canning Recipes
Canning safety guidelines evolve as new research emerges. Before the season begins, take a moment to review your recipes and ensure you’re following the most current, scientifically tested methods.
Pull out your canning books and printed recipes and check online for updated recipes. Familiarize yourself with the ingredients and the expected harvest needed for each recipe.

Trusted Sources for Safe Canning Recipes
With so many online recipes, knowing which ones have been scientifically tested and safe can be difficult. Avoid unsafe methods by comparing your recipes to these trusted sources:
- The National Center for Home Food Preservation (NCHFP): Bookmark this website as your primary source for rigorously tested, up-to-date canning recipes. There is also a plethora of information on safe canning backed by scientific testing, so you can be sure you are canning safely.
- BallMasonJars: Bookmark the website for up to date recipes. Ball recommends using recipe publications from 2016 or newer and applying any updates listed in their official guidelines. Check Ball’s FAQs for the latest recommendations.
- Safe Canning Books: A well-stocked canning library is essential for home preservers. See my list of recommended safe canning books here.
- Grow a Good Life: We are committed to safe, tested canning recipes. Each recipe published in our ebooks or website follows USDA canning guidelines. We include the recipe source and any safe changes we have made or suggested. In addition, all the recipes are tested in our own home kitchen, photographed, and include tips to help you prepare the ingredients. As of 2025, we have reviewed and updated all the canning recipes on our site to ensure they follow the latest safe canning procedures.
By using trusted sources and current guidelines, you can confidently preserve food that is safe, delicious, and ready to enjoy all year long.
5. Organize Your Canning Tools
Gather your canning utensils, wash them in soapy water, and rinse well. Store the clean tools in your canners so they are easy to find when you are ready to can.
If you are new to canning, I suggest investing in the following essentials:
- Canning Tool Set: The essential canning utensils often come in a set, or you can purchase them separately. The set includes a jar lifter, canning ladle, funnel, and bubble popper.
- Jar Lifter: Special tong-like tool with a rubber-coated gripper to grip and securely hold hot jars when moving them in and out of the canner.
- Stainless Steel Canning Funnel: Special funnel with a wide opening for ease in filling jars with prepared ingredients before processing in the canner.
- Bubble Popper and Measurer: Plastic tool used to gently stir the contents in the jar to release air bubbles before canning. It also doubles as a headspace measurer to help correctly measure the space between the food and the top of the jar.
- Large Stainless Steel Ladle: A large capacity, long-handled ladle used to scoop hot contents out of a pot and into the jars for canning.
- Large Canning Rack: Extra canning racks come in handy for layering when double-stacking jars in a canner.
- Small Canning Rack: Ideal for small batch canning using a large saucepot as a water bath canner. I use an 8-quart tall pot and place an 8-inch canning rack at the bottom of the pot for canning small-batches of high acid foods and pickles. It can fit 4 pint-sized canning jars, which is perfect for jam and jelly recipes.
6. Inventory Your Canning Ingredients
Assess your canning ingredient inventory, discard old or outdated items, and replace them with fresh ones. Stock up on the following canning ingredients in advance, so you are ready to go:
Vinegar
Vinegar is a key ingredient in many canning recipes, from pickles to salsas. The standard vinegar strength for home canning is 5% acidity, sometimes labeled as 50% grain. Always check the label to ensure the correct acidity level for safe preserving. Here are the three types of vinegar I always keep on hand:
- White vinegar is a clear, distilled vinegar typically made from corn and rye. It has a sharp, acidic taste, making it ideal for classic pickled vegetables. Choose an organic brand to avoid genetically modified corn.
- Apple cider vinegar is madefrom fermented apples, this vinegar has a fruity tartness that complements vegetables beautifully. Its amber color may darken pickled foods slightly, but the flavor is worth it.
- Red wine vinegar is made from fermented red wine, this vinegar brings a slightly sweet, fruity note to pickled vegetables.
Pectin
Pectin is the gelling agent that helps create thick, spreadable jams, jellies, and preserves. There are different types of pectin, and each works a little differently:
- Powdered pectin: Used in many traditional jam and jelly recipes.
- Liquid pectin: Some recipes specifically require liquid pectin, so it’s good to have both types on hand.
- Low-sugar pectin: Allows for reduced sugar or alternative sweeteners while still achieving a proper gel.
- Pamona’s Universal Pectin: My favorite type of pectin for making jams and jellies. It is a citrus pectin that lets you use less sugar and other sweetening alternatives than your typical boxed pectin. Unlike traditional pectin, it uses calcium powder to activate the gel, allowing you to use less sugar while highlighting the natural fruit flavors.
Since pectin loses its potency over time, be sure to stock up on a fresh supply.
Pickling Salt
Also known as canning salt, pickling salt is a fine-grained, additive-free salt that dissolves quickly and evenly. It’s free of anti-caking agents and iodine, which can affect food flavor and make brine appear cloudy.
Pickling Spices and Herbs
Pickling spice blends add bold flavors to pickled vegetables. You can buy a pre-mixed blend or stock up on individual spices to create custom flavors.
- Essential pickling spices include: Celery seeds, whole allspice, cinnamon sticks, powdered turmeric, peppercorns, coriander seeds, whole cloves, and red pepper flakes.
- Dried herbs are also handy for canning recipes. I always keep oregano, parsley, bay leaves, and thyme in my pantry.
Citric Acid
Citric Acid is used to safely adjust acidity in home-canned tomatoes and tomato sauces. Unlike vinegar or lemon juice, it doesn’t affect the flavor, making it a great option for maintaining the natural taste of tomatoes.
Lemon and Lime Juice
Commercial bottled lemon juice and lime juice are key for balancing acidity in canning recipes such as tomato sauces, salsas, jams, and jellies. When a recipe calls for lemon or lime juice, use bottled juice rather than fresh to ensure a consistent and safe acidity level.

Get Ready for a Successful Canning Season
Home food preservation season will be here soon. Taking the time to prepare now will set you up for a smooth and stress-free canning season. By checking your canners, organizing your supplies, reviewing your recipes, and stocking up on essentials, you’ll be ready to preserve your harvest with confidence.
A well-prepared kitchen makes canning more enjoyable and ensures that everything runs efficiently when fresh produce is at its peak. So start now—inspect your equipment, make your shopping list, and get excited for another season of home-preserved goodness!
I hope these tips will help you prepare for the bulk of canning season, and soon you will fill your shelves with jars of homegrown goodness.
Note: This article was originally published on September 2, 2015. It has been updated on April 2, 2025, to provide the most current information, improve clarity, and include new tips to help you prepare for a successful canning season.
You May Also Find the Following Canning Guides Helpful:
- Pressure Canner Buying Guide
- Canning Recipe Books to Add to Your Library
- Water Bath Canner Buying Guide

I know exactly what you mean, at the beginning of each canning season, it’s like I’ve not been canning for over half of my life. It’s so awkward, by Fall’s end, I’ve got it down to a science.
Joanne, Isn’t it funny? No matter how long I have canned, it always takes me a few sessions to get myself in the groove again.
Here’s hoping for some cooler weather for canning. I love that sense of preserving the bounty for winter at this time of year. I’ve been busy making pesto and freezing it in one-serving cubes. Next up: tomato sauce.
Jean, Funny you mention the weather. I am simmering tomato sauce and pressure canning string beans at 10:30 at night so the window fans can cool the house down before tomorrow morning.