How to Grow Onions From Seed
This post may contain affiliate links, which means that I may receive a commission if you make a purchase using these links. As an Amazon Associate I earn from qualifying purchases.
Growing onions from seed opens up a wide variety of shapes, flavors, sizes, and colors. Here are some tips on selecting varieties for your growing area and starting onions from seed indoors under lights.

Onions are a staple in the kitchen and essential for adding flavor to numerous dishes all year long. One of my garden goals each year is to plant enough onions to satisfy our meals, canned sauces and salsas, and winter storage.
Onions can be planted from transplants, sets, or started from seeds. Onion transplants are sold in bunches and can be purchased online or at your local garden center. Onions sets are immature bulbs grown the previous year and are easily found at your local garden centers and nurseries in the spring.
I remember planting onion sets as a child when my family put the garden in every spring. When I started my own garden, I continued the tradition of purchasing scoops of onion sets and pushing them into the ground in spring.
Overall, I didn’t have very good success with growing onions from sets. Some were duds that failed to sprout, and some ended up bolting before forming large bulbs. The onions that did grow from sets were rather small and lasted only a short time in storage. I also wasn’t content with the limited variety of available onion sets, usually labeled as yellow, white, and red.
Growing onions from seed opens up a wide variety of shapes, flavors, sizes, and colors.
While this article will take you through the steps to growing onions from seed indoors under lights, you can learn more about planting and growing onions with our complete growing guide: How to Grow Onions.
Tips for Growing Onion Seedlings
Growing onions from seed can be a fulfilling experience, but success hinges on a combination of timing, quality seeds, and understanding the unique characteristics of onion varieties for different growing areas. Here are some tips:
Start Seeds Early
Onions take a while to develop from seed to maturity. For early spring planting, consider starting your seeds indoors in January or February under growing lights. Then transplant hardened off seedlings to the garden as soon as the ground can be worked. This gives the plants time to establish healthy roots for optimal growth before the day length increases and triggers the bulbs to form.
If you live in warmer regions, planting onion seeds in late summer to early fall, allowing them to overwinter, sets the stage for robust growth when the weather warms.
Use Fresh Seeds Each Year
Onion seeds have a limited shelf life. Ensure success by using fresh seeds each year, purchasing only what you can use within one or two years for the best germination rate.
Choose the Right Varieties
When choosing onion seeds, tailor your selection to your intended use and growing conditions. If you plan on storing onions for winter use, choose onion varieties known for their long-term storage capabilities.
Also, be sure to select the right type of onions for your growing area based on day length. You can look up your day length here: Sunrise and Sunset Calculator. Onions are divided into short-day, day-neutral, and long-day varieties. Here’s a breakdown of onion varieties:
- Short-day onions are ideal for the plant hardiness Zone 7 and warmer, where the mild weather allows them to grow through the fall and winter months and harvested in March, April, and May. Short-day onions are triggered to bulb when the day length increases to 10 to 12 hours. Some common short-day varieties include Gabriella, Red Burgundy, Red Creole, and Vidalia. Most short-day onions will last up to 3 months when properly cured and stored in a cool location.
- Day-neutral or intermediate-day onions can grow in almost all climates and are prompted to bulb when the daylight length increases to 12 to 14 hours. Common day-neutral onions for fresh harvests include Candy, Red Long of Tropea, and Monastrell, while Cabernet, Calibra, and Red Long of Florance varieties also last a while in storage.
- Long-day onions are what we grow in the North in plant hardiness Zone 6 and colder. They are sown early under lights and transplanted to the garden in spring, so they have plenty of time to grow before forming bulbs. Long-day onions are triggered to bulb when the day length increases to 14 to 16 hours. Common long-day onion varieties include the following: Ailsa Craig, Bridger, New York Early, and Walla Walla Sweet. Long-day storage varieties that last up to 6 months when stored in a cool area include Cortland, Patterson, Powell, Red Carpet, Redwing, Rossa di Milano, and Yankee.
How to Sow Onion Seeds:
Start onion seeds indoors at least 8 to 10 weeks before your last frost date (look up yours here at PlantMaps.com). However, if you have the desire to start seeds early under lights, onions are a good choice. They only take up a little space, and since you can trim the tops, the plants won’t outgrow the indoor growing lights. Also, the larger the seedlings are at transplant size, the larger your onion bulbs will be when it is time to harvest. Here are the steps to starting onions from seed:
Step 1: Gather Your Seed Starting Supplies
Here’s what you will need:
- Grow lights: Onion seedlings need supplemental light to grow healthy and strong. See Using Grow Lights for Seedlings to learn how to set up a DIY seed-starting shelf.
- Fresh onion seeds: Onion seeds are only viable for 1 to 2 years, so it is best to purchase new seeds yearly.
- Growing containers: I use recycled berry containers to grow onion seedlings. The containers are about 4 inches deep and have a cover and plenty of holes for drainage. You can use pots, seed starting flats, or any recycled container at least 3 inches deep. Bonus if it has a cover to help hold in moisture until the seeds sprout. Wash the containers with warm soapy water, rinse well before using, and punch extra drainage holes into the bottom. Be sure also to use a seedling tray to catch water.
- Seed starting mix: Use a new seed starting mix for growing seedlings. Using soil from your garden or reusing potting soil from your houseplants can introduce disease to your young and vulnerable seedlings. Starting with a fresh, sterile, seed starting mix will help ensure healthy seedlings.
- Bucket or dishpan to pre-saturate the soil.
- Heat mat: Ideal for increasing the soil temperature to help sprout seeds quicker.
- Spray bottle to keep the soil surface damp by watering gently with a fine mist so as not to disrupt the roots.
- Liquid fertilizer, such as fish emulsion for regular feedings to grow healthy seedlings.
Step 2: Sow the Seeds
Hydrate the seed starting mix by mixing it with warm water, and let it soak for about 10 minutes until the soil is damp. Next, fill your containers with the pre-moistened seed starting mix, sprinkle the seeds evenly on top of the soil, mist them with water, cover with 1/8-inch of seed starting mix, and press down gently to be sure the seeds are in contact with the moist soil.

Step 3: Place in a Warm Location
Label the containers, place them in a seed flat or waterproof container, cover them with a humidity dome, and put them on a heat mat or in a warm area around 70 to 75˚F (21 to 24˚C). Seeds should germinate in 1 to 2 weeks.

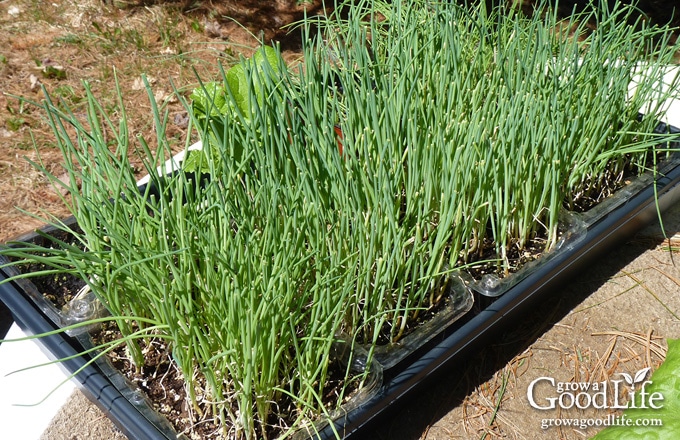
Step 4: Add Light
Once the seeds sprout, remove the humidity dome and place the containers under lights in a cool location. Onions prefer cooler temperatures, so there is no need for the heat mat after the seeds germinate.
Position the lights so they are about 2 inches above the seedlings, and adjust as the plants grow. Keep the lights on for 16 hours, and off for 8 hours. Don’t worry, artificial lights will not trigger the plants to prematurely bulb.

Step 5: Water and Fertilize
Keep the soil surface damp so the young roots don’t dry out by misting with water as needed.
As the plants become established and the roots grow into the soil, bottom water the plants by setting the containers in a tray of water so the soil can draw in moisture. Once the soil is evenly damp, remove the container, place in a dry drip tray to drain, and let the soil dry slightly between watering.
Once the plants form 2 to 3 leaves, begin fertilizing with a diluted liquid fertilizer, such as fish emulsion or compost tea every 2 weeks. Use half the dose recommended on the label so you don’t over fertilize and burn the young roots. Stop fertilizing about 2 weeks before transplanting.

Step 6: Trim the Foliage
Cut the green onion tops with scissors to keep the seedlings around 3 to 4 inches high. Regular trimming will help prevent the containers from becoming top-heavy and provide more nutrients to the roots instead of the foliage. The trimmings are edible and can be added to soups and salads or used as a garnish or pizza topping.

Step 7: Harden Off
Begin hardening off onion transplants about 4-weeks before your last expected frost date. Hardening off is the process of adapting plants to the outside so they can adjust to sunlight, cool nights, and less frequent watering. Harden off the onion seedlings in a sheltered location for a few hours on the first day, and increase the amount of time each day until the plants are outside overnight. Learn How to Harden Off Transplants with this full tutorial.
Step 8: Transplant Onion Seedlings to the Garden
Select a growing location that receives full sun or at least six hours of direct sunlight daily. Onions grow best in loose, fertile soil that drains well. Remove weeds and amend the soil with finished compost to add nutrients and organic material to aid with drainage, and work in an all-purpose organic fertilizer into the soil.
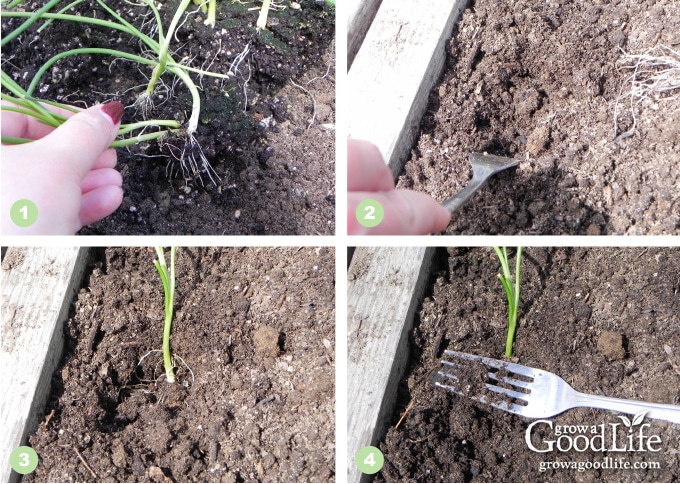
- To transplant, remove the seedlings carefully from the container by squeezing the plastic gently to loosen the roots. Then, while holding your hand over the seedlings, turn the container upside down, and shake gently.
- The root ball usually breaks apart as it is removed from the container. However, if the onions are more densely seeded, the roots will hold the soil together more firmly. Gently tease the onion seedlings apart for planting one at a time, so the roots don’t dry out.
- Transplant the separated seedlings 3 to 4 inches apart depending on the variety (check the seed package for recommended spacing). I use a fork or small tool to transplant onion seedlings. I pull the soil forward, place the onion seedling in the hole, and gently push back the soil—no patting or tamping in.
- Once seedlings are transplanted, water the bed gently. Onions have a shallow root system and need to be watered frequently to keep the soil evenly moist. Keep the bed weeded so the onions don’t have to compete for nutrients or resources.
Step 9: Grow and Care
Once the seedlings are transplanted, water the bed gently. Onions have a shallow root system and must be watered frequently to keep the soil evenly moist. Also, keep the bed weeded so the onions don’t have to compete for nutrients or resources. See How to Grow Onions for more information on caring for your plants.

Watch your weather for freezing temperatures. While onions are cold hardy, and can withstand cool temperatures, the young seedlings are vulnerable to frosts and freezes. Ways to Protect Seedlings from Unexpected Frosts.
Onions can be harvested as young as green onions or left to mature fully. Onions are finished growing when the tops flop over. Stop watering at this point and wait for a dry day to harvest. Harvest, lay out to cure, and store for winter. Visit this link for more information on How to Harvest, Cure, and Store Onions.

Onions are a staple in the kitchen and essential for adding flavor to numerous dishes all year long. One big advantage to growing onions from seed is there is more variety. I hope this seed sowing tutorial helps you learn how to sow onions indoors and transplant onion seedlings to your vegetable garden.

I love the way you include pictures to show each step of the process! I haven’t gardened much for a good number of years. But, I would like to do flowers in the spring. Do you have any flower posts?
Weeds are my onion enemy! Due to back issues I am not able to get down on the ground & and weed them constantly. What do you do about those?
Two years ago I planted from sets and got the best. biggest onions of my life. Last year I planted sets from the same source and every one died. They just rotted in the ground after a few weeks. It was so sad & a waste of money. I am need to plant seeds this year.
DJ, I hate weeding so I use mulch a lot. Once the onions are established, I mulch heavily with straw or shredded newspaper. Weed seeds will have a more difficult time sprouting with no light. Just be careful not to smother your onions.
Onions are my garden nemesis! I appreciate the straight forward tips you give here. I am going to attempt them again this year with the bed improvements I’ve made and your tips. Thanks for sharing this article.
I have tried to grow onions from seeds before without good results. Last year I planted small bulbs, not sets, and ended up with the best onion harvest yet!! You make this seem pretty easy, but I think I may as well give it another shot!
I have been planting onion seed indoors for years now. Try to grow enough to get us through the winter without having to spend a lot, seeds are the way to go. I use the 3.4″ soil cubes though, planting one seed per cube. Makes transplanting a breeze!
Great easy-to-follow instructions. I would love for you to share this on The Maple Hill Hop!
Good tutorial. Onions from seeds are the way to go. It’s not surprising that sets tend to bolt since onions are biennials. Sets are OK if you want to pull them as green onions but are not the way to get large onions. Plus your selection of varieties is extremely limited.
Great tutorial. This was my first year growing onions and it was, by far, the best new veg in the garden. Many people don’t want to grow onions because they are so “cheap” to purchase, but I think they are really missing out. The quality (and keeping ability) of home grown onions can’t be beat.
Lovely instructions. I’ve never liked sets either. I’ve always grown mine from seed. This year though I’m thinking about buying plants instead of starting my own. I’ve never done that before.
Daphne, I was reminded how much I dislike growing onions from sets this past year. My seeds were old and many failed to germinate, so I planted sets along with the transplants I grew from seed. I was glad to have a back up option, but noticed a lot of the sets were duds or the onion bolted.
Geez… You make me want to plant something! Two years ago I planted seeds in the spring. It didn’t work, they didn’t reach harvest size by the end of the Summer. I basically had a bunch of sets in my hands. So the year after that I planted the sets in the spring and got a beautiful bunch of onions by the end of the season. I wish I had room indoors to start them in Jan like you do, but I don’t. However, I heard that here in NC (zone 7b) you can plant the seeds directly in the ground in the Fall for next year harvest. So this is what I did this past Fall. I have about 400 seeds in the ground. They germinated, but they are just there now…. Not growing but they also don’t die in the freeze. I guess they will start growing again when it gets warmer. I am curious to see if I get to harvest nice size onions next year.
Thanks for this great post!
Lee, Yes, since you are in NC you can direct seed Short Day onion varieties mid September through late October in the garden and overwinter. They will stay dormant until it warms up and daylight increases. I’ll be following along to see how your onions do next summer.