Homemade Seed Mats or Seed Tapes
This post may contain affiliate links, which means that I may receive a commission if you make a purchase using these links. As an Amazon Associate I earn from qualifying purchases.
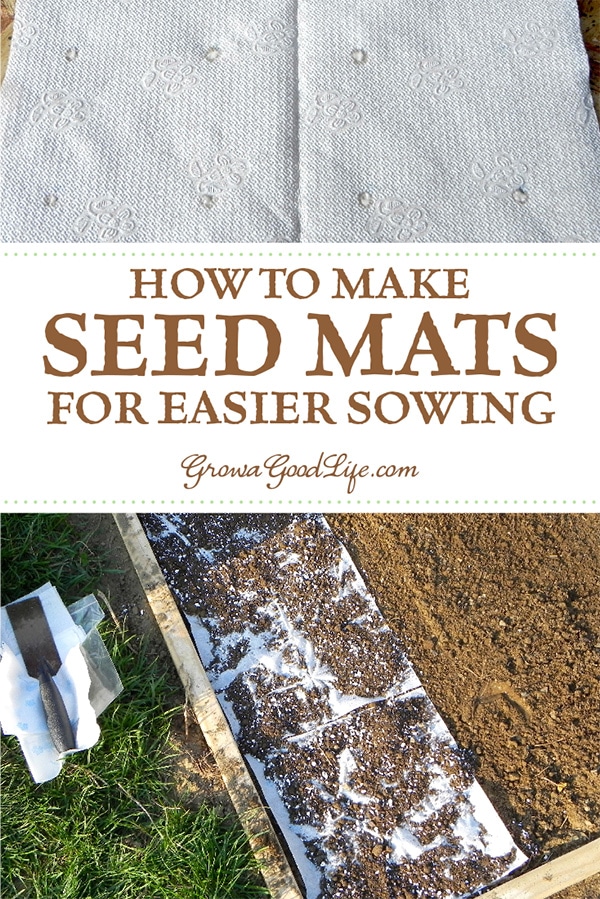
Seed mats are helpful for planting tiny seeds, such as lettuce and carrots that are hard to sow one at a time.

Instead of scattering seeds then thinning later, creating seed mats allows you to space out the seeds according to the suggested spacing on the back of the seed package or Square Foot Garden spacing recommendations. I have used seed mats for sowing carrots, lettuce, and spinach with good results over the years. This year, I prepared seed mats for carrots, lettuce and succession plantings of spinach.

Seed mats made with napkins work particularly well for the Square Foot Gardens because one napkin fits into one square. Even if you garden in rows, strips of napkins or even bathroom tissue can be used to make your seed tape.
How to Make the Seed Mats:
 You’ll need:
 You’ll need:
- 12 x 12 inch cardboard square
- Marker
- Ruler
- Thin napkins
- Flour and enough water to make a paste
- Toothpicks
- Seeds
- Tweezers
Make a Template:
Check the back of the seed package for the recommended seed spacing or refer to the Square Foot Garden’s guidelines. This example is for carrots which are 3-inches or 16 per square foot.
Measure 1.5 inches (half of 3) in from the upper left corner, then measure 3-inches across and mark along your cardboard. Do the same along the other edges and then draw your lines. Place a dot with your marker where the lines intersect. There are 3-inches between each dot.

Make Your Seed Mat:
- Mix the flour and water together to make a paste. It should coat a toothpick without dripping off.
- Open up the napkin and layer it on your template.
- Using the dots as a guide, dab a drop of the paste onto the napkin with your toothpick.
- Use tweezers to place two seeds into each dab of paste.
- Write the name of the variety on each mat and allow it to dry completely.


Once the seed mats are dry, they can be folded up and stored in a zipper bag until ready to plant.

When planting time comes, it is easy to place the seed mats in the beds, cover with soil, and water.

At first it seems like extra work to make the seeds mats compared to sowing the seeds directly in the garden. But having the seed mats prepared ahead of time to plant when the soil is ready will save some time. I find it easier to make seed mats at my leisure inside rather than hovering over a garden bed trying to space out tiny seeds evenly.
You May Also Like:
- How to Organize Seeds and Make a Seed List
- Mapping the Garden Beds
- How to Develop a Seed Starting Schedule
- 13 Easy Vegetables to Direct Sow
Great article, thank you for sharing! How long can you store the seed mats for? Will the flour-paste mix affect the seed at all? I’d like to get started on these but won’t be able to plant for a few more months on some seeds – should I just wait until a closer time? Thanks again, looking forward to doing this with my kiddies 🙂
Romi, I have made the seed mats up to 2-weeks before planting, let them dry completely, and stored them in zipper bags. It would be a fun project for the kiddies, but I would try to wait until it was closer to planting time. Moisture does affect the seed. Have fun 🙂
Great idia, sure going to have a go.Thank you
Why do you place two seeds? If the mats mean you don’t need to thin, wouldn’t you still need to thin them if both seeds germinate? Is it just as insurance that one will germinate? I’m excited to try this!!!
Rachel, I like to use two seeds to be sure that at least one will germinate and grow. I want to maximize the growing space and not have any gaps in between the plants. I have never had to thin using seed mats. Even if two seeds sprout initially, only one usually survives to mature. I urge you to experiment though and let me know how it works out for you 🙂
Looks like a great method! I’ve never used mats before, and I’m a relative newbie gardener so I have what may be a very silly question – Do you put the mats on the soil seed-side down or seed-side up?
Not a silly question at all! I try to place mine seed side down, but either way will be ok because the napkins will break down quickly.
Great idea!
I used Granny’s seed mats last year for carrots and it was the first time I got carrots to germinate (even though germination was poor because of the weather). We also used them at a local school, which has a raised bed garden for the special needs life skills class. The kids had a blast making the seed mats, and it nicely matched their skills and controlled the eventual planting process so they could be successful.
Dave, the kids must have had so much fun making the seed mats. It seems like a great way to get them involved with gardening. I still have trouble germinating spring carrots unless I keep the bed evenly moist. Fall carrots germinate quicker because of the heat and require less daily care once they get going.
I love them as well & used them with success last year for carrots – until the slugs got at my seedlings just as they were coming up……sigh
Margaret, I have difficulty growing carrots and this is the only method that seems to work. I hope the slugs leave your alone this year.
Keep your egg shells and put on baking sheet and bake at 200 degrees for an hour to kill bacteria.then crush egg shell. With a blender and then place around the base of those carrots. No more slugs catepillar etc. Will cross the sharp pieces of the egg shells and if you bury a few along side the carrots,they will add calcium to the soil,which a benefit too!
Great tip, Ronald! Thanks for sharing.
I salt my rows for root vegetables. It helps keep the pests out
Morgan, salt may keep the pests away, but you are also harming your soil. Here is an article with more info:
http://articles.extension.org/pages/63502/solutions-to-soil-problems:-high-salinity
I know so many people that love them, but I’ve found that seed mats just aren’t for me. I’d rather spend the time thinning. But ask me again when I have to go out an thin my carrots. lol
I don’t like thinning because of the extra work and a loss of potential in the sprouted seed. Of course, the chickens would enjoy the thinnings 🙂
I have been using Granny’s seed mat method for a few years now. They work great! I make them ahead of time also. A gardener needs something to do during the winter! I use bathroom tissues instead of napkins though. It’s just the right width for my garden layout.
It does take some time to make the seed mats ahead, but it is a nice gardening task to do if you can’t get outside to garden.
I always start with napkins now. That gives me the option to cut them in strips if I need to add an entire row or two, or just need to fill in an area that didn’t want to germinate.
I block plant most of my garden now, but do cut the napkins to fit too. While researching for this post, I found so many people sharing your idea and linking back to your blog. It must be one of your most viewed posts. Thanks to this method, I am able to grow fall carrots more successfully.