How to Harvest, Cure, and Store Onions from the Garden
This post may contain affiliate links, which means that I may receive a commission if you make a purchase using these links. As an Amazon Associate I earn from qualifying purchases.
Wondering when to harvest onions and how to keep them from sprouting or spoiling in storage? This guide will walk you through harvesting, curing, and storing onions from the garden so you can enjoy your homegrown harvest through the winter months.

Storage onions are one of the crops I count on most to carry us from one garden season to the next. Each year, I grow a mix of onions for fresh eating, but most of the onions I plant are chosen for one important job: lasting through the winter in storage.
There is nothing quite like reaching for your own homegrown onions months after harvest to add flavor to soups, stews, roasts, chili, and everyday meals. But getting onions to store well takes more than simply pulling them from the garden and setting them aside. The timing of the harvest, the curing process, and the storage conditions all make a big difference in how long they last.
Here in Maine, my storage onions are usually ready in early August, when the tops begin to flop and the bulbs have finished sizing up. From there, I cure them in a dry, airy spot and store the best bulbs for winter use. Over the years, I have found that a little extra care at harvest time goes a long way toward preventing spoilage and sprouting later on.
In this guide, I will share how to tell when onions are ready to harvest, how to cure onions properly, and the best ways to store onions so they stay in good condition for months.
Why Proper Harvesting, Curing, and Storage Matter
Growing storage onions takes months of planning and care, from starting seeds under lights in winter to transplanting seedlings into precious garden space in spring. After all that effort, it is worth taking a little extra time at harvest to help them last as long as possible.
Onions that are harvested at the right stage, cured fully, and stored in the right conditions are less likely to soften, mold, rot, or sprout before you have a chance to use them.
Curing is especially important for long-term storage. As onions cure, the outer layers dry into papery skins, the necks tighten, and the bulbs form a protective covering that helps seal out moisture. If onions are stored before they are fully cured, moisture can become trapped in the neck or outer layers, which may lead to spoilage later.
Good storage conditions help preserve the quality of your onion harvest through the winter months. A cool, dark, dry place with good airflow slows sprouting, discourages mold, and keeps the bulbs firm and flavorful longer.
Best Onion Varieties for Winter Storage
If you want onions that will last for months after harvest, start with varieties known for good storage. Sweet onions are wonderful for fresh eating, but they usually have a higher water content and thinner skins, so they don’t keep as long as storage onions. For winter storage, look for firm, pungent onion varieties that are described as long-keeping or good for storage.
Choose the Right Onion Type for Your Climate
It is also important to choose the right type of onion for your growing region. Onions are sensitive to day length, which means they begin forming bulbs when daylight reaches a certain number of hours. Choosing the right type for your area helps the plants bulb properly and mature in time for harvest.
Long-Day Onions
Long-day onions are best for northern climates, generally Zone 6 and colder. These onions begin forming bulbs when daylight reaches about 14 to 16 hours. They are usually started indoors in late winter and transplanted into the garden in early spring.
Here in Maine, I grow long-day onions for winter storage. Since our growing season is short, onions are the first seeds I sow for the approaching garden season. I start them indoors under grow lights in January or February so they have plenty of time to develop strong foliage before bulb formation begins.
Short-Day Onions
Short-day onions are best for southern climates, generally Zone 7 and warmer. These onions begin forming bulbs when daylight reaches about 10 to 12 hours. They are often planted in fall and harvested in late spring or early summer, depending on the region.
Short-day onions are better suited to mild-winter areas because they can grow through the cooler season and bulb before the heat of summer arrives.
Intermediate-Day Onions
Intermediate-day onions, sometimes called day-neutral onions, grow best in the middle range, roughly Zones 5 to 7. These onions begin forming bulbs when daylight reaches about 12 to 14 hours and can be a good choice for gardeners who fall between northern and southern growing regions.
Varieties such as Candy and Superstar are examples of intermediate-day onions that may work well in these areas.
My Favorite Storage Onion Varieties
Patterson, Cortland, Rossa di Milano, and Redwing have all done well in my garden and are the varieties I rely on most for storing through the winter months.
- Yellow Storage Onions: Patterson is one of my favorite yellow storage onions because it keeps very well and has a strong onion flavor that works beautifully in soups, stews, chili, roasts, and everyday cooking. Cortland is another reliable yellow storage onion with firm bulbs and good keeping quality.
- Red Storage Onions: For red onions, I like Rossa di Milano and Redwing. Rossa di Milano has a rich flavor and stores well for a red onion, while Redwing produces beautiful deep red bulbs that hold up nicely in storage when cured properly.
If you are still planning your onion crop, you can learn more about planting onions from seeds, sets, and transplants in my guide: How to Grow Onions. If you want to start your own seedlings indoors, visit: How to Grow Onions from Seed.

When to Harvest Onions
Onions can be harvested at any stage for fresh eating, but storage onions should be allowed to mature fully before harvesting. Mature onions have larger bulbs, tighter skins, and better keeping quality than onions pulled too early.
Signs Your Onions Are Ready to Harvest
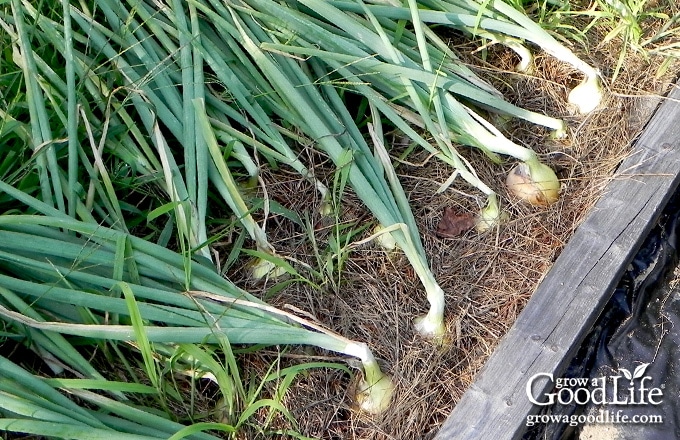
The easiest way to tell when onions are ready to harvest is to watch the tops. As the bulbs finish growing, the foliage begins to yellow, weaken, and flop over at the neck.
This is a natural sign that the plant has stopped sending energy into the leaves and the bulbs have reached maturity.
At first, you may notice just one or two onion tops falling over. Soon, more will follow. Once about half to most of the tops have flopped over, it is time to begin watching the weather and planning your harvest.
Here in my Maine garden, this usually happens in early August, but the exact timing can vary depending on your climate, planting date, onion variety, and growing conditions. A cool or cloudy season may delay maturity, while hot, dry weather can speed things along.

Stop Watering Before Harvest
Once the tops begin falling over, stop watering and let the onions dry down for several days if the weather allows. Wait for a dry stretch to harvest so the bulbs are not pulled from wet soil. Harvesting during dry weather helps reduce excess moisture and gives the onions a better start on the curing process.
Should You Wait for All the Tops to Fall Over?
You don’t have to wait until every onion top has fallen over before harvesting. Once about half to most of the tops have flopped, the crop is usually close to ready. At that point, watch the weather and plan to harvest during a dry stretch.
If a few onions are still standing but the rest of the crop is mature, you can harvest the whole bed or pull the mature onions first and give the others a little more time.
Any onions with thick, green necks should be used fresh or preserved another way because they usually don’t store as well.
How to Harvest Onions
Once your onions have finished growing and the tops have flopped over, wait for a dry stretch of weather before harvesting. Dry soil is easier to work with, and the bulbs will have less moisture clinging to the outer skins.
Step 1: Harvest on a Dry Day
Choose an overcast day if you can, or harvest early in the morning before the sun is too strong. Freshly pulled onions can sunscald if they sit in hot, direct sunlight for too long, so move them to a shaded, airy spot as you work.
Step 2: Loosen the Soil First
Use a garden fork to gently loosen the soil around the onions before pulling them. Insert the fork several inches away from the bulbs to avoid piercing or bruising them, then lift the soil enough to make the onions easier to remove.
Step 3: Lift and Handle Gently
Grasp each onion near the neck, just above the bulb, and gently pull it from the ground. Avoid yanking, tossing, or knocking the bulbs together. Even small bruises, cuts, or punctures can shorten storage life.
As you harvest, set aside any onions that are damaged, soft, thick-necked, or showing signs of rot. These should be used fresh or preserved another way instead of going into long-term storage.
Step 4: Let Them Dry Briefly in a Shady Spot
If the soil is dry, you can brush off loose dirt with your hands. Avoid washing storage onions before curing because extra moisture can settle into the necks and outer layers.
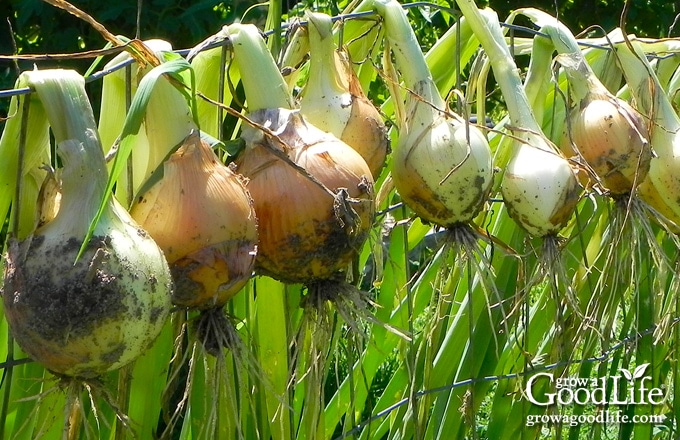
If the sky remains cloudy after harvesting, you can spread the onions out on the garden fence or a similar structure to allow any remaining soil to dry and be shaken off. If the sun is out, move the onions to a dry, shady area out of direct sunlight to prevent sunscald.
How to Cure Onions
After harvesting, onions need time to cure before they are stored. Curing is the process of drying the outer skins, roots, and necks so the bulbs form a protective wrapping that helps them keep longer in storage.
As onions cure, the outer skins dry into papery layers, the roots dry down, and the necks tighten. A dry, sealed neck is especially important because moisture can enter through this area and cause the onion to soften or rot in storage.

The best place to cure onions is somewhere warm, dry, shaded, and airy. A covered porch, shed, garage, barn, or other sheltered outbuilding can work well as long as the onions are protected from rain, direct sun, and excess humidity. Good airflow helps the bulbs dry evenly and reduces the chance of mold or soft spots.
Step 1: Spread Onions Out in a Single Layer
Arrange the onions in a single layer on a clean, dry surface. Wire racks, screens, slatted shelves, or mesh trays work especially well because they allow air to circulate around the bulbs. If you don’t have racks, you can spread the onions out on newspaper, cardboard, or a dry table and turn them occasionally so they cure evenly.
Do not stack onions while they are curing. Crowding the bulbs can trap moisture and lead to mold, soft spots, or uneven drying. Leave space around each onion so the skins and necks can dry thoroughly.
Step 2: Keep Them in a Dry, Shaded, Airy Place
Keep the onions in a warm, dry, shaded location while they cure. Good airflow is important because it helps moisture evaporate from the outer skins and necks. Avoid damp basements, closed bins, or humid areas where moisture can linger around the bulbs.
Direct sunlight can also be a problem during curing. A little brief drying in the garden is fine if the weather is mild and dry, but onions should not sit in hot, direct sun for long periods. Strong sun can heat the bulbs and may cause sunscald, which can shorten storage life.
Step 3: Check the Onions Regularly
Check the onions every few days while they cure. Turn them as needed, brush off loose soil once it dries, and remove any bulbs that show signs of mold, rot, soft spots, or sprouting. One spoiled onion can affect others nearby, so it is better to catch problems early.
This is also a good time to watch for onions with thick necks or damaged bulbs. These usually will not store as long as fully mature, firm onions, so set them aside to use first.
Step 4: Cure Until the Necks Are Tight and the Skins Are Papery
Onions usually take 2 to 4 weeks to cure, depending on the size of the bulbs, humidity level, temperature, and airflow. They may cure faster in warm, dry weather and take longer during humid or rainy periods.
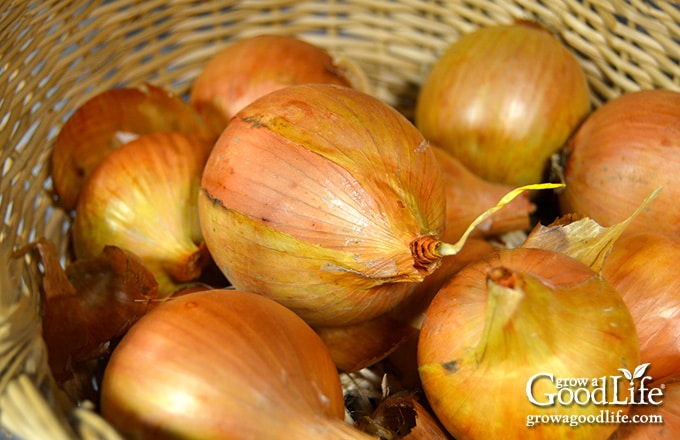
You will know onions are fully cured when the outer skins are dry and papery, the roots are dry and wiry, and the necks are tight and completely dry. The tops should be brown and shriveled with no green remaining near the bulb. If the necks still feel thick, moist, or flexible, give the onions more time to cure before trimming and storing them.
How to Prepare Onions for Storage
Once the onions are fully cured, they can be cleaned, trimmed, and sorted for storage. I like to bring the cured onions back outside on a dry day for this step because the loose dirt, dry roots, and papery skins can get a little messy.
Step 1: Trim the Tops
Use clean scissors or garden snips to trim the dried tops to about 1 to 2 inches above the bulb. Avoid cutting too close to the onion, especially if the neck still feels a little thick. Leaving a short stem helps protect the bulb and reduces the chance of moisture entering through the neck.
Step 2: Trim the Roots
Trim the dry roots close to the base of the onion, but be careful not to cut into the bulb itself. The goal is to remove the wiry roots without damaging the basal plate, which can shorten storage life if nicked or cut.
Step 3: Brush Off Dry Soil
Gently brush off any dry soil clinging to the outer skins. It is fine if some of the loose, papery outer layers flake away as you handle the onions, but avoid peeling them down to the fresh layers underneath. Those dry outer skins help protect the bulbs in storage.
Do not wash onions before storing them. Even after curing, extra moisture can settle into the neck, roots, or outer layers and may lead to mold or rot later.
Step 4: Sort the Onions
As you trim and clean the onions, inspect each one carefully. Set aside any bulbs that are soft, bruised, cut, sunscalded, thick-necked, sprouting, or showing signs of mold or rot. These onions should be used first or preserved another way instead of going into long-term storage.
Only firm, fully cured, unblemished onions should be stored for winter. Taking the time to sort them now helps prevent one damaged onion from spoiling the rest of your harvest later.
Best Conditions for Storing Onions
After onions are fully cured, trimmed, and sorted, they should be stored in a cool, dry, dark place with good airflow. You don’t need a traditional root cellar to store onions successfully, but you do need to avoid warmth, moisture, and poor ventilation.
Keep Onions Cool
Storage onions keep best in a cool location. Ideally, they should be stored around 32 to 40°F, but any consistently cool space is better than a warm kitchen or pantry. Cool temperatures slow sprouting and help the bulbs stay firm longer.
An unheated basement, enclosed porch, insulated garage, or cool closet may work if the temperature stays above freezing and does not fluctuate too much. Avoid places that become warm during the day or freeze during cold nights.
Keep Onions Dry
Moisture is one of the biggest causes of spoilage in stored onions. Choose a dry location with low humidity and good air circulation. Damp basements, sealed containers, or areas with condensation can encourage mold, soft spots, and rot.
If your storage space tends to be humid, check your onions more often and consider using a fan or dehumidifier to improve airflow and reduce moisture.
Keep Onions in the Dark
Light can encourage onions to sprout, so store them in a dark place or cover the storage container with a breathable cloth. Avoid plastic covers or sealed lids, which can trap moisture around the bulbs.
Allow Good Airflow
Good ventilation helps keep onions dry in storage. Store onions loosely so air can move around the bulbs. Avoid piling them too deeply or packing them into closed bins, where moisture can build up and one spoiled onion can quickly affect the rest.
Best Ways to Store Onions
The best way to store onions is in a container that allows good airflow around the bulbs. Avoid sealed plastic bags, airtight bins, or deep containers where moisture can become trapped. Even after curing, onions continue to benefit from dry air and ventilation.
Store Onions in Baskets or Crates
Baskets, shallow crates, and wooden boxes work well for storing onions because they allow air to move around the bulbs. Arrange the onions loosely instead of piling them too deeply. If you have a large harvest, use several smaller containers rather than one deep bin.
Check the onions regularly through the winter and remove any that begin to soften, sprout, or show signs of mold.
Store Onions in Mesh Bags
Mesh bags are another good option because they allow airflow and can be hung in a cool, dark storage area. Fill the bags loosely so the onions are not packed too tightly, and hang them where air can circulate around the bag.
If you reuse mesh produce bags, make sure they are clean and dry before filling them with cured onions.

Store Onions on Wire Shelves or Slatted Racks
Wire shelves, slatted shelves, or drying racks are helpful if you have the space to store onions in a single layer. This method gives each bulb plenty of airflow and makes it easy to spot any onions that need to be used first.
This is a good option if you have a basement storage area, pantry shelf, or root cellar setup.
Braid or Tie Onions for Storage
If you leave the tops long after curing, you can braid or tie onions together and hang them in a cool, dry place. This traditional method works best with onions that have flexible dried tops and firm, fully cured bulbs.
Braided onions should still be checked regularly, especially where the bulbs touch each other. Remove any onion that begins to soften or sprout so it does not affect the rest of the braid.
How Long Do Homegrown Onions Last?
How long onions last depends on the variety, how well they were cured, and the conditions where they are stored. Sweet onions and onions with thick necks usually have a shorter storage life, while firm, pungent storage onions can last for several months when cured and stored properly.
Under good storage conditions, many storage onion varieties can last 6 to 9 months. Here in my garden, Patterson and Redwing usually keep the longest and often last well into spring before they begin to soften or sprout.
Check stored onions regularly through the winter. If you find any that are softening, sprouting, molding, or developing a strong odor, remove them from storage right away. One spoiled onion can affect others nearby, so it is better to catch problems early.
Onions that are just beginning to sprout or soften can still be used if they are otherwise firm and show no signs of mold or rot. Use these onions first in cooked recipes, or chop and freeze them for later.
What to Do with Onions That Won’t Store Well
Not every onion will be suitable for long-term storage, and that’s okay. Some bulbs may be bruised during harvest, have thick necks, cure unevenly, or begin to soften or sprout sooner than the rest. These onions should be set aside and used first.
Keep your best, firmest, fully cured onions for winter storage, and use imperfect onions in everyday cooking. Chopped onions can be added to soups, stews, chili, casseroles, roasted vegetables, stir-fries, and skillet meals.
If you have more onions than you can use fresh, consider preserving them another way. Onions can be chopped and frozen for cooked recipes, dehydrated into onion flakes or onion powder, or pickled using a tested recipe.
I usually keep an eye on my stored onions as winter goes on. Once I notice some beginning to soften or sprout, I pull those from storage and either use them right away or preserve them before they spoil.
Frequently Asked Questions About Harvesting, Curing, and Storing Onions
Have questions about harvesting, curing, and storing onions? Here are quick answers to some common questions about knowing when onions are ready, how long to cure them, and how to keep your homegrown onions in good condition for winter storage.
Keep Your Onion Harvest Going
Harvesting, curing, and storing onions takes a little extra time, but it is well worth the effort when you can reach for your own homegrown onions months after the garden has been put to bed. By choosing good storage varieties, waiting until the bulbs are mature, curing them fully, and storing them in a cool, dark, dry place, you can help your onion harvest last for months after harvest.
Check your stored onions regularly and use any that begin to soften or sprout before they spoil. Even the onions that don’t make it into long-term storage can still add plenty of flavor to soups, stews, sauces, roasted vegetables, and other everyday meals.
With a little care at harvest time, your onion crop can continue feeding your kitchen long after the growing season ends.

I like to chop up some of my onions and pre measure out and put in zip lock bags and pop in the freezer. That way when I want onions in a dish but am short on time I just dump the pre measured onions in while my meat is cooking and they are perfect! Huge time saver and great way to store those extra onions that are reaching the end of their shelf life.
Very helpful information for starting onion seeds.
I dehydrate my onions. It seems to consume the least time and they last so much longer.
Great post! Looking forward to getting our onions harvested in the next week. Thank you!
I’m determined to grow onions next year.
Great post! We’ve been getting loads of onions from our CSA this season and I’ve been thinking about how I want to save them. This has been very helpful!
Thank you,
Christine
Fantastic tips & beautiful pictures. Hanging them on the fence to cure is a genius idea! I’m visiting from Our Simple Homestead blog hop.
Thanks
Angie
I planted 7 varieties of onion, leeks, and two garlic varieties…We love all of these so much!! My question is–if the tops flop over from little feet should they be harvested or will they still grow? Foliage still green and onions pretty small still. Let me know your thoughts. Thanks!
Krista, They may still grow. I would let them go for a while and wait until the foliage begins to turn brown.
My mother braided her onions instead of cutting the neck once they were cured. She hung them from nails around the edge of the store room in our basement. They can then be used by cutting them from the braid, bottom onions first.
Laura, I love how pretty braided onions look. Plus it would be much easier to keep an eye on them to check for any rotting.
What a fabulous article! Thank you! I always grow a lot of onions and did NOT know how to cure or store, so many many rotted.