Planning Your Vegetable Garden: Mapping the Garden Beds
This post may contain affiliate links, which means that I may receive a commission if you make a purchase using these links. As an Amazon Associate I earn from qualifying purchases.
Mapping your vegetable garden before planting helps you see how many seedlings you need, where they will be planted, and how you can keep each bed producing all through the growing season.

Late winter is the perfect time to plan your vegetable garden. After enduring snowstorms and cold temperatures for months, I begin wondering whether spring will ever come at all.
Thoughts of warmer days and fresh garden harvests encourage me to the next step in planning a vegetable garden: Mapping the Garden Beds.
After organizing your seed box, paging through the catalogs thinking about what to grow, and making a seed wish list, the following step is to figure out how everything will fit into the garden.
Things to consider when planning the garden beds
Before sowing a single seed, it is helpful to sketch a map of the garden so you know how many seedlings you will need, where they will be planted, and how you can keep each bed producing all through the growing season.
Plant Spacing
Don’t be tempted to overcrowd your garden. Each plant requires a certain amount of space to grow healthy and produce an abundant harvest. Plants that are too close together will compete for nutrients, moisture, and airflow.
Overcrowded plants will actually produce less and become more susceptible to pests and diseases. Follow the recommended plant spacing specified on the seed packages.
Crop Rotation
It is beneficial to rotate plant families from one garden bed to another each growing season. Vegetables that are in the same family use similar nutrients and are vulnerable to the same pests and diseases. Planting different crop families from year to year helps to avoid depleting the soil and prevents crop specific pests and diseases from building up from one season to the next. In my garden, I focus on five vegetable plant families for rotation planning purposes:
- Allium Family: chive, garlic, leeks, onions, and shallots.
- Solanaceae Family: eggplant, peppers, potatoes, tomatillo and tomatoes.
- Brassica Family: broccoli, cabbage, cauliflower, collards, kale, kohlrabi, mustard greens, radish, rutabaga, spinach, and turnip.
- Cucurbit Family: cucumbers, gourds, melons, pumpkin, and squash.
- Legume Family: beans and peas.
The plants in each family are grouped together and planted in the same beds, so I can easily move them to a different bed the following year. Other vegetables such as lettuce, corn, carrots, and herbs are worked in where there is room, but I try not to plant them in the same spots two years in a row.
Growing Vertical
Tall trellised plants such as peas, pole beans, and indeterminate tomatoes are limited to the north end of the garden beds, so they don’t shade other plants.
- Learn More: 9 Creative DIY Trellis Ideas
Succession Planting
Even in my Maine Zone 5 garden, I can grow up to three crops in the same garden space if schedule carefully. Quick growing crops such as spinach, lettuce, and other various greens can be planted in spring. Once the warmer weather arrives, spring greens usually turn bitter and bolt. These can be removed, fed to the chickens, and the space used to grow bush beans. Once the bush beans are finished producing, a fall crop of spinach, lettuce, and other cool-season crops are planted.
Winter Storage Inventory
The inventory of the preserved garden bounty from the previous year also factors into the amount of plants in the plan. I don’t weigh my harvests, but do keep notes on the number of plants grown from year to year. At the end of winter, I inventory what is left in storage and decide if I need to increase or decrease the number of plants grown to provide us with enough preserved food until the following years garden begins to produce.
- Learn More: 9 Crops to Grow for Winter Food Storage
How to Map the Vegetable Garden Beds
Planning begins with a blank garden diagram and the list of plants that you want to grow.
Before you begin plotting out your garden layout, review the list of crops you want to grow, decided roughly how many plants of each vegetable you would like to raise, and review the seed package to see how much area each plant will need.
The way you approach mapping out your garden beds will depend on your priorities.
- Learn More: Choosing What to Grow in the Garden
For example, we rely heavily on canned tomato sauce, canned salsa, and frozen tomatoes to use in soups and stews. So tomatoes, peppers, onions, and garlic are considered necessities in the garden and take priority on the garden space.
I begin with these crops and plot out where they will be planted for the new season. Then I move on to other crops that will need trellis supports and extra space to grow. Finally, I fill in with short seasoned spring crops along with what will be planted once these crops are finished.

Step 1: Sketch the Garden Area
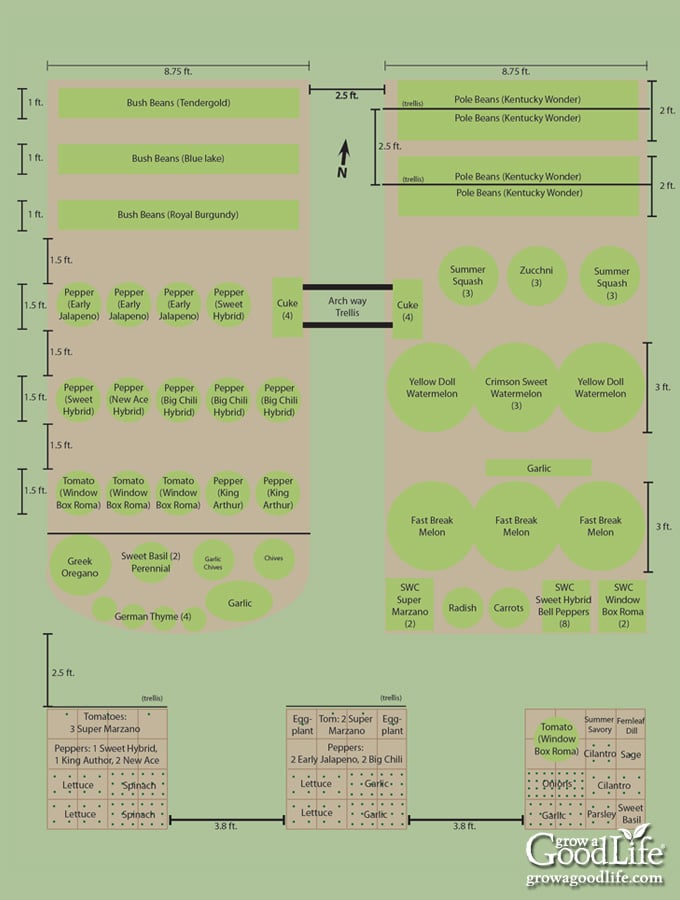
First, make a sketch of the garden area showing the dimensions of your garden beds. This can be done on a computer program or simply drawn out on graph paper.
Step 2: Plot the Plants on the Map
Refer to your seed list and begin arranging the crops in the garden map. Use square foot garden spacing or the recommended space between plants indicated on the back of your seed package to estimate how many plants you can grow in an area.
Step 3: Start with High Value Crops
Start plotting your garden with the crops you consider important. For example, tomatoes, peppers, onions, and garlic are very high value in our garden. These are plotted first on my garden map to ensure there is plenty of room to grow enough of these crops for preserving.
Remember to account for crop rotation and avoid planting the same plant families in the area they grew last year.
Step 4: Decide Which Vegetables to Grow Vertically
Move on to crops that need trellis supports to grow. Remember tall crops should grow on the north side of your beds, so they don’t shade other plants.
Plan out where you will grow your indeterminate tomatoes, cucumbers, pole beans, peas, and other crops that will benefit growing with supports.
Step 5: Give Vining Crops Plenty of Room
Vining crops, such as squash, pumpkins, and melons will need plenty of room to sprawl. Be sure to locate these plants in an area where they can grow long vines without smothering other plants. I like to plant these along the edges of my garden beds and let the vines trail out into the paths if they need to.
Step 6: Fill in With Other Crops
Finally, fill in with short seasoned spring crops along with what will be succession planted in summer and fall once these crops are finished. For example, spinach, lettuce, and salad greens will grow in spring, and then replant the beds with bush beans when the spring crops are finished growing, followed by cool season crops again in fall.
Tuck in a few herbs and flowers where space allows, but avoid overcrowding your plants so they have plenty of space to grow strong.
—
There you have it! A general idea of how your vegetable garden will be planted in the spring. This plan may change come planting time and as the season progresses, but this is great starting point.
Mapping the garden beds each year will help give you a plan to follow, making it easy to figure out the amount of seeds and seedlings you will need to fill the space.
In addition, mapping the garden beds provides a record of what was planted in each location from year to year to help with crop rotation for next year.
The next step in Planning Your Vegetable Garden -> How to make a planting and seed-starting schedule so you know when to sow your seeds.
You May Also Like:
- How to Build Raised Beds
- Vegetables to Grow in Shady Gardens
- 10 Steps to Starting Seedlings Indoors
- Crops to Direct Sow in the Garden
Good planning is key to a successful vegetable garden
Whether you are new to growing your own food or have been growing a vegetable garden for years, you will benefit from some planning each year. You will find everything you need to organize and plan your vegetable garden in my PDF eBook, Grow a Good Life Guide to Planning Your Vegetable Garden.


Hi Rachel, Have just come across this site & I’m enjoying all I’m learning, signed up for the newsletter too. We’ve recently moved to Vancouver Island, BC. (zone 8b) & this year I’ll be planting my first veggie garden ‘here’, it’s been over 25 years since I’ve had a veggie garden. There is certainly a lot to absorb with all the amazing (new to me) information available. The new garden area was roto-tilled, the grass composted, weeds removed. Multiple bags of manure, 30 I think, and 2-½ large peat moss were added to the existing clay ground. We purchased soil with sand, humous, compost and added it to the mix. Fall rye & mustard seed were planted and 4″ of seaweed. All sprouted very quickly but has been covered in frozen snow for over a month, It’s been raining hard all day, so I hope to see the yard tomorrow.. I’ve looked at the info on mulches, I thought straw was a hit, but I’m concerned about it seeding down & mold? I’ve started a garden binder, with all the research notes. I will go through your info, edit, print & add to the binder for reference & reminders. I do not have raised beds, flower and veggie gardens have all been amended, the best we could. I really appreciate your advice to plant veggies in families, I have not come across this. Companion gardening & planting for the “Bees’ are my main focus, so I will not be planting in rows (I don’t think). Thanks again for enlightening me & I look forward to ‘More’..
Hi Donna, It sounds like you are on your way to a great gardening season. One thing to remember is that there is no right or wrong way to grow food. It is all trial and error to figure out what works well for you. Straw mulch, unlike hay shouldn’t have seeds. Or if it doesn, it shouldn’t have many seeds. Straw is the hollow stalks left over after threshing oats, wheat, or barley. Mold shouldn’t be a problem unless you have drainage issues. Straw mulch does break down, but as it does, it adds organic matter to the soil. You should cover your soil with some sort of mulch to help prevent weeds, hold in moisture, and prevent nutrient loss. You can learn more about mulch here: 5 Ways Organic Mulch Helps Your Garden.
You can still use crop rotation in your garden; just divide the plot into sections and plant by family with companion planting worked in. Or you can mix it up. It is all up to you. Most importantly is that you have fun and enjoy the process of nurturing your plants.
What family is okra in?
Charlotte, Okra is in the Malvaceae botanical family. There aren’t many other garden vegetables in this family, but you can group it with the Solanaceae family because it has similar growing needs. Feel free to plant okra in the same beds as eggplant, peppers, potatoes, tomatillo and tomatoes.
I’ve really been enjoying your posts so far. I’m a new gardener so there’s still so much I don’t know yet. I understand the logic of planting vegetables together by ‘family’…but my concern is this: I grow almost exclusively heirloom/heritage varieties, and so keeping seeds pure is very important. If say, I intend to grow 3-4 different varieties of pumpkin or watermelon, wouldn’t putting them together in the same bed run too high a risk of cross-pollination? (Also…would it be safe to plant my purple tomatillos in the same bed as my tomatoes? (cross-pollination wise)
Margaret, Yes, isolation is very important if you are saving seeds but you really need a large distance (up to a mile) to try to keep the plants isolated. It is really difficult to do in a backyard garden surrounded by other folks who garden as well. Bees and wind can spread pollen a mile away. Tomatoes and beans are considered self-pollinating. These are less likely to cross-pollinate, but it can happen.
I am new to your site and I am really enjoying it! Your articles are so informative and your instructions are so easy to follow. Thank you for giving your time and knowledge.
Rebecca, Thank you for your kind comment. I have learned so much from other gardeners over the years. I enjoy sharing what works for me in the hopes that it inspires others.
Thanks for this article and reminder that I need to get this year’s garden planning started.
Seeing you mapping out your garden beds is a reminder that spring really will come — as difficult as that may be to believe right about now. The lengthening days also give me hope. I’m very grateful that this last storm missed us.
Jean, This was the best blizzard ever! I am so happy we did not receive the predicted additional foot of snow this time around. I am trying so hard to think spring right now and planning the garden is helping boost my spirits.
I adore mapping out my garden beds each winter. I usually do it several times just because I enjoy it so much. lol
Thanks Rachel for this valuable information which I pinned. Also liked it on Facebook. I especially will pay attention to the growing seasons of each veggie. As you mentioned, I will plan to re-use space for more than one crop in a season.
I am new-ish to food gardening but I have big ideas. Signed up for your newsletter because there seems to be such good information for someone like me.
Mapping beds is what keeps us going through the winter! Can’t wait to start putting them in come spring. Great post!
Actually I have a follow up question – I am starting some new beds in a location I don’t think has ever been tilled before. What are your recommendations for adding to the soil and starting mulch on a new bed?
Hi Kirsten, Compost will be the best thing to add to a bed no matter what the quality of the soil. Organic matter will help soil structure and provide nutrients. After digging the bed, add at least 4-inches of compost and work into the soil. I would also suggest getting a soil test to see if there are any nutrient deficiencies (http://www.csrees.usda.gov/Extension/). If you start digging the beds and find the soil too poor, you can always add a square foot garden on top of the soil (https://growagoodlife.com/square-foot-garden/). For mulch, I really like using straw. I hope this helps.