How to Freeze Peppers (Sweet or Hot, No Blanching Needed)
This post may contain affiliate links, which means that I may receive a commission if you make a purchase using these links. As an Amazon Associate I earn from qualifying purchases.
Learn how to freeze peppers the easy way. This step-by-step guide shows how to freeze sweet or hot peppers without blanching for quick meals all winter.

Got an abundance of peppers from your garden? Whether you’re harvesting sweet bell peppers or fiery hot chiles, freezing is one of the easiest ways to preserve peppers and enjoy them long after the growing season ends.
If you grow peppers in your vegetable garden, you know how productive the plants can be once they get going. By late summer, it’s not unusual to have more peppers than you can use fresh.
Here in the north, our growing season is short, so I try to leave peppers on the plants as long as possible to give them time to fully ripen and develop their best flavor. Then it happens… the dreaded end-of-season frost warning.
As soon as frost is in the forecast, I head out to the garden with baskets and bowls, gathering every pepper I can find before the cold damages the plants.
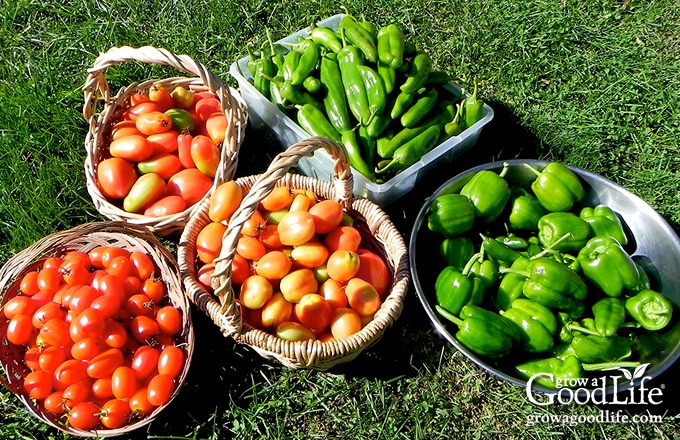
When you suddenly have piles of peppers on the counter, freezing is the quickest way to preserve them. The good news is that peppers are one of the few vegetables that freeze well without blanching first. With just a little prep, you can freeze sweet or hot peppers and have them ready to add to soups, stir-fries, fajitas, and other cooked dishes all winter long.
In this guide, you’ll learn how to freeze peppers step-by-step, including tips for freezing bell peppers, hot peppers, and even whole peppers for quick meals later.
If you’re looking for more ways to store your harvest, see my guide on preserving peppers for additional methods like dehydrating, pickling, and canning in shelf-stable jars.
Can You Freeze Peppers?
Yes, peppers freeze very well and can be frozen without blanching first. Unlike many vegetables that require blanching to preserve quality, peppers can be frozen raw with very little preparation.
While frozen peppers do lose some of their crisp texture after thawing, they keep their bright color and fresh pepper flavor. This makes them perfect for adding to cooked dishes like soups, casseroles, stir-fries, fajitas, omelets, and sauces.
Both sweet peppers and hot peppers freeze well, including bell peppers, jalapeños, serranos, banana peppers, and many other varieties. You can freeze peppers sliced, diced, or even whole, depending on how you plan to use them later.
Freezing peppers is one of the easiest ways to preserve a large harvest and keep garden-fresh flavor on hand throughout the winter.
Why Freezing Is the Easiest Way to Preserve Peppers
When the garden suddenly produces more peppers than you can use fresh, freezing is one of the simplest ways to preserve the harvest. Unlike canning or dehydrating, freezing requires very little equipment and only a few minutes of preparation.
Here are a few reasons why freezing works so well for preserving peppers:
- No blanching required: Peppers are one of the few vegetables that can be frozen raw without blanching first.
- Quick and easy: With just a knife, baking sheet, and freezer bags, you can preserve a large batch of peppers in a short amount of time.
- Great for cooked dishes: Frozen peppers hold their flavor and color well, making them perfect for soups, sauces, stir-fries, fajitas, omelets, and casseroles.
- Convenient portions: Freezing peppers in small pieces or strips makes it easy to grab just what you need for a recipe.
While frozen peppers won’t stay crisp like fresh ones, they retain their flavor beautifully and are perfect for adding garden-grown goodness to your meals all winter long.
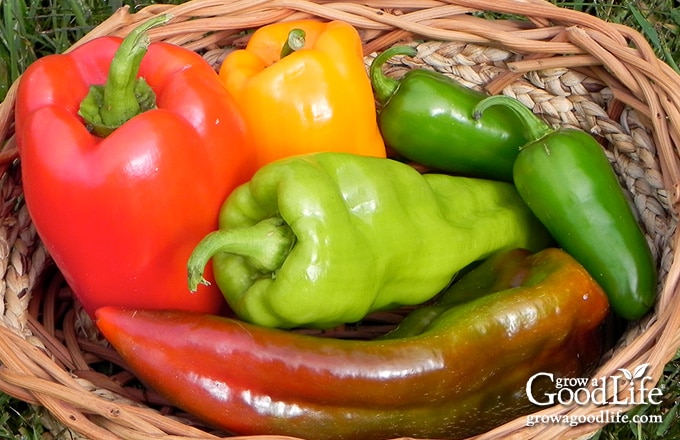
What Types of Peppers Can Be Frozen
Most fresh peppers freeze very well, making this a great way to preserve both sweet and hot varieties from your garden or farmers’ market. Whether you have a handful of peppers or a large harvest to process before frost, freezing helps you save them for later meals.
Sweet Peppers
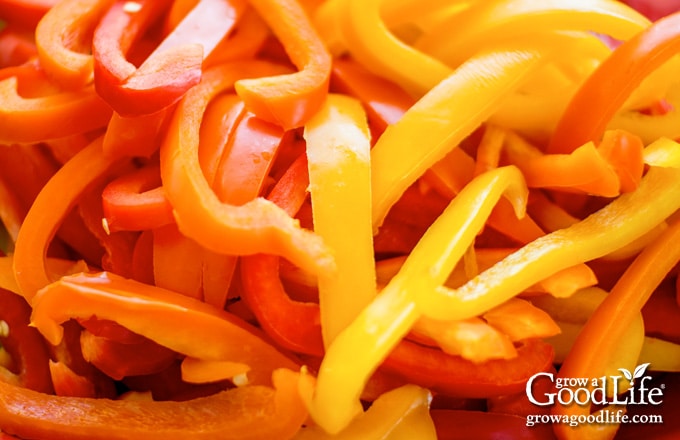
Sweet peppers are some of the easiest peppers to freeze. They can be sliced, chopped, or diced and added directly to cooked dishes later.
Common sweet peppers that freeze well include:
- Bell peppers (green, red, yellow, or orange)
- Cubanelle peppers
- Banana peppers
- Sweet Italian frying peppers
- Pimento peppers
Bell peppers are especially popular for freezing because they are easy to prep and convenient to use in soups, casseroles, stir-fries, and fajitas.
Hot Peppers
Hot peppers can also be frozen easily and often require very little preparation. Smaller peppers are frequently frozen whole, while larger peppers can be sliced or chopped before freezing.
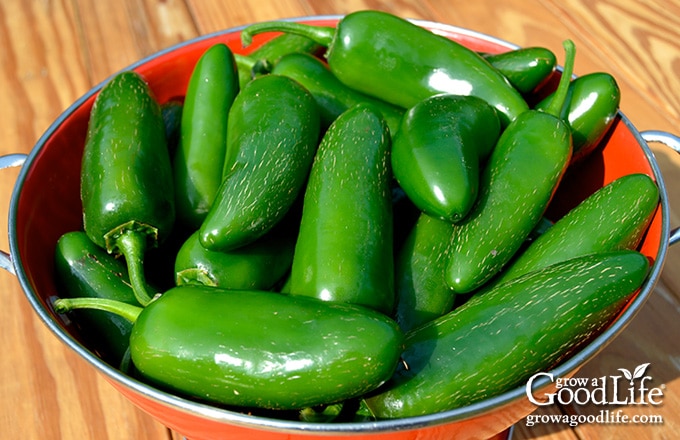
Hot peppers that freeze well include:
- Jalapeños
- Serrano peppers
- Habanero peppers
- Thai chiles
- Anaheim or Hatch chiles
When handling hot peppers, it’s a good idea to wear gloves to protect your skin from the oils that can cause irritation.
No matter the variety, freezing is a simple way to preserve fresh peppers so they are ready to use in your favorite cooked recipes throughout the year.
How to Freeze Peppers (Step-by-Step)
Freezing peppers is simple and only takes a few basic kitchen tools. The key is to prepare the peppers the way you plan to use them later, so they are ready to add directly to your favorite recipes.
Step 1: Select Fresh Peppers
Start with firm, freshly harvested peppers that have no blemishes, soft spots, or signs of decay. Peppers from your garden or a local farmers’ market will give you the best flavor.
Wash the peppers thoroughly to remove any dirt or residue, and allow them to air dry on a clean kitchen towel.
Step 2: Prepare the Peppers
Think about how you plan to use the peppers later and cut them into the shapes that will work best for your recipes.
Preparing Bell Peppers
Remove the stems, seeds, and membranes from bell peppers. Then slice, chop, or dice them as desired.
I like to slice bell peppers into strips because they are easy to grab by the handful for fajitas or stir-fries. Diced peppers are also handy to have in the freezer for soups, omelets, casseroles, or pizza toppings.
Preparing Hot Peppers
Thin-skinned hot peppers such as jalapeños, serranos, and similar chiles can be frozen whole or chopped into pieces before freezing.
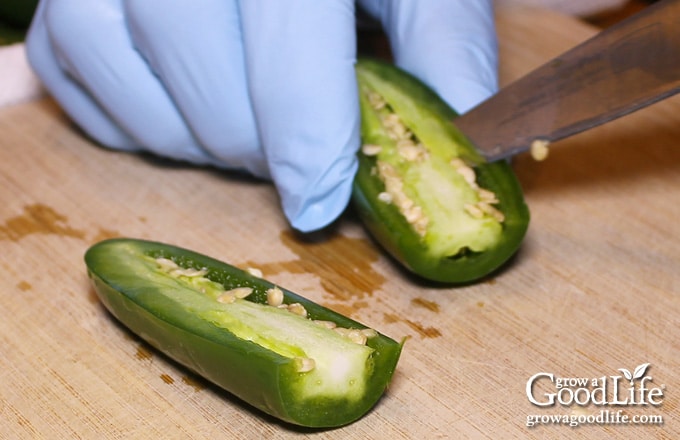
If you plan to make jalapeño poppers, you can slice the peppers in half and remove the seeds before freezing. When you’re ready to use them, fill the frozen halves and place them directly into the oven.
Wear gloves when handling hot peppers to prevent the oils from irritating your skin.
Preparing Thick-Skinned Peppers (Anaheim or New Mexico Chiles)
Peppers with thicker skins, such as Anaheim or New Mexico chiles, are often roasted and peeled before freezing.
To peel them, blister the skins by grilling or broiling the peppers until the skins crack and separate from the flesh. Remove them from the heat and place the peppers in a covered glass bowl so they can steam.
Once the peppers are cool enough to handle, remove the skins, stems, seeds, and membranes. Wearing gloves is recommended when working with these peppers.
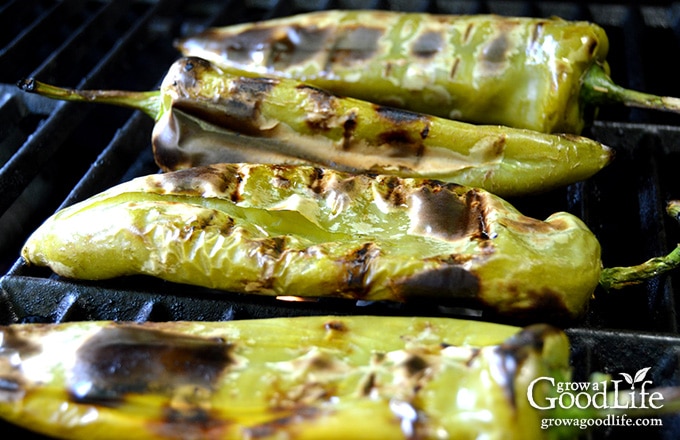
You can learn more about this process in my guide on how to roast and peel peppers.
Step 3: Flash Freeze the Peppers
Pre-freezing the peppers on baking sheets helps prevent the pieces from sticking together in the freezer. This makes it easy to grab a handful whenever you need them.
Line a cookie sheet with parchment paper and spread the prepared peppers out in a single layer so they are not touching. Place the baking sheet in the freezer until the peppers are frozen solid, about 1 to 2 hours.
Step 4: Package for Freezer Storage
Once the peppers are frozen, transfer them into freezer bags or freezer-safe containers.
Remove as much air as possible from the bags before sealing. Label each bag with the contents and the date, then store them in the freezer.
For the best quality, use frozen peppers within 8 to 10 months.
How to Freeze Whole Peppers
Smaller peppers can easily be frozen whole, which makes this method especially convenient for hot peppers and thin-skinned varieties. Freezing peppers whole saves time because there is very little preparation required.
This method works well for peppers such as:
- Jalapeños
- Serrano peppers
- Banana peppers
- Thai chiles
- Other small garden peppers
To freeze whole peppers:
- Wash the peppers thoroughly and allow them to dry completely.
- Remove the stems if desired, although this step is optional.
- Spread the whole peppers in a single layer on a parchment-lined baking sheet.
- Place the baking sheet in the freezer and freeze until the peppers are solid, about 1 to 2 hours.
- Transfer the frozen peppers to freezer bags or freezer-safe containers.
Freezing the peppers on a baking sheet first prevents them from sticking together, making it easier to remove just the amount you need later.
Whole frozen peppers are great for adding to soups, sauces, stir-fries, and other cooked dishes. If needed, you can slice or chop them while they are still partially frozen.

How to Freeze Bell Peppers
Bell peppers are one of the most common peppers to freeze because they are easy to prepare and incredibly versatile in the kitchen. Freezing them in ready-to-use pieces makes it simple to add garden-grown peppers to meals all year long.
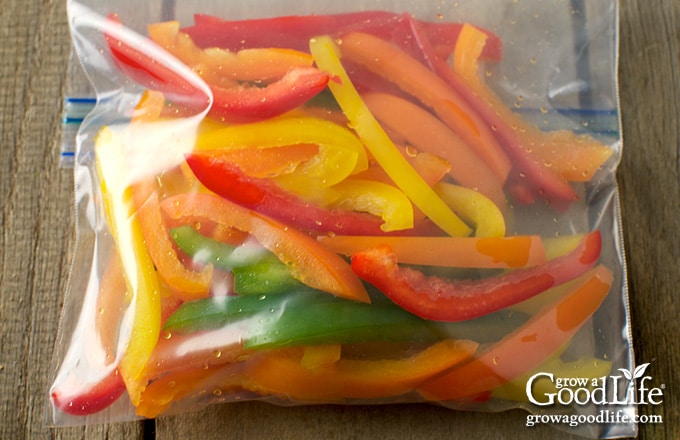
Start by washing the peppers and removing the stems, seeds, and inner membranes. Then cut the peppers into the shapes that work best for your cooking.
Common ways to prepare bell peppers for freezing include:
- Strips: Perfect for fajitas, stir-fries, and skillet meals.
- Diced: Great for soups, chili, casseroles, and omelets.
- Rings: Ideal for pizza toppings or sautéed pepper dishes.
Once the peppers are cut, spread the pieces in a single layer on a parchment-lined baking sheet and freeze until solid. Then transfer the frozen peppers to freezer bags or containers for long-term storage.
This flash-freezing method prevents the pieces from clumping together so you can easily scoop out a handful whenever a recipe calls for peppers.

How to Freeze Hot Peppers
Hot peppers freeze just as easily as sweet peppers and often require very little preparation. Many gardeners prefer freezing hot peppers because it preserves their flavor and heat for later use in sauces, soups, and spicy dishes.
Small hot peppers can be frozen whole, while larger peppers are usually sliced or chopped before freezing.
Common hot peppers that freeze well include:
- Jalapeños
- Serrano peppers
- Habanero peppers
- Thai chiles
- Cayenne peppers
To prepare hot peppers for freezing, wash them thoroughly and allow them to dry. You can freeze them whole, sliced, or chopped, depending on how you plan to use them later.
For example, jalapeños can be frozen whole for use in sauces, sliced for nachos and pizzas, or cut in half and seeded for jalapeño poppers.
Because hot peppers contain oils that can irritate your skin, it is best to wear gloves while cutting and handling them.
Once prepared, freeze the peppers on a baking sheet until solid, then transfer them to freezer bags for storage.
Do Peppers Need to Be Blanched Before Freezing?
No, peppers do not need to be blanched before freezing. In fact, peppers are one of the few vegetables that freeze well without blanching first.
Blanching is often used for vegetables like green beans or broccoli to stop enzyme activity that can affect texture, color, and flavor during storage. However, peppers hold their flavor and color well when frozen raw, making the process much quicker and easier.
Simply wash, prepare, and freeze the peppers using the flash-freezing method described above.
While frozen peppers will soften slightly once thawed, they still work beautifully in cooked dishes such as soups, stir-fries, casseroles, sauces, and fajitas. Because of this texture change, frozen peppers are best used in recipes where they will be cooked rather than eaten raw.
How Long Do Frozen Peppers Last?
Frozen peppers will maintain their best quality for about 8 to 10 months when stored properly in the freezer. After that time, they are still safe to eat but may begin to lose some flavor and texture.
For the best results:
- Store peppers in airtight freezer bags or freezer-safe containers.
- Remove as much air as possible before sealing to help prevent freezer burn.
- Label each bag with the contents and the date so you know how long they have been stored.
Keeping your freezer at 0°F (-18°C) or colder will help maintain the quality of frozen peppers for the longest possible time.
How to Use Frozen Peppers
Frozen peppers are incredibly convenient to have on hand and can be added directly to many cooked dishes without thawing first. Because freezing softens their texture slightly, they are best used in recipes where the peppers will be cooked.
Here are some easy ways to use frozen peppers:
- Stir-fries: Toss frozen pepper strips into a hot skillet with vegetables and protein for a quick meal. Try this Sweet and Sour Stir-fry recipe.
- Fajitas: Add frozen sliced peppers to sautéed onions and seasonings for flavorful beef or chicken fajitas.
- Soups and stews: Stir diced peppers into soups, chili, and stews for added color and flavor.
- Omelets and scrambled eggs: Frozen diced peppers are perfect for breakfast dishes.
- Casseroles: Mix chopped peppers into baked dishes like lasagna, enchiladas, or pasta casseroles.
- Pizza toppings: Sprinkle diced peppers over homemade pizza before baking.
If needed, frozen peppers can also be chopped easily while still partially frozen.
Having a bag of frozen peppers in the freezer makes it easy to add garden-grown flavor to meals throughout the year.

Tips for Freezing Peppers Successfully
Freezing peppers is simple, but a few small tips can help you get the best results and make them easier to use later.
- Start with firm, healthy peppers. Choose peppers that are fresh, crisp, and free from soft spots, blemishes, or signs of decay. The better the quality of the peppers going into the freezer, the better they will taste when you use them later.
- Freeze peppers in meal-sized portions. Dividing peppers into smaller amounts makes it easy to grab just what you need for a recipe.
- Flash freeze first. Freezing the pepper pieces on a baking sheet before bagging prevents them from sticking together.
- Remove as much air as possible. Squeezing excess air out of freezer bags helps reduce freezer burn and maintain quality.
- Label and date your bags. This helps you keep track of how long the peppers have been in the freezer.
- Use frozen peppers in cooked dishes. Because freezing softens their texture, they are best used in soups, stir-fries, casseroles, and other cooked recipes.
With just a little preparation, freezing peppers is an easy way to preserve your harvest and enjoy the flavor of fresh garden peppers throughout the year.
Frequently Asked Questions About Freezing Peppers
Since this article was first published in 2016, readers have shared lots of great questions about freezing peppers her and on social media. Here are quick answers to some of the most common questions that come up when preserving peppers from the garden.
Can you freeze peppers without blanching?
Yes, peppers can be frozen without blanching. Unlike many vegetables, peppers freeze well when raw. Simply wash, cut, and freeze them using the flash-freezing method so the pieces don’t stick together. While the texture softens slightly after thawing, frozen peppers keep their flavor and color well for cooked dishes.
Can you freeze peppers whole?
Yes, smaller peppers can be frozen whole. Wash and dry the peppers, then place them on a baking sheet in a single layer and freeze until solid. Transfer the frozen peppers to freezer bags for long-term storage. Freezing them individually first helps prevent them from sticking together.
Can you freeze bell peppers whole?
Bell peppers can be frozen whole, but most people prefer to slice or dice them before freezing for easier use later. If freezing whole bell peppers, remove the stems and seeds first. Whole peppers take up more freezer space, so cutting them into strips or diced pieces is often more convenient.
Can you freeze jalapeños?
Yes, jalapeños freeze very well. They can be frozen whole, sliced, or chopped depending on how you plan to use them. Some gardeners freeze jalapeños whole for sauces, while others slice them for easy use in nachos, pizzas, and cooked dishes.
Do frozen peppers become mushy?
Frozen peppers soften slightly after thawing because freezing breaks down their cell structure. While they lose some crispness, they still retain their flavor and color.
Because of this, frozen peppers are best used in cooked dishes like soups, stir-fries, casseroles, and sauces.
How long do frozen peppers last?
Frozen peppers maintain their best quality for about 8 to 10 months when stored in airtight freezer bags or containers. They are still safe to eat after that time, but may gradually lose flavor and texture
How to Freeze Peppers (Sweet or Hot, No Blanching)
Ingredients
- 6 peppers of choice
Instructions
Prepare the Peppers
- Bell Peppers: Trim out the stems, membranes and seeds of bell peppers. Peel, slice, chop, or dice depending on how you will use them.
- Jalapeño Chiles: I freeze jalapeños, Serrano, and other thin skinned chiles whole, but you can also remove the stems, seeds, membrane, and chop into pieces before freezing. Wear gloves when working with hot peppers.
- Anaheim Chiles: To peel skins, blister the pepper by grilling or broiling until the skins crack and separate from the flesh. Remove from the peppers from heat and place in a covered glass bowl to steam. Once the peppers are cool enough to handle, remove skins, stems, seeds, and membrane. Wear gloves to prevent burning your hands.
Freeze
- Line baking sheets with parchment paper, and arrange the pieces on the trays so they are not overlapping.
- Place the baking sheets in the freezer and freeze until the peppers are solid, about 1 to 2-hours.
- Add the frozen peppers to freezer bags, remove air by sucking out with a straw, and seal the bag. Label, date, and store the frozen peppers in the freezer until you are ready to use. Use within 8-10 months.
Notes
Nutrition
Freeze Your Pepper Harvest for Later
When pepper plants are producing heavily in the garden, freezing is one of the quickest and easiest ways to preserve the harvest. With just a little preparation, you can freeze both sweet and hot peppers so they’re ready to use in soups, stir-fries, casseroles, fajitas, and other cooked dishes year-round.
Keeping bags of frozen peppers in the freezer makes it easy to add garden-grown flavor to everyday meals, even long after the growing season has ended.
If you enjoy growing your own food, you may also find my guide on how to grow peppers helpful for planning next year’s garden and getting an even bigger harvest.
If you love salsa, consider adding our eBook, Grow a Good Life Guide to 50 Salsa Canning Recipes, to your resource library. This 72-page eBook is packed with a variety of delicious salsa recipes, including classic tomato salsas to roasted and grilled salsas to tomatillo and delicious fruit blends, all safe for water bath canning. It’s the perfect guide to help you preserve your garden harvests.

Thank you so much!! I’m doing this today!