Good Old-Fashioned Pickled Dilly Beans
This post may contain affiliate links, which means that I may receive a commission if you make a purchase using these links. As an Amazon Associate I earn from qualifying purchases.
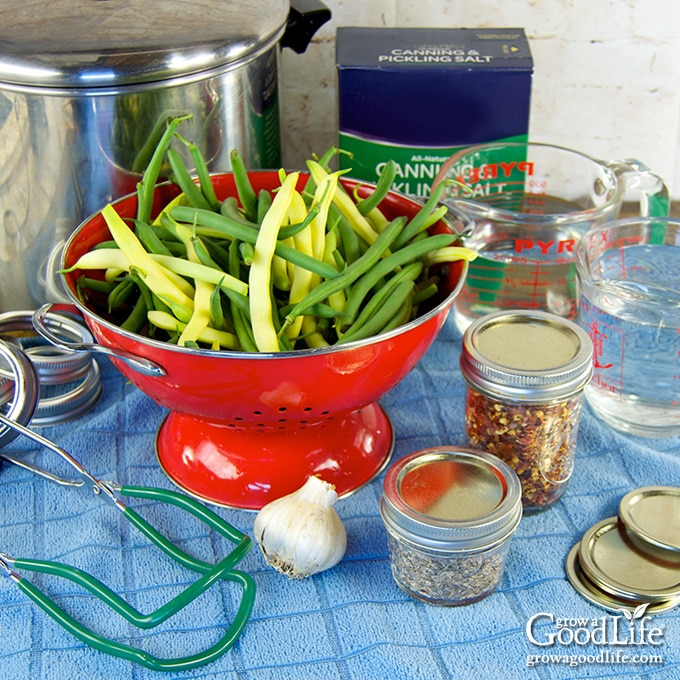
Dilly beans are pickled green beans flavored with dill, garlic, and spicy pepper flakes. Learn how to preserve string beans in a water bath canner with this easy recipe.

I remember the first time I tried dilly beans. It was at a cookout with friends who were astonished that I had never had them. At their urging, I pulled one of the beans out of the jar with a fork and nibbled on the end to taste it.
It was so good!
I found myself drawn to the jar time and again throughout the day and enjoying the crunchy, vinegary, and intensely flavored dilly beans.
Dilly beans are one of the easiest canning recipes. Because you are pickling the beans, all you need is a water bath canner to preserve the jars.
Serve dilly beans as a side dish as you would pickles, layer them into sandwiches, or include on a charcuterie board or antipasto platters. Of course, whenever you have a craving, go ahead and snack on dilly beans right out of the jar.
Tips for Making Dilly Beans
Dilly beans are zesty pickled string beans flavored with dill, garlic, and spicy pepper flakes. Because we are using vinegar to adjust the acidity, pickled beans can be preserved into shelf-stable jars using a boiling water bath canner. Here are tips for pickling green beans:
Use fresh beans
Green beans, string beans, snap beans, and wax beans are all terms used to describe young pods that are harvested from bush or pole beans. They come in different colors, including green, purple, and yellow. All can be used to make dilly beans.
Fresh string beans will stay crispy when pickled. Skip the limp beans at the supermarket and use freshly harvested beans from your garden, a friend’s garden, or farmers market.
Select the small to medium sized string beans for making crispy dilly beans that snap when you bite into them. Avoid the large, seedy pods because they tend to be tough when pickled. You’ll need about 2 pounds of string beans to fill 4 pint sized canning jars.
Use canning salt
Table salt contains iodine and anti-caking agents that can darken food and make the jars cloudy. Pickling salt, also known as canning salt, is just pure granulated salt (sodium chloride) with no additives.
Type of vinegar for pickling
Use commercial vinegar with at least 5% acidity for pickling. The most common types used for canning are apple cider and white vinegar.
- Apple cider vinegar is made from fermented apples and adds a slightly sweet apple flavor to pickled foods, but it will slightly darken your dilly beans.
- White vinegar is clear vinegar made by distilling corn and rye. The flavor is sharper than apple cider vinegar. Choose an organic brand of white vinegar to avoid genetically modified corn.
You can make some flavor adjustments to pickle and relish recipes without affecting canning safety. For guidance on safe substitutions and changes, see: How to Safely Modify Pickle and Relish Canning Recipes.
Cut the beans to fit the jar
Trim the string beans to fit the jars and remain submerged in the pickling solution. The trimmings can be added to salads, or frozen and used to make homemade stock.
Don’t have a water bath canner?
If you don’t want to pull out a canner, you can use a large pot to process the jars of pickled green beans. I use an 8-quart tall pot with an 8-inch canning rack that holds 4 pint-sized canning jars.
Your saucepan needs to be high enough to cover the tops of the jars by a few inches of water, plus two inches of space to prevent boiling water from splashing out of the pot. Place a rack in the bottom to elevate the jars up away from direct heat, and allow the water to circulate around the jars as they are processed.
How to Can Pickled Dilly Beans
This recipe for dilly beans is from the So Easy to Preserve and the Ball Blue Book Guide to Preserving books. The full and printable recipe can be found at the bottom of this article, but these are the steps for making and canning pickled beans.
New to water bath canning? Take a moment to review the process before starting your recipe. This guide walks you through each step: Water Bath Canning for Beginners.
Staying organized makes canning day much smoother. I put together a free printable Home Canning Checklist with prep reminders, safety notes, and batch tracking space. Download it here:
Grab your Free copy
Home Canning Checklists
Step 1: Prepare the Canning Equipment
Gather your kitchen and canning equipment, prepare the jars, set up the canner, and organize your work area.
You’ll need:
- Water bath canner or a large pot (8 quart tall) with a rack
- 4 pint sized canning jars
- Lids and bands (new lids for each jar, bands can be reused)
- Canning tools: jar lifter, canning ladle, funnel, and bubble popper
- Plus basic kitchen supplies such as kitchen towels, a large bowl, medium pot, knife, and cutting board.
Wash your jars, lids, bands, and canning tools in warm, soapy water and rinse well. Set the lids, bands, and tools aside to air-dry until you are ready to use them.
Place the jar rack into the canner, set the jars upright on the rack, and add water to cover the jars. Bring the canner to a simmer (180˚F) for 10 minutes, and keep the jars hot until you are ready to fill them. Jars must be warm before filling to prevent a fluctuation in temperature that may cause the jars to break.
Follow the manufacturer’s directions for preparing the lids. Pre-heating lids is no longer necessary before using, but it is still safe to simmer (180°F) the lids if you want to. Just add them to the canner when you heat your jars.

Step 2: Prepare the string beans
Wash the beans under cold running water. Trim off the ends, pull off the strings, and cut the beans to 4-inches to fit the jars.

Step 3: Make the pickling brine
In a medium pot, combine the salt, vinegar, and water. Bring to a boil, and then reduce the heat and simmer (180˚F) for 10 minutes. Keep the brine warm.

Step 4: Pack your jars
Spread a kitchen towel on the counter. Use the jar lifter to remove a hot jar from the canner, drain, and place on the towel. Keep the remaining jars in the canner, so they stay warm.
Add 1/4 teaspoon red pepper flakes, 1 clove of garlic, and 2 teaspoons dried dill seeds or 1 head of dill. Pack the string beans lengthwise into the jars. It may help to turn the jar on its side, and stack the beans inside. Try to pack the beans as tightly as you can.

Place the canning funnel on the jar, and ladle hot brine over the beans, leaving 1/2 inch of headspace.

Run the bubble popper through the jar to release any trapped air bubbles. You can also tilt the jar back and forth to let air escape. Add more brine to adjust the headspace again if needed. You want to be sure all the beans are submerged completely in the brine.
Wipe the rim with a damp towel to remove any residue. Center a lid on the jar, place the band over the lid, and screw it on until fingertip tight. Place the jar back into the canner, and repeat with the rest of the jars. Depending on the size of your beans and how tightly you packed them, you may not use all the brine.

Step 5: Process your jars
Once all the jars are in the pot, adjust the water level so it is covering the jars by several inches. Bring the pot to a boil, and process the jars for the times indicated in the recipe below.
Let the canner cool, remove the jars, and let them cool completely. Test the seals, label and date the jars, and store in a cool, dark location for 12 to 18 months. Allow 2 to 4 weeks before tasting for the dilly beans to develop their flavor. Use within 12 to 18 months.

Old-Fashioned Pickled Dilly Beans
Ingredients
- 2 pounds fresh string beans
- 1/4 cup canning salt
- 2 1/2 cups white vinegar or apple cider vinegar
- 2 1/2 cups water
- 4 cloves garlic divided
- 8 teaspoons dried dill seeds or 4 heads dill, divided
- 1 teaspoon red pepper flakes divided
Instructions
- Wash your jars, lids, screw bands, and canning tools in hot soapy water. Rinse thoroughly to remove all suds. Set aside to air dry on a clean kitchen towel.
- Place the jar rack into water bath canner, place jars in the canner, and add water to cover. Bring the canner to a simmer (180˚F) for 10 minutes, and keep the jars hot until you are ready to fill them.
- Rinse the string beans and cut into 4-inch pieces to fit in the jar.
- Combine the salt, vinegar, and water in a large pot. Bring to a boil, reduce the heat, and simmer (180˚F) for 10 minutes.
- Spread a kitchen towel on the counter. Use your jar lifter to remove a warm jar from the canner, drain, and place on the towel. Keep the remaining jars in the canner, so they stay hot.
- Add 1 clove of garlic, 1/4 teaspoon red pepper flakes, and 2 teaspoons of dried dill seeds or 1 head of dill to the bottom of the jar.
- Pack the string beans lengthwise into the jars. Try to pack the beans tightly. Pour the hot pickling liquid over the string beans, leaving 1/2 inch of headspace.
- Run the bubble popper through the jar to release any trapped air bubbles. You can also tilt the jar back and forth to let air escape. Add more brine to adjust the headspace again if needed to maintain a 1/2 inch. You want to be sure all the beans are submerged beneath the brine.
- Place the jar back into your canner, and repeat with the rest of the jars.
- Once the jars are in the canner, adjust the water level so it is 2-inches above the top of the jar.
- Cover the canner, and bring it to a boil over high heat. Once the water boils vigorously, continue boiling for 10 minutes at altitudes of less than 6,000 feet. Adjust processing time for your altitude if necessary (See Note).
- When processing time is complete, turn off heat, and let the canner cool down and settle for about 5 minutes.
- Spread a dry kitchen towel on the counter. Remove the cover by tilting lid away from you so that steam does not burn your face.
- Use the jar lifter to remove the jars from canner and place on the towel. Keep the jars upright, and don't tighten bands or check the seals yet. Let the jars sit undisturbed for 12 to 24-hours to cool.
- After 12 to 24-hours, check to be sure jar lids have sealed by pushing on the center of the lid. The lid should not pop up. If the lid flexes up and down, it did not seal. Refrigerate jar and use up within 2 weeks.
- Remove the screw on bands and wash the jars. Label, date, and store your jars in a cool, dark place for 12 to 18 months. Allow 2 to 4 weeks for the dilly beans to develop their flavor. Once the jar is open, store in the refrigerator for up to 2 weeks. Recipe makes about 4 pints.
Notes
Nutrition
You May Also Like
- Granny’s Bread and Butter Pickles
- Dill Pickle Spears Canning Recipe
- Pressure Canning Green Beans
- How to Freeze String Beans
40+ Meals in a Jar Pressure Canning Recipes
In this eBook, you will find 50 pressure canning recipes, including 44 meals, along with homemade stocks and bone broths. Recipes include soups, stews, chilis, beans, beef, pork, and poultry. Explore the world of preserving delicious home-cooked meals for all seasons.

Can I use pickling vinegar in stead of white vinegar?
Debbie, You can use any vinegar as long as it’s labeled at least 5% acidity (50 grain). If your bottle just says “pickling vinegar” and the label shows 5% acidity with no added ingredients, you can substitute it directly for white vinegar. Just avoid blends that are already seasoned, diluted, or contain salt, sugar, or spices, since those can affect both the safety and flavor. As long as it’s plain 5% pickling vinegar, you’re good to go!
Ty for this articles and your inciteful replies. Can I substitute iodine free Himalayan sea salt?
Tracy, I’m so glad you found the article and replies helpful! 😊 Yes, you can use iodine-free Himalayan sea salt as a substitute. Just be sure it’s a pure, additive-free version (no anti-caking agents), as those can sometimes cloud the brine or affect the texture over time. Since Himalayan salt grains can vary in size, you may want to weigh it for accuracy. 1/4 cup of pickling salt weighs approximately 72 grams, so you can use about 72 grams by weight as a substitute.
Ty. The green beans just came out of the ten ten minute water bath. Here’s hoping I meet some great people to share with:)
Is there not any sugar in the brine?
Mary, This recipe doesn’t include sugar in the brine, but you can absolutely add it if you’d like a sweeter flavor. It’s perfectly safe to do so. I’d suggest adding about 1/2 cup to 1 cup of sugar to the brine along with the other ingredients. Feel free to adjust the amount to suit your taste.
Will the green beans be crispy?
Debra, Yes, they should still retain a bit of crispiness. It depends on the type of beans you use and how fresh they are. However, if you want super crunchy dilly beans, consider storing the jars in the refrigerator instead of processing them in the water bath canner.
Is there an error in the recipe? Because if it makes 4 pints, 2 teaspoons of dill seed in each jar means it’s 8 teaspoons altogether, which is not 1/4 cup. What do you do with the leftover dill? Or should it be 3 teaspoons of dill seed for four jars?
Thanks for catching that, Michelle. It should be 8 teaspoons dried dill seeds, 2 teaspoons per jar.
If I don’t have fresh dill or dill seed can I use Pickering spice if so how much?
Jeannie, Absolutely, you can use pickling spice as a substitute. For each pint jar, try adding about 1 to 2 teaspoons of pickling spice. This should give your pickled beans lots of flavors.
I’m making these Good Old fashioned pickled Dilly Beans. I don’t have any red pepper flakes, so can I use Mrs. DASH Caribbean citrus salt free seasoning blend? It has peppers and such all ground up together.
Cheryl, Sure you can use Mrs. Dash seasoning or you can omit the red pepper flakes completely.
If I wanted to make 8 pints would I just double the quantities in the recipe?
Gunner, Yes, just double everything.