Canning Beef Stew
This post may contain affiliate links, which means that I may receive a commission if you make a purchase using these links. As an Amazon Associate I earn from qualifying purchases.
Home canned beef stew is a hearty and filling meal that can be enjoyed year-round. This recipe and tutorial will teach you how to pressure can beef stew with ease.

Having a variety of home canned ready to eat meals is an easy solution to satisfying hunger without spending a lot of time in the kitchen. When things get too busy to cook, or the refrigerator is bare, it is handy to grab a jar and heat it up for a quick and tasty meal.
I love canning beef stew because I can make it using so many vegetables I grow in the garden, including potatoes, carrots, onions, celery, thyme, and homemade beef stock. Plus I know exactly what is in the jar, and can avoid excess salt, chemicals, and preservatives found in store bought canned goods.
Tips for Canning Beef Stew
You will need to use a pressure canner to can beef stew. If you don’t have a pressure canner, you can freeze your stew instead. A pressure canner provides the high heat necessary to kill bacteria that can cause botulism.
I use a Presto 16-quart pressure canner. It holds a canner load of 7 quarts or 9-pint sized jars. Other brands of pressure canners I recommend are Mirro and All American. Each has a slightly different procedure, so follow the directions for your brand. Here are other tips for canning beef stew:
Type of Beef for Stew
Beef stew meat comes in conveniently cut up in packages at your grocery store, but you can save some money by opting for beef roasts and cutting your own.
Lean meat can get tough when heated for such a long period of time. You want to pick a cut of beef with plenty of marbling of fat and connective tissue that will break down and tenderize during the pressure canning time.
Good beef cuts to use for canning beef stew include, chuck, chuck shoulder, chuck roast, bottom round roast, rump roast, eye round roast, top round, round tip roast, or pot roast.
Best Potatoes for Canning
Some potatoes hold up better when canned than others. Use waxy or boiling varieties of potatoes. These are low in starch and high in moisture, which helps them hold up to the heat without breaking apart.
Red, white round, and gold potatoes work well for canning. New potatoes are also great choices for pressure canning because they have less starch than mature tubers.
Avoid canning starchy potatoes that are typically used for baking, such as russets and Yukon gold potatoes. While not unsafe to use, these will break down during the canning process, turn mealy, and leave behind a starchy residue.
Onions
Any type of bulb onion will work for this recipe since the sharp onion flavor mellows as the beef stew is cooked and processed. Feel free to use red, white, or yellow onions.
Use Beef Stock
The original recipe calls for cooking the stew briefly in water, and then canning it. Using beef stock infuses more flavor into the stew. You can use beef stock or broth from the grocery store, or home canned beef stock. If you are using a store bought, try to choose one without a lot of sodium, chemicals, and ingredients you cannot identify.
How to Prevent Liquid Loss
Liquid loss occurs when the contents of the jar is siphoned out of the jar. It is caused by a rapid change in air pressure and temperature. If properly processed, loss of some liquid is ok, and won’t cause the food to spoil, but any food above the liquid turn dark and dry out. Don’t store the jar if the loss half the jar or more. Instead, refrigerate the jar, and use within several days.
Siphoning is less likely to happen if you prevent rapid changes in temperature and pressure. Maintain a steady temperature, and let your pressure canner cool down naturally after processing time is complete.
How to Can Beef Stew
If you’re new to pressure canning or need a refresher, this guide explains the equipment, preparation, and safe processing steps: Pressure Canning for Beginners.
For extra help staying organized during canning day, download my free Home Canning Checklist. Get it here:
Grab your Free copy
Home Canning Checklists
This safe canning recipe is the “Beef Stew with Vegetables” from the Ball Blue Book Guide to Preserving and the Ball Complete Book of Home Preserving. Changes include swapping the water with beef broth for more flavor, and reducing the amount of salt.
According to Ball, other safe customizations include:
- Replace some of the potatoes with turnips.
- Reduce the onion to 2 cups, and replace with 1-cup peas, green beans, or corn.
- Include dried herbs or spices to your liking.
Some ingredient adjustments are safe when pressure canning meat and poultry recipes. Learn which changes are allowed in this guide: Safe Changes for Pressure Canning Meat and Poultry.
The full printable recipe is summarized at the bottom of this article, but these are the detailed steps for preparing the ingredients and canning beef stew:
Step 1: Gather Your Canning and Kitchen Equipment
You will need:
- Pressure canner with canning rack
- 14 pint sized canning jars, or 7 quart sized jars
- Lids and bands (new lids for each jar, bands can be reused)
- Canning tools: jar lifter, canning ladle, funnel, and bubble popper
- Plus basic kitchen supplies such as a large pot, several large prep bowls, kitchen towels, vegetable brush, peeler, baking sheets, knife, and a cutting board.
If you are canning in pint jars in a 16-quart pressure canner, you may need to either can in two batches, or double-deck, or stagger the jars. Follow the instructions for your pressure canner. Presto, for example says to stagger the jars by placing one jar on top of two. You can also use an additional canning rack in between the jars to double stack.
Wash the canner, rack, jars, lids, bands, and tools in hot soapy water, and rinse well. Set aside until you are ready to use them.
Step 2: Prepare the Ingredients
It is helpful to have all your ingredients prepared and measured before making your beef stew. You can save ends of the carrots, celery, and onion trimmings in a freezer bag to use later to make homemade stock.
Potatoes
Prepare about 6 pounds of potatoes to get 12 cups cubed peeled potatoes. Fill a large prep bowl about half way with cold water. Scrub the potatoes with a vegetable brush under running water. Use a vegetable peeler and remove the peelings, and cut into 1-inch cubes.
Measure as you work, and drop the cut pieces into the bowl of cold water. This will help remove some of the surface starch and prevent discoloring from exposure to air while you work on the other ingredients.

Carrots
You’ll need about 3 pounds of carrots to get 8 cups of sliced carrots. Scrub the carrots well with a vegetable brush under running water. Remove the peelings with a vegetable peeler. Rinse the carrots again. Remove and discard the ends, and cut into 1/2-inch thick slices. Measure as you go, until you reach 8 cups sliced peeled carrots. Add to the second large prep bowl.

Celery
About 6 stalks of celery will equal 3 cups chopped. Rinse celery well under clean running water while rubbing your thumbs along the ribs to remove any soil and residue.
Remove the leafy tips and trim the white sections off of the bottom of each stalk. If your celery is stringy, you can use a knife or a vegetable peeler to remove the threads. Cut the celery ribs into 1/2-inch slices. Measure 3 cups chopped celery, and add to the prep bowl.

Onions
Prepare 4 medium or about 1 pound of onions. Remove the skins and use a sharp knife to cut the ends off the onions. Chop into 1/2-inch pieces. Measure 3 cups of chopped onions and add to the prep bowl.

Beef
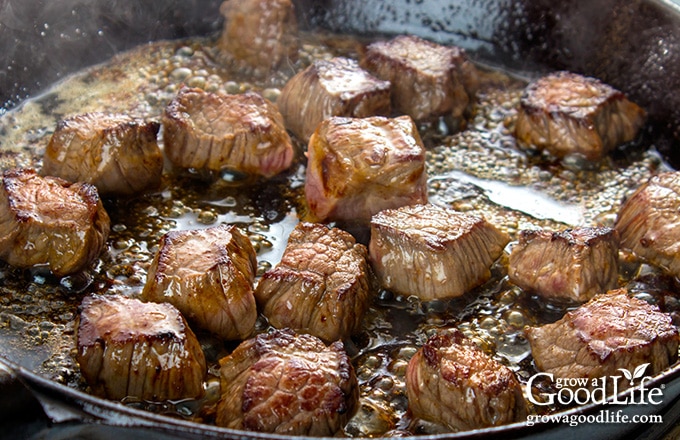
Remove any fat, and cut the beef into 1 1/2-inch cubes. You can brown the beef in batches in a skillet or the bottom of your large saucepot, but I find it much easier to partially cook the meat all at once in the oven.
Preheat the oven to 350˚F, and line several large baking sheets with parchment paper. Toss the pieces with the oil, season with salt and pepper, and place in a single layer on the prepared sheet pans. Bake in the preheated oven until browned, about 20 minutes. The meat shouldn’t be cooked completely through, but you do want to sear the outside to add flavor.
To sear the beef on the stove: Add the oil to a skillet, and heat it over medium heat. Season the beef well with salt and pepper. While working in batches, brown the meat in the hot oil turning to sear all sides.
While the meat is cooking, get the canner set up, warm the jars, and organize your work area.
Step 3: Prepare the Canning Equipment
Place the pressure canner on the stove, and insert the canning rack. Add water per your pressure canner manufacturer’s instructions. For example, Presto requires 3 quarts, Mirro 2 quarts, and All American is 2 to 3 inches.
Fill the clean jars halfway with hot water, and then place them on the rack in the canner. Bring the canner to a low simmer (180˚F) for 10 minutes, and keep warm.
Step 4: Make the Stew
Add the seared beef to a large saucepot. Drain the potatoes, rinse well with cold water, and add to the pot. Add the prepared carrots, celery, onions, thyme, and top off with just enough beef stock to cover.
Stir to combine, and bring the stew to a boil over medium-high heat, and then reduce the heat and simmer (180˚F) for 5 minutes.
Step 5: Can the Stew
Spread a kitchen towel on the counter. Use the jar lifter to remove a jar from the canner. Pour out the water (save it for washing dishes), and place the jar on the towel. Keep the remaining jars in the canner, so they stay hot.
Place the canning funnel on the jar and use the ladle and canning funnel to fill the jar with hot stew leaving a 1-inch headspace. Run the bubble popper through the jar to remove air bubbles, and clean the rim.
Center a lid on the jar, place the screw band over the lid, and twist it on until fingertip tight. Immediately place the jar back into the rack in the canner, and repeat with the rest of the jars until all the jars are filled, or you run out of stew. If you have leftovers, refrigerate and use up in a couple of days.
Place the lid on the canner, and lock it. Bring the canner to a boil over medium-high heat. Process the jars according to the instructions for your canner for the proper times indicated in the recipe below.
Let the canner cool, remove the jars, let them cool completely for 12 to 24 hours, and then check the seals. Wash the jars with soapy water, label, date, and store the jars of canned corn in a cool location. Use within 12 to 18 months.

Heat and Serve
Canned beef stew is fully cooked and just needs to be heated before serving. Open the jar, and skim off any fat that has risen to the top. Add the stew to a saucepot, bring to a boil over medium-high heat, then reduce the heat and simmer until hot, about 10 minutes. Season as desired, and serve warm with a nice crusty bread for a hearty meal.
I like to add the following when heating up a quart sized jar: 1 tablespoon fresh chopped parsley, 1 teaspoon Worcestershire sauce, 1/2 teaspoon paprika, 1/4 teaspoon garlic powder, and additional salt and pepper to taste.
How to Thicken Canned Beef Stew
If you like a thicker gravy-like stew, you can thicken the broth with cornstarch or flour. Open the jar, hold the lid over the top, and drain just the broth into the pot. Whisk in about 1 tablespoon of cornstarch or flour, and bring the pot to a boil over medium-high heat. Continue to whisk and cook until thickened and bubbly, about 5 minutes. Add the solids, season as desired, and simmer until hot, about 8 minutes longer.

Canning Beef Stew
Ingredients
- 5 pounds beef stew meat cut into 1 1/2-inch cubes
- 1 tablespoon extra virgin olive oil
- 1 teaspoon canning salt
- 1/2 teaspoon ground black pepper
- 12 cups cubed peeled potatoes about 18 medium or 6 pounds
- 8 cups sliced peeled carrots about 10 medium or 3 pounds
- 3 cups chopped celery about 6 stalks
- 3 cups chopped onions about 4 medium or 1 pound
- 1 teaspoon dried thyme
- 4 quarts beef stock 12 cups
Instructions
Prepare the Canning Equipment:
- Wash the jars, lids, and rings in hot soapy water and rinse thoroughly. Set the lids and rings aside until you are ready to use them.
- Place the jar rack into the pressure canner, and fill with water per your pressure canner manufacturer’s instructions: Presto is 3 quarts, Mirro is 2 quarts, and All American is 2 to 3 inches.
- Fill the jars halfway with hot water, and then place them on the rack in the canner. Bring the canner to a simmer for 10 minutes (180˚F). Keep hot until you are ready to fill them.
Make the Beef Stew
- Season the beef cubes with salt and pepper and either toss with oil and brown in a 350˚F oven for about 20 minutes, or sear in oil in a skillet.
- Add the seared beef, prepared potatoes, carrots, celery, onions, thyme, to the pot, and top off with just enough beef stock to cover.
- Stir to combine, and bring the stew to a boil over medium-high heat, and then reduce the heat and simmer (180˚F) for 5 minutes.
Can the Stew
- Spread a kitchen towel on the counter. Use your jar lifter to remove a jar from the canner. Pour out the water (save it for washing dishes), and place the jar on the towel. Keep the remaining jars in the canner, so they stay hot.
- Use the ladle and canning funnel and fill the jar with the stew leaving a 1-inch headspace.
- Run the bubble popper through the jar to release air bubbles, adjust headspace if needed, wipe the rim, and center a lid on the jar, and screw on band until it is fingertip tight.
- Place the jar back into the canner, and repeat with the remaining jars until your canner is full, or you run out of stew.
- Cover the pressure canner and secure the lid. Leave the vent open, adjust the heat to medium-high, and bring the canner to a boil. Allow the pressure canner to vent steam for 10 minutes, then place weight on the vent.
- Once the canner has reached the correct pressure (10 pounds for weighted gauge, and 11 pounds for dial-gauge pressure canner), set a timer, and process quarts for 90 minutes, and pints for 75 minutes at altitudes of less than 1,000 ft. Adjust pressure for your altitude if necessary (see note below). Regulate the heat as needed to maintain a steady pressure.
- When processing time is complete, turn off the heat and let the pressure canner cool and depressurize. The time will depend on your brand and should be between 30 to 60 minutes. Follow the instructions for your pressure canner.
- Once the pressure canner is depressurized, spread a kitchen towel on the counter, remove the weight from the vent pipe or open the petcock, and wait 10 minutes for the jars to adjust to the change in pressure.
- While wearing pot holders, unlock the cover and remove the lid while tilting it away from you so that steam does not burn your face. Allow another 10 minutes for the jars to adjust to the change in pressure.
- Use a jar lifter to remove the jars from canner and place on the towel. Keep the jars upright, and don’t tighten bands or check the seals yet. The jars will be bubbling. Let the hot jars sit undisturbed for 12 to 24-hours to cool.
- Wait until the jars have cooled for at least 12-hours, and then check to be sure jar lids have sealed. Test the seal by pushing on the center of the lid. The lid should not pop up. If the lid flexes up and down, it did not seal. Refrigerate the jar and use up within a few days.
- Remove the screw on bands and wash the jars. Label, date, store the jars in a cool, dark place (50 to 70 degrees F). Use within a year for the best quality. Yields about 14 pint jars, or 7 quarts.
Notes
Nutrition

Resources and further learning:
- Safe Changes for Pressure Canning Meat and Poultry
- Safe Canning Resources: Trusted Guides for Home Food Preservation
- Evaluating Canning Recipes: How to Tell if a Canning Recipe is Safe
40+ Meals in a Jar Pressure Canning Recipes
In this eBook, you will find 50 pressure canning recipes, including 44 meals, along with homemade stocks and bone broths. Recipes include soups, stews, chilis, beans, beef, pork, and poultry. Explore the world of preserving delicious home-cooked meals for all seasons.

I just put by 14 pints of your recipe using beef cheek meat! It was $3.39 a pound at the Spanish grocery. I had never prepared it before but from what i read it was possible to first braise it and then cook it slowly. The cut up pieces became my beef for the stew. Only I added 3 cups of wine (cabernet Sauvignon of the Feizia box wine brand) with 12 bouillon cubes and 12 cups of water. I ate the stew that was left over from loading the Canning jars and it was quite flavorful, though a bit tough. I am hoping the pressure canning will tenderize it some more. I am sl9wly cooking the left overs during the canning times to test it out. Anyway just thought I would share this cheaper alternative.
Liz, This is a great tip! The pressure canning process should help break down the tough muscle and make the meat more tender. Thank you for sharing!
At the bottom of my jars of canned beef stew look like they have a bunch of crumbled hamburger. I am wondering if the beef stew meat was crumbled during the canning process. Have you ever heard of this? Appreciate any pointers. Thank you!
– Some of my meat looks like it was pulverized because I see at the bottom of my jars a mass of brownish crumbles. Why might this of happened? Thanks for any pointers! -Terri
– Is it OK to clean/sterilize the glass jars in the dishwasher before filling them? Thanks again! – Terri
Terri, The solids at the bottom are proteins, pieces of meat, and starch from the potatoes. It is completely normal. As long as you followed the recipe, your jars are safe for storing. As far as heating the jars…You can wash them in the dishwasher. However, it is much more efficient to heat the jars right in the canner as described in the recipe, keep them warm, and fill them one at a time, so they don’t cool down. You need to heat up the canner anyway, so the water is 180˚F.
Thank you! Is there a way to prevent the meat from falling apart so much?
Terri, It is natural for the beef to become tender and break down when heated. It all depends on the type of meat you use. I have had the best results with chuck roast, cubed and lightly seared in a skillet until just lightly browned. Also, try not to overcook your stew before canning. Bring it to a boil, then reduce the heat to a simmer as you fill your jars.
Just a question, can I add my spices before pressure canning?
Patti, Yes, you can safely add dried spices before canning, but keep in mind that some change flavor, while others even turn bitter when pressure canned. That is why I suggest seasoning to taste after opening the jar as you heat it to serve.
One part confuses me. It says to fill the jars with a slotted spoon. Does that mean no broth goes into the jar for processing? Or do I fill with vegetables and meat than add broth? Thanks. Anxious to give it a try. Just purchased a 16 quart Presto.
Celeste, I apologize for the confusion. Please follow the recipe for the detailed steps. Under Can the Stew: Use the ladle and canning funnel and fill the jar with the stew leaving a 1-inch headspace.
I followed these instructions yesterday and everything turned out beautifully. 95% of liquid stayed in the jars too! Thank you for this, I will definitely be making it again!
Thank you, Lisa! I am so glad you found the instructions helpful for canning beef stew. You’ll love having a ready-to-eat meal on the shelf for easy dinners.