How to Can Chicken Soup
This post may contain affiliate links, which means that I may receive a commission if you make a purchase using these links. As an Amazon Associate I earn from qualifying purchases.
Homemade chicken soup is the ultimate comfort food to help warm you on a cold winter evening. Learn how to can soup for your food storage pantry.
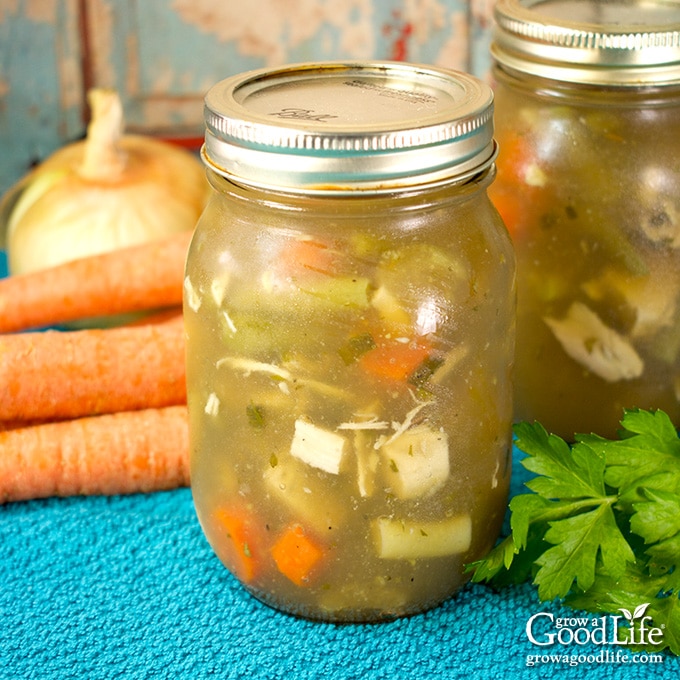
Pressure canning soup is a great way to fill your panty with easy to heat and eat meals with no added chemicals, preservatives, or sodium found in commercially processed cans. You control the quality of the ingredients and can even customize the vegetables and seasoning to your liking.
When you open a jar of homemade chicken soup, it can be heated and served as is, or amended with other ingredients. Consider adding cooked rice, noodles, fresh herbs, and leftover vegetables you may have in the refrigerator. Simply combine the ingredients in a saucepan, add more liquid if needed, heat, season to taste, and serve hot.
Tips for Canning Soups
Soups are made from meat and low acid vegetables. To make jars of homemade soup safe for eating, they must be processed in a pressure canner. A pressure canner brings the temperature up high enough to kill harmful microorganisms that can cause foodborne illness. There are no safe recipes for water bath canning soup. You can freeze the soup if you don’t have a pressure canner.
Do not add noodles, pasta, rice, flour, or other thickening agents to home canned soups, because the starch will interfere with the heat processing. Don’t add any cream or milk, because dairy cannot be canned safely at home. In addition, there are no approved recipes for pureed soups because the blended ingredients may not allow heat to penetrate properly when processed in a pressure canner.
Instead, modify your home canned soup when you open the jar at serving time. Empty the contents into a pot, and feel free to include additional vegetables, herbs, noodles, and thicken or puree before serving, if desired. Warm over medium high heat for about 10 minutes, and serve.
Here are other tips to help you can homemade chicken soup for your food storage shelves:
Make Your Own Chicken Stock
Delicious soups start with a flavorful stock. My favorite way to make chicken soup begins by slow roasting a whole chicken in a crockpot. Once the chicken is cooked, the meat is removed and the bones are returned to the slow cooker, combined with vegetable scraps, garlic, water, and slow cooked to extract as much flavor as possible. See How to Make Chicken Stock from Scratch for the full recipe.
Then the broth is strained and refrigerated overnight so the fat will rise to the top and can be skimmed off before using. You’ll need about 16 cups (4 quarts) of prepared chicken stock for this recipe. Use stock or broth that is made fresh, canned, or frozen.
Choosing Vegetables
Select fresh or frozen vegetables. You can use any combination of vegetables that have been tested for home canning, including asparagus, string beans, carrots, celery, corn, peas, onions, peppers, and tomatoes. Keep the vegetables in chunks so the heat can surround and penetrate properly when processed in the pressure canner. If dried beans or peas are used, you must soak and fully rehydrate them first.
PennState Extension advises to avoid canning pumpkin, winter squash, broccoli, or cauliflower because these pack together and contain ingredients that interfere with safe processing, and there are no scientifically research-tested recipes for these vegetables in soups.
Steps to Making and Canning Chicken Soup
If you are new to canning or need a refresher, it may be helpful to review this article on pressure canning at the National Center for Home Food Preservation website.
This homemade chicken soup recipe is based on the Soup recipe in So Easy to Preserve, USDA Complete Guide to Home Canning, and the NCHFP website. Processing time has been increased to the longest time for chicken and mixed vegetables. I also referenced the Ball Blue Book of Preserving‘s recipe for Chicken Soup for the amount of ingredients.
A more detailed and printable recipe can be found at the bottom of this article, but these are the general steps for making and canning homemade chicken soup:
Step 1: Prepare the Vegetables
You will need 4 cups of chopped vegetables. For this recipe, I used a combination of string beans, carrots, celery, frozen corn, frozen peas, and diced onion. But feel free to mix and match to your taste using vegetables that are safe for pressure canning (see Choosing Vegetables above).
Wash fresh vegetables thoroughly under clean, running water. The peeling on carrots and tomatoes may harbor bacteria. Both must be peeled before using. Remove ends and skins from the onion and dice fine. If you use dried beans or peas, they must be soaked and rehydrated before canning.
Step 2: Make the Soup
If your meat is raw, cook it first by roasting in the oven, or boiling in a pot on the stove until tender. You will need to prepare 1 1/2 pounds of boneless chicken breasts or thighs, or a 3 to 4 pound whole chicken to yield about 3 cups of cooked diced chicken for this recipe. Once the chicken is cool enough to handle, remove the skin, bones, and dice into 1-inch pieces.
Combine the chicken stock, vegetables, chicken, parsley, and seasonings in a large saucepot. Bring the pot to a boil, reduce the heat to a simmer (180˚F), and cook for about 15 minutes. Prepare the canning equipment while the soup is simmering.
Step 3: Prepare the Canning Equipment
Gather your canning gear, prepare the jars, set up the canner, and organize your work area.
You will need the following:
- Pressure canner with canning rack
- 8 pint sized canning jars, or 4 quart sized jars
- Canning lids and bands (new lids for each jar, bands can be reused)
- Canning tools: jar lifter, canning ladle, funnel, and bubble popper
- Plus basic kitchen supplies such as a slotted spoon and clean kitchen towels.
Wash the canning jars, lids, bands, and canning tools in hot soapy water, and rinse well. Set the lids and bands aside until you are ready to use them.
Place the pressure canner on the stove, and insert the canning rack. Add water per your pressure canner manufacturer’s instructions: Presto is 3 quarts, Mirro is 2 quarts, and All American is 2 to 3 inches. Fill the clean jars halfway with hot water, and then place them on the rack in the canner. Bring the canner to a simmer for 10 minutes (180˚F). Keep hot until you are ready to fill them.
Combine the chicken stock, vegetables, chicken, parsley, and seasonings to a large sauce pot. Bring the pot to a boil, reduce the heat to a simmer, and cook for about 30 minutes. Prepare the canning equipment while the soup is simmering.
Step 5: Can the Soup
Spread a kitchen towel on the counter. Use the jar lifter to remove one jar from the canner. Pour out the water (save it for washing dishes), and place the jar on the towel. Keep the remaining jars in the canner, so they stay hot.
Place the canning funnel on the jar and use the slotted spoon to fill the jar about halfway with the solid ingredients. Ladle liquid over the solids while maintaining a 1-inch headspace.
Run the bubble popper through the jar to remove air bubbles, and clean the rim. Center a lid on the jar, place the band over the lid, and screw it on until fingertip tight. Immediately place the jar back into the rack in the canner, and repeat to fill jars with solids, and remaining liquid.
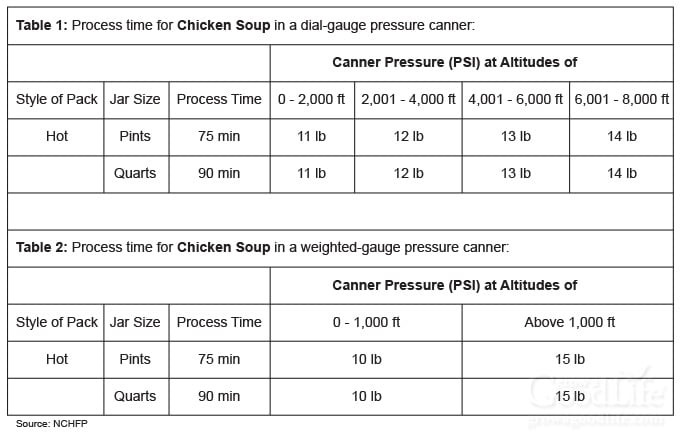
Place the lid on the canner, and lock it. Bring the canner to a boil over medium-high heat. Process the jars according to the instructions for your canner for the proper times indicated below.
Let the canner cool, remove the jars, and let them cool completely. Wash the jars with soapy water, label, date, and store the jars of canned corn in a cool location. Use within 12-18 months.
To serve, open the jars of chicken vegetable soup and warm on the stove. Feel free to add other ingredients after opening, such as cooked pasta, barley, cooked rice, homemade egg noodles, and fresh herbs. Heat the soup for about 10 minutes, season to taste, and serve warm. Makes 8 pints or 4 quarts of chicken soup.
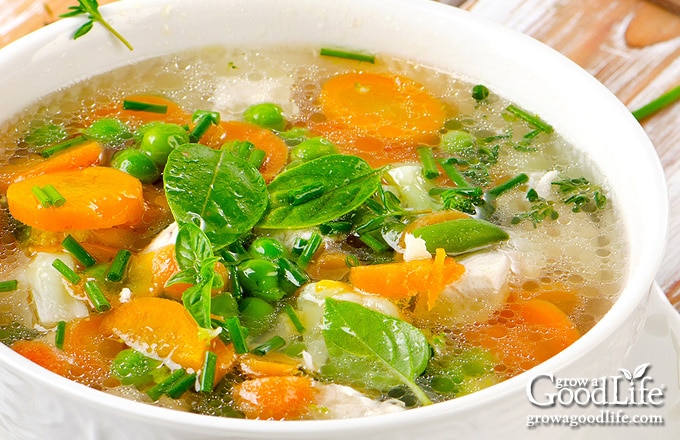
Chicken Soup Canning Recipe
Ingredients
- 16 cups chicken stock
- 1 cup cut string beans
- 1 cup sliced carrots
- 1/2 cup sliced celery
- 1/2 cup frozen corn
- 1/2 cup frozen peas
- 1/2 cup diced onion
- 3 cups cooked diced chicken
- 1 teaspoon dried parsley (optional for flavoring)
- 1 teaspoon sugar (optional for flavoring)
- 1/2 teaspoon poultry seasoning (optional for flavoring)
- 1/2 teaspoon kosher salt (optional for flavoring)
- 1/4 teaspoon pepper (optional for flavoring)
Instructions
Make the Chicken Soup:
- Add the chicken stock, vegetables, chicken, parsley, poultry seasoning, salt, and pepper and to a large pot. Stir to combine, and bring the pot to a boil over high heat. Once the pot reaches a boil, reduce the heat to a simmer (180˚F) and cook the soup for about 15 minutes. Keep hot, and stir occasionally to prevent sticking.
Prepare the Canning Equipment:
- Wash the jars, lids, and rings in hot soapy water and rinse thoroughly. Set the lids and rings aside until you are ready to use them.
- Place the jar rack into the pressure canner, and fill with water per your pressure canner manufacturer's instructions: Presto is 3 quarts, Mirro is 2 quarts, and All American is 2 to 3 inches.
- Fill the jars halfway with hot water, and then place them on the rack in the canner. Bring the canner to a simmer for 10 minutes (180˚F). Keep hot until you are ready to fill them.
Can the Soup:
- Spread a kitchen towel on the counter. Use your jar lifter to remove a jar from the canner. Pour out the water (save it for washing dishes), and place the jar on the towel. Keep the remaining jars in the canner, so they stay hot.
- Use the ladle and canning funnel and fill the jar halfway with solid ingredients, and then top the solid mixture with liquid leaving a 1-inch headspace.
- Run the bubble popper through the jar to release air bubbles, adjust headspace if needed, wipe the rim, and center a lid on the jar, and screw on band until it is fingertip tight.
- Place the jar back into the canner, and repeat with the remaining jars until you run out of jars or soup.
- Close the pressure canner and secure the lid. Leave the vent open, adjust the heat to medium-high, and bring the canner to a boil. Allow the pressure canner to vent for 10 minutes, then place weight on the vent.
- Once the canner has reached the correct pressure (10 pounds for weighted gauge, and 11 pounds for dial-gauge pressure canner), set a timer, and process pints for 75 minutes, and quarts for 90 minutes at altitudes of less than 1,000 ft. Adjust for your altitude if necessary (see note below). Regulate the heat as needed to maintain a steady pressure.
- When processing time is complete, turn off the heat and let the pressure canner cool and depressurize. The time will depend on your brand and should be between 30 to 60 minutes. Follow the instructions for your pressure canner.
- Once the pressure canner is depressurized, spread a kitchen towel on the counter, remove the weight from the vent pipe or open the petcock, and wait 10 minutes for the jars to adjust to the change in pressure.
- While wearing pot holders, unlock the cover and remove the lid while tilting it away from you so that steam does not burn your face. Allow another 10 minutes for the jars to adjust to the change in pressure.
- Use a jar lifter to remove the jars from canner and place on the towel. Keep the jars upright, and don't tighten bands or check the seals yet. The jars will be hot and bubbling. Let the jars sit undisturbed for 12 to 24-hours to cool.
- Wait until the jars have cooled for at least 12-hours, and then check to be sure jar lids have sealed. Test the seal by pushing on the center of the lid. The lid should not pop up. If the lid flexes up and down, it did not seal. Refrigerate the jar and use up within a few days.
- Remove the screw on bands and wash the jars. Label, date, store the jars in a cool, dark place (50 to 70 degrees F). Use within a year for the best quality. Yields 8 pints or 4 quarts.
Notes
Nutrition
You May Also Like:
40+ Meals in a Jar Pressure Canning Recipes
In this eBook, you will find 50 pressure canning recipes, including 44 meals, along with homemade stocks and bone broths. Recipes include soups, stews, chilis, beans, beef, pork, and poultry. Explore the world of preserving delicious home-cooked meals for all seasons.

Can you add noodles to this recipe before canning?
No. There are no safe canning recipes that include noodles or other pasta, rice, flour, cream, milk, or other thickening or dairy ingredients.
Adding noodles before canning can increase the density of the soup, potentially affecting the heat penetration during the canning process and compromising food safety.
Is it possible to make a 7 qt. batch in the pc or is 4 the limit?
Doc, Yes, you can increase the recipe if you’d like. Just keep the proportion of the ingredients the same.
Thanks for the great article. I have this in my pressure canner as we speak! We were so sick a few weeks ago and did not have the energy to make chicken soup. And the canned stuff on the grocery store shelves just does not feel like it’s going to cure what ails you. NOw I have it ready on the shelf!