Canning Apples for Food Storage
This post may contain affiliate links, which means that I may receive a commission if you make a purchase using these links. As an Amazon Associate I earn from qualifying purchases.
Canning apples is a great way to preserve the fresh flavor to enjoy throughout the year. Learn how to home can plain apples slices, quarters, or chunks for your food storage shelves.

Although apples can be stored in a root cellar or cool location for a long time, having peeled, cored, and sliced apples ready to go can be a time saver in the kitchen. Canned apples can be enjoyed right out of the jar, or added to your favorite baked, simmered, or fried recipes.
Tips for Canning Apples
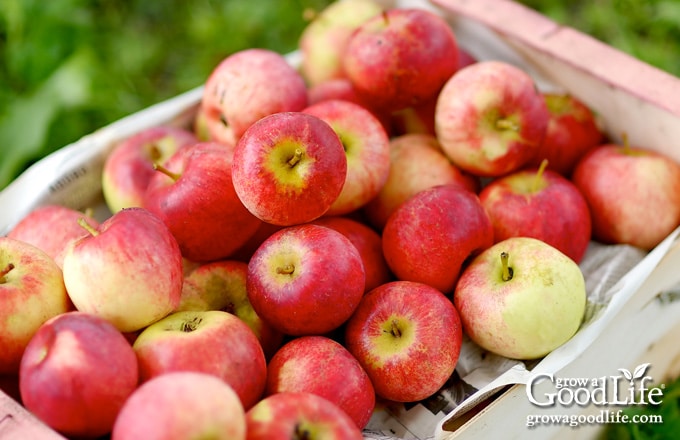
The best apples for canning are freshly harvested, local apples. Apples found out of season in the stores have been kept in storage, which affects the freshness, crispness, and juiciness.
Types of Apples for Canning
Choose crisp apple varieties that hold up well when cooked. Baking apples such as Braeburn, Cortland, Fuji, Honey gold, Gala, Granny Smith, Pink Lady, and Honeycrisp are good choices. Consider mixing several varieties for flavor.
Slightly damaged or softer apple varieties, such as Jonagolds, Macouns, McIntosh, Golden Delicious, and Red Delicious can be turned into canned applesauce.
Select fresh, firm apples with no bruises or insect damage that have a strong apple aroma. If you are aiming for a full canner load, that would be about 17 1/2 pounds for a load of 7 quarts, and about 13 1/2 pounds for a canner load of 9 pint sized jars depending on the size of your apple pieces.
Decide on the Jar Size
Think about how you will use canned apples. I like canning apples in a mix of quarts and pints. You can fit about 3 pounds of apples into a quart-sized jar. That is just the right amount to make an apple pie, apple crisps, and for most baked recipes, while the pints can be used for snacking.
The processing time is the same for pint and quart sized jars, so feel free to mix jar sizes in the same canner load.
Select a Preserving Liquid
Canning fruit in a sugar syrup helps to maintain flavor and shape. You can preserve apples in a sugar syrup, honey syrup, apple juice, white grape juice, or even plain water.
This recipe uses a very light sugar syrup, but feel free to substitute any of these options:
Syrup for 9 Pint Sized Jars:
- Very Light: 6 1/2 cups water and 3/4 cups sugar
- Light: 5 3/4 cups water and 1 1/2 cups sugar
- Medium: 5 1/4 cups water and 2 1/4 cups sugar
- Heavy: 5 cups water and 3 1/4 cups sugar
- Light Honey: 7 cups water and 1/2 cups mild honey
Syrup for 7 Quart Sized Jars:
- Very Light: 10 1/2 cups water and 1 1/4 cups sugar
- Light: 9 cups water and 2 1/4 cups sugar
- Medium: 8 1/4 cups sugar and 3 3/4 cups sugar
- Heavy: 7 3/4 cups sugar and 5 1/4 cups sugar
- Light Honey: 11 cups water and 1 cup honey
Steps to Canning Apples
In this canning recipe, apples are peeled, cored, cut into chunks, slices, quarters, or halves, and preserved into shelf stable jars using a water bath canner.
If you need a refresher on the boiling water bath canning process, see my complete guide: Water Bath Canning for Beginners.
To help make canning day run smoothly, you can also download my free Home Canning Checklist with helpful reminders and space to track your batches. Grab your copy here:
Grab your Free copy
Home Canning Checklists
This canning recipe can be found in the USDA Complete Guide to Home Canning and So Easy to Preserve books, and at the NCHFP website. A more detailed and printable recipe can be found at the bottom of this article, but these are the general steps for canning apples in pint-sized jars. See the notes in the recipe for quarts.
Step 1: Gather Your Canning Supplies
You will need the following canning and kitchen equipment:
- Water bath canner with canning rack
- 9 pint sized canning jars
- Canning lids and bands (new lids for each jar, bands can be reused)
- Canning tools: jar lifter, canning ladle, funnel, and bubble popper
- Kitchen scale
- Plus basic kitchen supplies such as a large saucepot, large prep bowl, kitchen towels, large slotted spoon, tongs, peeler, knife, and cutting board.
Step 2: Prepare the Canning Jars
Wash the jars, lids, and canning equipment in hot, soapy water and rinse well. Check the jars for nicks and cracks. Eliminate any jars that are damaged as these will break in the canner. Set the lids, bands, and tools aside to air-dry until you are ready to use them.
Place the canning rack into the water bath canner, set the jars upright in the canner, and add water to cover the jars. Bring the canner to a simmer (180˚F) for 10 minutes, and keep hot until you are ready to fill them.
Step 3: Make the syrup
Add the sugar and water to the large saucepan and bring to a boil over medium-high heat to dissolve sugar, keep warm.
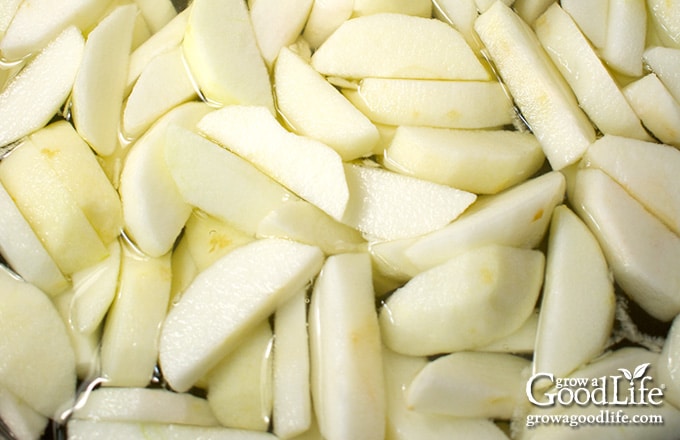
Step 4: Prepare the Lemon Water
To help prevent the peeled apples from browning, dip the pieces in a lemon water bath or an ascorbic acid mixture, such as Fruit-Fresh (follow the instructions on the container).
For a lemon water bath, fill a large bowl with about a gallon of cold water and juice from one lemon or 1/2 cup of bottled lemon juice.
Step 5: Prepare the Apples
Wash the apples well under clean, running water. Peel, core, and cut into halves, quarters, chunks, or slices. Add the apple pieces to the prepared lemon bath as you work.
Step 6: Simmer the Apples in the Syrup
Drain the apples and add them to the sugar-syrup pot. Cover the pot, raise the heat, and bring it to a boil. Once it is boiling, reduce the heat and simmer the apples for about 5 minutes.
Partially cooking the apples in the syrup helps draw the air out of the fruit so it will be less likely to float in the jar or absorb extra liquid when processed.

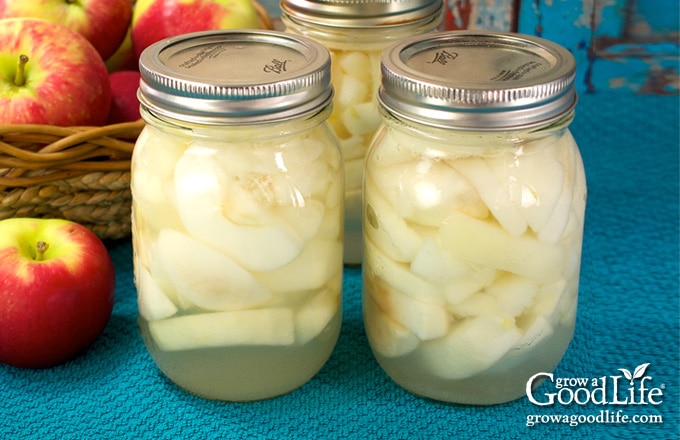
Step 7: Can the Apples
Spread a kitchen towel on the counter. Use the jar lifter to remove a hot jar from the canner, drain, and place on the towel. Keep the remaining jars in the canner, so they stay warm.
Use tongs and pack the hot apples into the jar. Use the canning funnel and ladle to pour the hot syrup over the apples maintaining a 1/2-inch headspace. To help prevent siphoning, make sure that the apples are covered with the liquid while allowing for adequate headspace.
Wipe the rim of the jar with a damp towel to remove residue. Center a lid on the top, place the band over the lid, and screw it on until fingertip tight. Place the jar back into the canner, and repeat with the rest of the jars.
Adjust the water level so it is covering the jars by two inches, bring the canner to a boil, and process in a boiling water canner for the times indicated in the recipe below. Let the jars cool completely, and then test the seals, label, date, and store in a cool, dark location. Canned foods are best if eaten within a year and are safe as long as lids remain sealed.
Canning Apples for Food Storage
Ingredients
- 13 1/2 pounds baking apples
- 6 1/2 cups water
- 3/4 cup sugar
- 1/2 cup bottled lemon juice (optional to prevent browning)
Instructions
Prepare the canning equipment:
- Wash your jars, lids, screw bands, and canning tools in hot soapy water. Rinse thoroughly to remove all suds. Set aside to air dry on a clean kitchen towel.
- Place the canning rack into water bath canner, place jars in the canner, and add water to cover. Bring the canner to a simmer (180˚F) for 10 minutes, and keep hot until you are ready to fill them.
Make the syrup:
- Add the sugar and water to the large saucepan and bring to a boil over medium-high heat to dissolve sugar, keep warm.
Prepare the apples:
- Fill a large bowl with about a gallon of cold water and lemon juice if using (or use Fruit Fresh – follow directions on package).
- Wash the apples well under clean, running water. Peel, core, and cut the apples into halves, quarters, or slices. Add the apple pieces to the bowl of water as you work.
Heat the apples in the syrup:
- Drain the apples and add them to the sugar-syrup pot. Cover the pot, raise the heat, and bring the pot to a boil, and boil for 5 minutes. Reduce the heat to low and fill the jars.
Can the apples:
- Spread a towel on the counter. Use your jar lifter to remove a warm jar from canner, drain the water into the canner, and place on the towel. Keep the rest of the jars in the canner so they stay hot.
- Use your canning funnel and ladle, to fill the warm jars with hot apples and top off with the syrup leaving 1/2-inch headspace.
- Run you bubble popper through the apples to release air bubbles, and wipe jar rim with a clean, damp kitchen towel.
- Place a lid on the jar, and screw the metal band down fingertip tight. Place the jar back into the canner, and repeat with the remaining jars.
- Once all the jars are in canner, adjust the water level to two inches above the tops.
- Cover the canner and bring to boil over high heat. Once water boils vigorously, process pints and quarts for 20 minutes at altitudes of less than 1,000 ft. Adjust processing time for your altitude if necessary. (see notes below)
- When processing time is complete, turn off the heat and allow the canner to cool down and settle for about 5 minutes.
- Lay a dry towel on the counter. Remove the cover by tilting lid away from you so that steam does not burn your face.
- Use the jar lifter to remove the jars from canner and place on the towel. Keep upright, and don't tighten bands or check the seals yet. Let the jars sit undisturbed for 12 to 24-hours to cool.
- After the jars have cooled for at least 12 hours, check to be sure lids have sealed by pushing on the center of the lid. The lid should not pop up. If the lid flexes up and down, it did not seal. Refrigerate jar and use up within a few days.
- Remove the screw on bands and wash the jars. Label, date, and store your jars in a cool, dark place and use within 12-18 months. Yields about 9 pint of apples.
Notes
Nutrition
Canning Resources and Further Reading:
- Syrups for Canning Fruit – National Center for Home Food Preserving
- Frequently Asked Canning Questions – National Center for Home Food Preserving
You May Also Like:

Hi, I did the canning recipe for apple butter it turned out great I was just wondering why the 1/2 inch headspace instead of the 1/4 inch tht so many others use, I used your 1/2 inch recommendation and all sealed I did only get seven half pints though but great.
J.L., Thanks so much for trying the recipe. I’m glad to hear your jars sealed and that you enjoyed the apple butter! This recipe is adapted from the Apple Butter in Ball Canning Back to Basics, and that tested recipe specifies a 1/2-inch headspace. With canning, recipes aren’t interchangeable — different formulations, textures, and processing times can change the required headspace, so it’s always best to pick one tested recipe and follow it as written for safety and best results. Yield can vary a bit depending on how much the butter is cooked down, so seven half-pints is still right in the normal range. Thanks again for the feedback and happy canning!
How would you proceed with using these canned apples to make a pie?
Geri, To use your canned apples for pie, drain the liquid from the jars and follow this apple pie recipe: Homemade Apple Pie.
We tried this recipe, and everything went well, but when i removed the jars after the 20 min process time, jars were floating and air bubbles were escaping from them. Does this mean they didn’t process correctly? Lids sealed, but worried did something wrong
Heather, I’m glad to hear that you gave the recipe a shot! If the lids have sealed correctly, then that’s a good sign. Sometimes, bubbles and floating can occur, but it doesn’t necessarily mean that there’s a problem with the canning process.
Let’s work together to troubleshoot this. Did you remember to cook the apples before packing them into the jars? This step is important as it helps release trapped air from the apple tissue. However, if you did cook the apples, some residual air bubbles may still exist.
Letting the jars cool undisturbed for 12 to 24 hours is also important to ensure proper sealing. During this time, any excess air is expelled, creating a vacuum, causing the lids to be drawn in and tightly sealing the jars. As long as the seals are secure, your canned apple slices should be safe to store and enjoy.
We tried this today. When we did the step where you boil the apples for 5 minutes in the syrup, the apples got mushy. We are going to turn them into applesauce. However, what can we do to prevent this.
Debbie, As you discovered, not all apples are a good choice for canning as apple slices. Be sure to use fresh, firm apples that hold their shape when cooked. I listed some varieties in the article, but you can test one apple to see if it will hold up. Peel, core, and slice one apple and boil it in a small pot of water. If it falls apart, preserve your apples as applesauce instead.
The recipe says you can use different syrups or plain water but I’m unsure if you would just boil the plain water as if it was syrup and add the slices to that and then proceed the same as if it was syrup?
Tina, Yes, You need to heat the apples before filling the jars. Follow the instructions, whether using syrup or using just plain water. Bring the plain water to a boil and add your prepared apples.
This recipe confuses me because I thought I needed to add an acid (lemon juice) to apples when canning them. Is that only if you are canning an apple pie filling and not just apple slices maybe???
Marsha, As noted in the recipe above, this is a tested safe canning recipe from the USDA Complete Guide to Home Canning. It does not require lemon juice. Apples are high in acid and have enough natural sugar to preserve well when canned using a boiling-water canner. This doesn’t mean you can omit lemon juice from other canning recipes that call for it. You cannot mix and match. Follow the instructions for that particular recipe because that is how it was tested and deemed safe.