Canning Peaches for Food Storage
This post may contain affiliate links, which means that I may receive a commission if you make a purchase using these links. As an Amazon Associate I earn from qualifying purchases.
Biting into a perfectly ripe peach is one of the most satisfying moments of summer. You can capture summer in a jar by preserving fresh peaches to enjoy all year long. Learn how to can peaches, plus tips to choose the best peaches for canning.

Canned peaches are such a versatile fruit to have on hand. You can eat them right out of the jar, or use them in baked goods, blend into smoothies, and add as a topping to yogurt, pancakes, and waffles. Peaches also pair very well with pork and chicken.
This year, limited grocery store runs and availability had me shopping online for canned foods to replenish our pantry. Although I was happy to find and stock up on cans of peaches to help us get by, I discovered quickly that there is no comparison in flavor. I tried different brands, but none had the fresh, peach flavor of home canned jars.
I vowed to add more canned jars of peaches to our food storage. So once peaches started showing up in my grocery stores and at our local farmers’ market. I set off to start preserving with this simple canned peaches recipe.
Tips for Canning Peaches
Canned peaches are blanched, peeled, sliced, packed into canning jars with a light syrup, and processed in a water-bath canner for shelf stable jars.
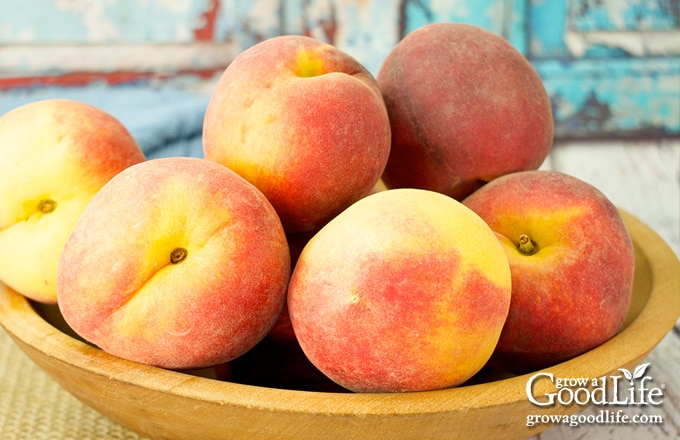
The Best Peaches for Canning
If I am canning peaches, I try to use the yellow-fleshed, freestone peaches because they are much easier to work with.
Yellow-Fleshed Varieties
Only the yellow-fleshed peaches can be home canned safely. White peaches and pale pink-fleshed peaches have a different pH acidity level than yellow. At this time, there is no tested safe canning recipe for white-flesh peaches. If you have white-fleshed peaches to preserve, freeze them instead.
Clingstone vs Freestone
There are two types of peaches, clingstone and freestone. They are called clingstone because the flesh clings to the pit. I find clingstone peaches are a hassle to trim into nice sized slices, and you may end up wasting some of the fruit. I prefer to use clingstone peaches to make peach jam.
The flesh easily separates from the pit of freestone peaches. This makes them much easier to clean and prepare for canning. Most early season peaches are clingstone varieties. If you are canning peaches for your food storage shelves, try to wait until mid- and late-season for the freestone variety.
Select Firm Fruit
Harvest or purchase good quality peaches at peak for the best flavor, texture, and color. Firm peaches are what you want to use for canning. They hold up better to the heat. If the peaches are too ripe, they will be too soft to take the heat and turn into a mushy mess…Still safe to eat, but not very pretty.
Choose unblemished ripe peaches that are still firm. Avoid peaches that are too hard, have green tinged skins, or with bruises and soft spots. Ripe peaches will smell sweet and fruity and yield slightly when pressed with your finger. If you are not canning your peaches the same day you purchased them, and they are at peak ripeness, place them in the refrigerator, so they don’t over-ripen. Peaches that are ripe, but firm can remain at room temperature.
Picking a Preserving Liquid
You can preserve peaches in a sugar syrup, honey syrup, apple juice, white grape juice, or plain water. Canning fruit in a syrup helps to preserve the flavor, shape, color, and improves the overall shelf life of the peaches. I use a very light sugar syrup in this recipe, but feel free to substitute any of these options:
Syrup for 9 Pints:
- Very Light: 6 1/2 cups water and 3/4 cup sugar
- Light: 5 3/4 cups water and 1 1/2 cups of sugar
- Medium: 5 1/4 cups water and 2 1/4 cups of sugar
- Heavy: 5 cups water and 3 1/4 cups of sugar
- Light Honey: 7 cups water and 1/2 cup mild honey
How to Can Peaches
If you need a refresher on the boiling water bath canning process, see my complete guide: Water Bath Canning for Beginners.
To help make canning day run smoothly, you can also download my free Home Canning Checklist with helpful reminders and space to track your batches. Grab your copy here:
Grab your Free copy
Home Canning Checklists
A more detailed and printable recipe can be found at the bottom of this article, but these are the general steps for canning peaches in pint-sized jars. See the notes in the recipe for quarts.
Step 1: Gather your canning supplies
- Water bath canner and canning rack
- 9 pint sized canning jars
- Canning lids and bands (new lids for each jar, bands can be reused)
- Canning tools: jar lifter, canning ladle, funnel, and bubble popper
- Plus basic kitchen supplies such as a large saucepot, large bowl, small pot, towels, large slotted spoon, knife, and a cutting board..
Step 2: Prepare the canning equipment
Wash the jars, lids, bands and canning tools in warm, soapy water and rinse well. Set the lids, bands, and tools aside to air-dry until you are ready to use them.
Place the canning rack into the water bath canner, set the jars upright in the canner, and add water to cover the jars. Bring the canner to a simmer (180˚F) for 10 minutes, and keep hot until you are ready to fill them.
Step 3: Peel the peaches
You will need about 11 pounds of peaches for a full canner load of 9 pint sized jars. Wash the peaches well under clean, running water.
Peel the peaches by blanching briefly in boiling water. Bring a large saucepan of water to a boil and fill a large bowl with ice water. Cut a small X at the bottom of each peach. Dip the peaches into the boiling water until the skins loosen, about 30-60 seconds.
Remove the peaches from the pot and place in the bowl of ice water to cool. Drain the pot and let the peaches cool in the ice water while you make the syrup.

Step 4: Make the syrup
Add the sugar and water to the large saucepan and bring to a boil over medium-high heat to dissolve sugar, reduce heat to low, and keep warm.
Step 5: Prepare the peaches
Peel the peaches once they are cool enough to handle. The skins should slip off easily. If not, use a pairing knife or vegetable peeler for stubborn skins.
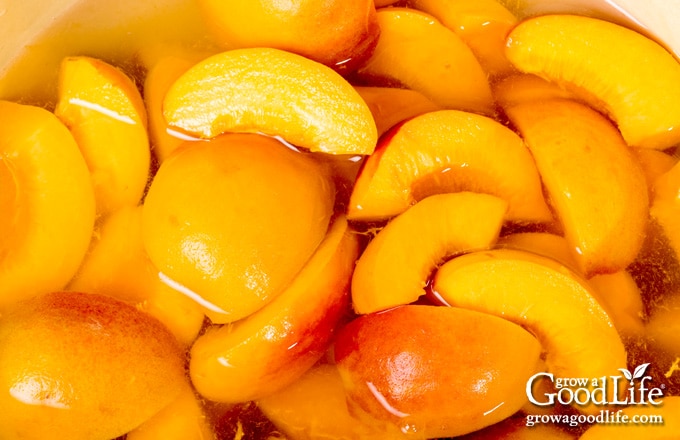
Remove the pits from freestone peaches by cutting the fruit in half around the pit and twisting the halves in opposite directions. Remove the pit, keep in halves or slice the peaches if desired.
To slice clingstone peaches, remove peeling, cut toward the center of the fruit around the pit, and lift out each slice as you go. Trim off fibrous areas.
Add the peaches to the pot of prepared syrup as you work. Try to work quickly because peaches will begin browning when exposed to air.
Once all the peaches are in the syrup, cover the pot, raise the heat, and bring the pot to a boil. Keep the peaches hot, but you can reduce the heat so it does not splash..
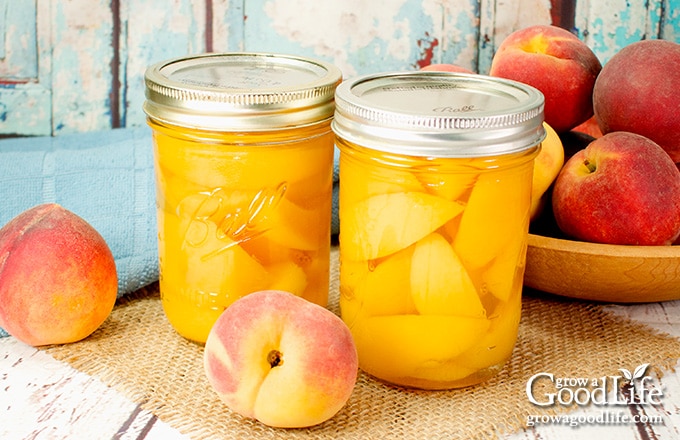
Step 6: Can the peaches
Spread a kitchen towel on the counter. Use the jar lifter to remove a hot jar from the canner, drain, and place on the towel. Keep the remaining jars in the canner, so they stay warm.
Use your canning funnel and slotted spoon to pack the jar with hot peaches, and ladle hot syrup over the peaches maintaining a 1/2-inch headspace. If you are canning half sized pieces, you can get more fruit into the jars if you stack the peach halves with the pit cavity side down.
Run the bubble popper through the jar to release air bubbles. Wipe the rim of the jar with a damp towel to remove residue. Center a lid on the top, place the band over the lid, and screw it on until fingertip tight. Place back into the canner, and repeat with the rest of the jars.
Adjust the water level so it is covering the jars by several inches, bring the canner to a boil, and process peaches in a boiling water canner for the times indicated in the recipe below. Let the jars cool completely, and then test the seals, label, date, and store in a cool, dark location.
Canning Peaches for Food Storage
Ingredients
- 11 pounds fresh peaches yellow fleshed
- 6 1/2 cups water
- 3/4 cups cane sugar
Instructions
Prepare the canning equipment:
- Wash your jars, lids, screw bands, and canning tools in hot soapy water. Rinse thoroughly to remove all suds. Set aside to air dry on a clean kitchen towel.
- Place the canning rack into water bath canner, place jars in the canner, and add water to cover. Bring the canner to a simmer (180˚F) for 10 minutes, and keep hot until you are ready to fill them.
Blanch and peel the peaches:
- Wash the peaches well under clean, running water.
- Bring a large pot of water to a boil and fill a large bowl with ice water.
- Cut a small X at the bottom of each peach. Plunge the peaches into the boiling water until the skins loosen, about 30-60 seconds.
- Remove the peaches from the pot and place in the bowl of ice water to cool. Drain the pot and let the peaches cool in the ice water while you make the syrup.
Make the sugar syrup:
- Add the sugar and water to the large saucepan and bring to a boil over medium-high heat to dissolve sugar, keep warm.
Prepare the peaches:
- Peel the peaches, remove the pits, and slice in halves or pieces.
- Remove the pits from freestone peaches by cutting the fruit in half around the pit and twisting the halves in opposite directions until one side releases. Remove the pits and keep in halves or slice the peaches if desired.
- To slice clingstone peaches, remove peeling, cut toward the center of the fruit around the pit, and lift out each slice as you go.
- Add the peaches to the prepared syrup and bring to boil.
Can the peaches:
- Spread a kitchen towel on the counter. Use your jar lifter to remove a warm jar from the canner, drain, and place on the towel. Keep the rest of the jars in the canner so they stay hot.
- Use your canning funnel and ladle, to fill the warm jar with hot peaches and top off with the syrup leaving 1/2-inch headspace.
- Run your bubble popper through the peaches to release air bubbles. Adjust headspace if necessary to maintain 1/2-inch headspace.
- Wipe the jar rim with a clean, damp kitchen towel. Place a lid on the jar, gasket side down. Screw the metal band down fingertip tight.
- Place the jar back into the canner with the jar lifter, and repeat with the remaining jars.
- Once all the jars are in canner, adjust the water level to two inches above the tops. If adding water, pour the water in between the jars and not directly onto them.
- Cover the canner and bring to boil over high heat. Once water boils vigorously, process pints for 20 minutes at altitudes of less than 1,000 ft. Adjust processing time for your altitude if necessary (see notes below).
- When processing time is complete, turn off the heat and allow the canner to cool down and settle for about 5 minutes.
- Spread a dry kitchen towel on the counter. Remove the cover by tilting lid away from you so that steam does not burn your face.
- Use the jar lifter to remove the jars from canner and place on the towel. Keep upright, and don't tighten bands or check the seals yet. Let the jars sit undisturbed for 12 to 24-hours to cool.
- After the jars have cooled for at least 12 hours, check to be sure lids have sealed by pushing on the center of the lid. The lid should not pop up. If the lid flexes up and down, it did not seal. Refrigerate and use within a few days.
- Remove the screw on bands and wash the jars. Label, date, and store your jars in a cool, dark place. Use within 12 to 18 months. Yields about 9 pint jars of peaches.
Notes
- Very Light = 10 1/2 cups water and 1 1/4 cups sugar
- Light = 9 cups water and 2 1/4 cups sugar
- Medium = 8 1/4 cups water and 3 3/4 cups sugar
- Heavy = 7 3/4 cups water and 5 1/4 cups sugar
- Light Honey = 11 cups water and 1 cup honey
- Pints at altitudes of 1,001 – 3,000 ft. is 25 minutes, 3,001 – 6,000 ft. is 30 minutes, and above 6,000 feet is 35 minutes.
- Quarts at altitudes of 1,001 – 3,000 ft. is 30 minutes, 3,001 – 6,000 ft. is 35 minutes, and above 6,000 feet is 40 minutes.
Nutrition
You May Also Like:
- How to Can Apple Slices
- How to Can Pears
- Maple Vanilla Peach Jam Canning Recipe
- Additional Ways to Home Can Fruit
- Safe Tweaks for Canning Fruit, Juice, and Preserves

Thank you for such a detail set of instructions. First time oeach canner here and probably the last time. $45 for 12 lbs of peaches. 😮
Marsha, I’m so glad the detailed instructions were helpful for your first time canning peaches! And wow, $45 for 12 pounds is definitely an investment. Prices can vary quite a bit, so buying during peak peach season or directly from a local orchard may be more affordable. Thank you for trying the recipe.
i see no option for printing recipe
t.r. maxey, The print button is located right beneath the square photo in the recipe card.
Hi- I’m going to try your recipe, but notice a mistake where you give directions for the syrup for Quarts. It should be water and not sugar for medium and heavy.
Catherine, Thanks for catching that. I have fixed it.
What variety of peaches do you use? Do you find your peaches stay somewhat firm after canning with this method? I have always raw packed my peaches and added granulated sugar to each jar (it dissolves and creates a syrup). But would like the peaches to be firmer if possible. I wonder if hot packing them the way you describe they will stay firmer….
AmyJo, I use whatever yellow-fleshed peaches I can find. The key to getting firm canned peaches is for them to be slightly under ripe, and yes hot pack instead of raw pack. Precooking the peaches in the syrup makes it easier to pack into jars and helps maintain the texture. It also releases some air in the fruit, which helps prevent the fruit from floating when canned.
I have canned clingstone before. Yes a hassle but I can get them for .97/lb. The Elberta are $1.99/lb and up. Canning peaches have gotten so expensive here in Minnesota.
I don’t think I will be canning any this year. I live in Tennessee and any I have found are very high priced. One place I found South Carolina free stone were $36.00 a half bushel! Tha’ts way to high [roced to can. There is no need to charge that much really.
Christine, Yes, pricing is a bit higher than normal, but things are going to be much different this year for farmers. Keep watching the prices and your local orchards for availability.