How to Grow Cantaloupe
This post may contain affiliate links, which means that I may receive a commission if you make a purchase using these links. As an Amazon Associate I earn from qualifying purchases.
Sweet, juicy, and refreshing, there’s nothing like a big slice of ripe, garden-fresh cantaloupe on a sizzling summer afternoon. This guide teaches you everything about growing cantaloupes in your backyard garden.

Cantaloupes are beautiful, orange-colored melons with beige outer shells distinguishable by their white net pattern. They thrive in the summer sunshine and heat and can be a great addition to your garden for a sweet summer treat.
In this guide, we’ll cover everything you need to know to grow your own cantaloupes, from choosing the right variety to knowing when to harvest the ripest fruits.
About Cantaloupes
Cantaloupes are often referred to as a type of melon, but they are actually a variety of muskmelon. Muskmelon is a term used to refer to a group of melons belonging to the species Cucumis melo. This group includes cantaloupes, honeydews, Crenshaw melons, and many other delicious varieties.
What distinguishes muskmelons from other types of melons is their characteristic musky aroma, which is where the name “muskmelon” originates. These melons typically have a sweet, fragrant flavor profile that sets them apart from other varieties.
Cantaloupes are known for their sweet flavor, orange flesh, and netted outer skin, making them one of the most recognizable types of muskmelons. Like other melon varieties, cantaloupes thrive in warm summer weather, growing on sprawling vines similar to other members of the Cucurbitaceae family, such as watermelons and cucumbers. They have a long growing season, often taking up to 90 days to grow and ripen fruit.
Cantaloupes offer delicious flavor and nutritional benefits, making them a tasty and healthful addition to summer meals and snacks. They are rich in antioxidants and packed with essential nutrients. They’re notably high in potassium and contain significant amounts of vitamin C and folate.
Cantaloupe Varieties to Consider Growing
When growing cantaloupes, selecting the right variety is key to a successful harvest. There are many options available that are tailored to different climates, preferences, and growing conditions. Here’s an overview of some popular cantaloupe varieties that you may want to consider:
Divergent Muskmelon: Exceptionally early, reliable, and even-ripening, these attractive, lightly netted round melons have a high sugar content and rich muskmelon flavor. They are ideal for challenging seasons with cool nights. Days to Maturity: 75 days. Type: F-1 hybrid. Fruit Size: 2½–3½ lb.
Hale’s Best Jumbo Cantaloupe is a melon variety known for its exceptionally sweet and thick-walled fruits. Its small seed cavity results in more delicious and mouth-watering fruit. This melon is suitable for most climates and is more drought-tolerant than other melons. Days to Maturity: 85 days. Type: Open-pollinated. Fruit Size: 3–5 pounds.
Hearts of Gold Cantaloupe: This is a classic, orange-fleshed muskmelon with a thin rind and thick flesh. It offers a rich flavor that speaks of summer itself—juicy, fragrant, and sweet. Vigorous vines produce two ribbed and netted fruits per plant. Days to Maturity: 85 days. Type: Open-pollinated. Fruit Size: 2–3 pounds.
Melonade Muskmelon: Known for its unusual sweet and sour flavor, Melonade features firm orange flesh that is tart, punchy, and refreshing. Vigorous plants with short days to maturity and concentrated fruit set. Days to Maturity: 70 days. Type: F-1 hybrid. Fruit Size: 4–5 pounds.
Minnesota Midget Cantaloupe: This compact variety produces sweet and juicy 4-inch fruits, making it especially suited for areas with short growing seasons. It is ideal for containers and raised bed gardens. Days to Maturity: 65 days. Type: Open-pollinated. Fruit Size: 1–2 pounds.
Triton Muskmelon: This melon variety is famous for its smooth, mild, and slightly sweet orange flesh. It has a smaller seed cavity and is highly resistant to fusarium wilt. The melon offers excellent sweetness and overall quality. Days to Maturity: 75 days. Type: F-1 hybrid. Fruit Size: 4-5 pounds.
Tips for Growing Cantaloupe
Cantaloupes are the perfect addition to any summer garden. With a little guidance, you’ll be well-equipped to nurture these delicious melons to perfection. To ensure a successful harvest, consider the following tips for cultivating cantaloupes:
Melons are a Summer Crop
Wait to plant until after all danger of frost is past and the ground has thawed and warmed to at least 60˚F. In warm growing areas, you can direct sow seeds in the garden after all danger of frost is past. In areas with shorter seasons, sow seeds indoors 4 to 6 weeks before your last frost date, then transplant hardened-off seedlings once all danger of frost is past and the soil has warmed.
Site Selection
Before planting cantaloupes, carefully select the perfect spot in your garden. Here are some factors to consider:
- Sunlight: Pick a location that receives full sun for at least 6 to 8 hours daily, as cantaloupes thrive in warm, sunny conditions.
- Soil Quality: Opt for well-draining soil rich in organic matter. Avoid compacted or waterlogged soil, as it can lead to poor root development and disease issues.
- Space: Cantaloupes need plenty of space to spread their vines. Ensure adequate spacing between plants, allowing for proper airflow and sunlight penetration.

Soil Preparation
Growing cantaloupes in raised mounds, hills, or rows helps retain heat and improves soil drainage, preventing waterlogging and root rot.
- Prepare your soil in spring by clearing last year’s mulch and removing any weeds. Leave the soil surface uncovered to drain and warm naturally, or consider adding a layer of black landscape fabric to warm the soil quicker.
- Plot out your melon patch, ensuring proper spacing as indicated on the seed package. Typically, each mound or hill can accommodate up to 3 plants. Space your hills 4 to 8 feet apart to allow the vines to spread.
- Once the soil is workable, form your mounds. Begin by digging a hole approximately 8 inches deep in the center of each planting area. Fill the hole with finished compost, a slow-release organic fertilizer, and mix it thoroughly with the native soil. Shape the mound to about 6 inches high and 2 feet in diameter.
Short Growing Season Tips
I never thought I could grow cantaloupes in my short-season, zone 5 garden. That was until I learned that a few varieties mature quicker than others—some in as little as 60 to 70 days!
Their long growing season and heat preference may make it harder for muskmelons to grow in cold climates, but you can do a few things to grow them successfully. This is what I do to get a good yield of fruit in my zone 5 garden:
Choose fast-maturing varieties: Minnesota Midget is my favorite variety to grow but I have also had great success with Triton and Divergent muskmelons.
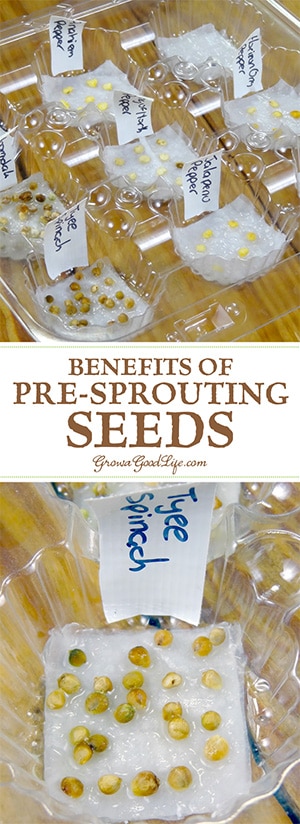
Start seeds indoors: Sowing cantaloupe seeds indoors under lights, and transplanting healthy seedlings is a great way to give the plants a head start. I try to start my seeds about 4 to 6 weeks before planting, and don’t transplant to the garden until nighttime temperatures are in the 60s. I like to pre-sprout my seeds using a damp paper towel in a warm spot, then plant them into 6-inch pots so the roots have plenty of space to develop.
Take your time hardening off: Start exposing your plants to outdoor conditions once the weather warms to at least 60°F and bring them in overnight.
Transplant once soil warms: Cantaloupes are very sensitive to cold temperatures, and even a mild frost can injure the plants. Don’t consider planting outdoors until all danger of frost is past and the soil temperature is about 60°F several inches beneath the soil surface. Consider covering the soil with black landscape fabric to help warm it up quicker while you are hardening off your transplants.
Pinch off early blooms: Removing early blossoms on young plants redirects their energy towards root development and establishing a strong foundation, ensuring healthier growth and increased fruit production later in the season.

Growing Cantaloupe Vertically
With their long, sprawling vines, Cantaloupes can be efficiently grown vertically using a sturdy trellis system. Growing cantaloupes on a trellis can be a great space saver in the garden.
Additionally, growing on a trellis allows for better exposure to sunlight, promoting healthy fruit development and ripening. With vines lifted off the ground, air can circulate freely around the plants, reducing the risk of fungal diseases. Elevating the vines off the ground also helps deter pests that prefer shaded, moist environments.
Trellis Setup
Choose a trellis approximately 8 feet tall and 20 feet wide to accommodate the vigorous growth of cantaloupe vines. Ensure the trellis is made of solid materials such as wood or metal and has sturdy posts to support the weight of the vines and fruit.
Attaching Vines to the Trellis
Plant the cantaloups at the base of the trellis. As the vines grow, gently guide them towards the trellis and loosely tie them using soft garden twine or plant ties. Avoid tightly binding the vines to allow for natural growth and prevent damage to the stems. Regularly check the vines and adjust the ties as needed to prevent them from becoming constricted.
Supporting Heavy Fruit
Cantaloupes produce large, heavy fruit that may require additional support when grown vertically.
Use fabric or mesh slings to cradle the developing fruit and prevent it from pulling down on the vine. Tie a mesh hammock underneath each fruit to support its weight as it matures. Ensure the supports are securely attached to the trellis to prevent the fruit from falling and getting damaged.

By implementing these techniques, you can grow cantaloupes vertically on a trellis, maximizing space efficiency and enhancing your garden’s overall health and productivity.
How to Plant Cantaloupes
Cantaloupes can be started from seeds indoors, directly sown into the garden, or transplanted as seedlings. By following these planting methods, you’ll be well on your way to growing healthy and productive plants in your garden. Here’s a guide on each method:
Starting Seeds Indoors
Starting cantaloupe seeds indoors gives you a head start on the growing season and allows for better control over environmental conditions. Check out our guides on How to Set Up an Indoor Seed Starting Area, 10 Steps to Starting Seeds Indoors, then follow these steps:
- Timing: Plan to sow seeds indoors about 4 to 6 weeks before your area’s last expected frost date. You can look it up by zip code here: PlantMaps.com.
- Planting: Sow in seed-starting trays filled with damp seed-starting mix—plant 2 to 3 seeds per pot or cell, burying them about 1 inch deep. Use a heat mat for faster germination. Keep the soil consistently moist but not soggy. See 10 Steps to Starting Seeds Indoors for details on sowing seeds under grow lights.
- Light: Once the seeds sprout, place the trays under the grow lights. Seedlings need 12 to 16 hours of light each day. I set my timer for 16 hours on and 8 hours off. Keep the lights about 2 inches above the seedlings. Adjust as the plants grow.

Transplanting Seedlings
Whether you grew you own transplants, or purchased seedlings from the garden center, here are the steps for transplanting your seedlings:
- Hardening Off: Once the seedlings are at least 3 to 4 inches tall, and daytime temperatures have warmed to 50 to 60˚F, begin hardening them off so they adapt to outdoor conditions. See How to Harden off Transplants for detailed steps.
- Transplanting: After all the threat of frost has passed and the soil has warmed to 60°F, prepare your soil and transplant the seedlings to the garden, spacing them according to seed package instructions.
- Watering: Water the seedlings immediately after transplanting and keep the soil evenly moist to help them adapt to their new environment.
Direct Sowing Seeds
Directly sowing cantaloupe seeds into the garden is ideal for regions with long growing seasons and warm temperatures. Here’s how to do it:
- Timing: Wait until all danger of frost has passed and the soil has warmed to at least 70°F before sowing seeds directly into the garden.
- Soil Preparation: Prepare the planting area as described above by loosening the soil and incorporating compost or aged manure to improve fertility and provide good drainage. Then, form your planting mounds, hills, or rows.
- Sowing Seeds: Plant seeds 1 inch deep and space them 12 to 24 inches apart in rows or 2 to 3 plants per hill or mound. Cover with soil and gently pat down to ensure good seed-to-soil contact.
- Watering: Keep the soil consistently moist but not waterlogged until seeds germinate, typically within 7 to 10 days. Then reduce watering once the plants begin to grow.
- Succession Sowing: If you have a long, warm growing season, consider sowing cantaloupe seeds every 2 to 4 weeks. This will help to stagger the harvest and avoid having all the fruit ripen at once.
How to Care for the Plants
Once your cantaloupe plants are established, proper care is essential to ensure healthy growth and abundant harvests. Here’s how to care for your cantaloupe plants throughout the growing season:
Watering
Proper watering is essential for cantaloupe plants, as inconsistent moisture levels can lead to issues such as blossom end rot or poor fruit development. Cantaloupes need a lot of water but be sure to keep the leaves as dry as possible to avoid disease. Follow these watering best practices:
Cantaloupe plants need about 2 inches of water a week before they start producing fruit. Then, once the fruit starts growing, reduce the amount of water to 1 inch, or as needed during hot spells. Reducing the amount of water will produce sweeter cantaloupe. Once you have melons beginning to ripen, only water them when the soil feels dry. Hot, dry weather conditions help your cantaloupe plants develop sweeter fruit.
Water plants deeply, thoroughly soaking the soil to encourage deep root growth. Water plants at the base of the plants to prevent foliage from getting wet, as wet foliage can lead to fungal diseases. It’s best to water cantaloupes about once a week using a soaker hose or a drip irrigation system if you have a larger garden.
Mulching
Adding a lightweight, organic mulch to your cantaloupe patch is beneficial in many ways. Organic mulch will break down over the growing season, providing your cantaloupes with plenty of nutrients. Mulching your cantaloupes will help keep pesky weeds away, making it easier on you as your cantaloupes grow. It will also help keep the soil soft and moist during the hot summer months.
Another great reason to mulch around your cantaloupes is that the mulch will keep the fruit off the soil, avoiding rot and pests. You can learn more about mulching in this article: How Organic Mulch Helps Your Garden. Here’s how to effectively apply mulch to your cantaloupe beds:
Use organic mulch such as straw or shredded leaves to cover the soil around cantaloupe plants. Apply a layer of mulch 2 to 4 inches thick to suppress weeds and retain moisture in the soil. Keep the mulch several inches away from the base of cantaloupe plants to prevent stem rot and fungal diseases.
Weeding
While mulch will help suppress weeds, regular weeding will ensure healthy growth of cantaloupe plants. Weeds will compete with your plants for water, nutrients, and sunlight. Follow these strategies for effective weed management:
Pull weeds out of your cantaloupe bed before the vines start to spread. Once the sprawling vines begin growing, pulling weeds around your cantaloupes can be challenging without damaging them.
Regularly inspect your garden beds for weeds and remove them promptly by hand or using a hoe. Be careful not to disturb the roots while weeding to minimize stress on the plants.
Apply more organic mulch as needed to suppress weed growth and reduce the need for frequent weeding. Check out this article for more tips on Organic Weed Control in Your Vegetable Garden.
Fertilizing
Cantaloupe plants need lots of nutrients to produce sweet, refreshing summer fruit. Proper fertilization is key to providing cantaloupe plants with the nutrients they need for vigorous growth and fruit production. If you added compost and fertilizer to the growing bed before planting, your plants are off to a great start. Here’s how to continue to feed your plants as they grow:
Apply a balanced organic fertilizer when plants begin to vine and again when fruits start to form. Follow the package directions and scatter fertilizer evenly around the base of plants, avoiding direct contact with stems or foliage. Scratch it into the soil and water thoroughly to help nutrients penetrate the soil and reach the roots. Avoid fertilizers high in nitrogen, though, as they help foliage growth but hinder fruit growth.
Consider Hand Pollination
If you have limited bees and pollinator insect activity, hand pollination can help improve fruit set. To hand pollinate cantaloupe plants, follow these steps:
Identify male and female flowers. Male flowers have a slender stem, while female flowers have a small swelling at the base, which will develop into the fruit.
Early in the morning, use a small paintbrush or cotton swab to transfer pollen from the male flowers to the stigma of the female flowers. Repeat this process daily to ensure thorough pollination and maximize fruit production. You can learn more in our Hand Pollinating guide.
Troubleshooting Pests and Diseases
While cantaloupe plants are generally hardy, they can be susceptible to various pests and diseases. Identifying and managing these issues promptly is essential to ensure healthy plant growth and maximize yield. Here are some common pests and diseases that may affect cantaloupe plants, along with organic management strategies:
Common Pests:
Aphids: These small, soft-bodied insects feed on plant sap, causing stunted growth and distorted leaves. Control aphids by spraying plants with a strong stream of water to dislodge them, or use insecticidal soap or neem oil as organic alternatives. Spray in the morning so the moisture evaporates quickly.
Cucumber Beetles: These pests feed on foliage and transmit bacterial wilt disease. Control cucumber beetles by handpicking them off plants, using row covers to prevent infestation, or applying diatomaceous earth around the base of plants.
Spider Mites: These tiny pests suck plant juices, causing yellowing leaves and webbing on plants. Control spider mites by regularly spraying plants with water to dislodge the insects and increase humidity or use insecticidal soap.
Squash Bugs: These pests feed on the foliage, causing wilting and yellowing foliage. They can also transmit bacterial diseases, leading to further damage. To manage squash bugs organically, handpick and dispose of them, use row covers at planting time to protect the plants, and encourage natural predators such as beneficial insects. Regular monitoring and early intervention are key to preventing severe infestations.
Common Diseases:
Powdery Mildew: This fungal disease appears as white powdery spots on leaves, eventually causing leaf yellowing and distortion. Control powdery mildew by improving air circulation around plants, avoiding overhead watering, and applying a fungicidal spray containing sulfur or potassium bicarbonate.
Downy Mildew: Another fungal disease, downy mildew causes yellow spots on leaves, which eventually turn brown and necrotic. Control downy mildew by removing and destroying infected plant parts, applying copper-based fungicides, and practicing crop rotation.
Fusarium Wilt: This soil-borne fungal disease causes wilting and yellowing of leaves, leading to plant death. Control fusarium wilt by planting disease-resistant varieties, practicing crop rotation, and improving soil drainage.
Organic Management Strategies:
Cultural Practices: Maintain good garden hygiene by removing plant debris and weeds, as they can harbor pests and diseases. Rotate crops annually to prevent the buildup of soil-borne pathogens.
Biological Controls: Promote biodiversity to attract natural predators of pests to your garden. Ladybugs, lacewings, and predatory wasps are beneficial insects that can help control pest populations, along with frogs, toads, and snakes.
Organic Sprays: If all else fails, you can use organic sprays, such as insecticidal soap, neem oil, or horticultural oil, to control pest infestations. Always follow label instructions and avoid spraying during hot, sunny conditions to prevent leaf damage.
By implementing these organic management strategies and staying vigilant for signs of pests and diseases, you can effectively protect your cantaloupe plants and ensure a healthy and productive harvest.
When and How to Harvest
Cantaloupes typically take up to 90 days to mature from seed. Once flowers bloom, it can take an additional 30 to 45 days for the fruit to ripen fully. Keep track of the timeline from flowering to gauge when your cantaloupes are nearing maturity, then watch for the following signs:
- Netting and Rind Color: As cantaloupes ripen, the netting on the surface becomes more pronounced, and the rind changes from green to beige or yellowish-orange. Look for vibrant, uniform color without any green patches.
- Aroma: A fully ripe cantaloupe emits a sweet, fruity aroma from the blossom end, indicating readiness for harvest.
- Firmness: Gently press the blossom end with your thumb. A ripe cantaloupe will yield slightly to pressure but still feel firm and not overly soft.
- Stem Crack or Slip: Check for a crack in the stem where it attaches to the fruit or a slight crack where the stem meets the fruit. If the cantaloupe is ripe, the stem should detach easily from the fruit with a gentle twist.

Harvest When Ready
Ripe muskmelons should slip from the vine easily, so you shouldn’t need to cut the stem when you harvest them. However, if they fall from the vine without being pulled, they may be overripe. Be sure to eat these right away.
Cantaloupe growing along the same vine usually ripens around the same time, so keep an eye on any remaining fruit you have after harvesting.

Storing Cantaloupes
Place harvested cantaloupes in the refrigerator immediately to slow down ripening and prolong shelf life. Avoid washing cantaloupes before refrigeration, as moisture can promote mold growth. Store whole cantaloupes in the refrigerator’s crisper drawer, where the temperature is slightly cooler and more consistent.
Muskmelons have a short storage life. Depending on the level of ripeness, you should consume the fruit within 5 to 7 days. Rinse them well before cutting, then store any leftover pieces in an airtight container in the fridge and consume them within a few days.
By following these harvesting and storage guidelines, you can enjoy delicious, fresh cantaloupes at their peak ripeness for longer periods.
Freezing Cantaloupes
While frozen cantaloupe won’t have the same firm texture as fresh, it’s a convenient way to preserve the fruit for use in various recipes throughout the year. Here’s how to freeze cantaloupes:
- Preparation: Start by washing the cantaloupe thoroughly under running water to remove any dirt or debris from the surface. Use a clean knife to cut the cantaloupe in half and remove the seeds and pulp from the center.
- Peel and Slice: Use a vegetable peeler or a knife to remove the outer skin from each half of the cantaloupe. Once peeled, slice the cantaloupe into cubes or wedges, depending on your preference.
- Flash Freezing: Arrange the cantaloupe pieces in a single layer on a baking sheet lined with parchment paper or wax paper. Make sure the pieces are not touching each other to prevent them from sticking together during freezing. Place the baking sheet in the freezer and allow the cantaloupe to freeze for about 1 to 2 hours, or until firm.
- Transfer to Freezer Bags or Containers: Once the cantaloupe pieces are frozen solid, transfer them to freezer-safe bags or airtight containers. Remove as much air as possible from the bags before sealing to prevent freezer burn.
- Store in the Freezer: Don’t forget to label the bags or containers with the freezing date. Frozen cantaloupe can be stored in the freezer for up to 6 months.
- Thawing: When you’re ready to use the frozen cantaloupe, transfer the desired amount to the refrigerator and allow it to thaw overnight. Alternatively, you can add frozen cantaloupe directly to smoothies or fruit salads without thawing.
—
Growing cantaloupes in your backyard garden will result in plenty of refreshing, juicy melons throughout the summer. This refreshing, succulent summertime fruit can be an exquisite addition to any garden. Anyone can grow cantaloupes in their garden; all it takes is a little planning and plenty of sunshine, water, and nutrients. I hope I have convinced you to give it a try.
