How to Freeze Celery
This post may contain affiliate links, which means that I may receive a commission if you make a purchase using these links. As an Amazon Associate I earn from qualifying purchases.
Learn how to freeze celery so it stays fresh for months. See the step-by-step method, whether celery should be blanched, and how to store frozen celery properly

Freezing celery is an easy way to reduce food waste and always have chopped celery ready for soups, stews, and casseroles. If you’ve ever bought a bunch of celery for one recipe and wondered what to do with the rest, learning how to freeze celery is a simple solution.
Celery isn’t something I use regularly in the kitchen. We enjoy a few ribs here and there in salads, soups, stir-fries, and bread stuffing on Thanksgiving, but it’s rare that I use up a whole bunch at once.
Instead of letting the extra go to waste, I chop it up and freeze it. That way, I can easily grab a handful of frozen celery whenever I need it and add it straight to the pot or pan. While celery loses its crisp texture after freezing, it still works beautifully in cooked recipes.
If you grow your own celery, you may end up with more than you can use at once. Freezing is a great way to preserve the harvest.
In this guide, you’ll learn how to freeze celery step-by-step, whether you should blanch it first, and how to store it so it keeps its quality in the freezer for months.
Can You Freeze Celery?
Yes, celery can be frozen. Freezing celery is a convenient way to preserve extra stalks so they don’t go to waste.
Because celery contains a lot of water, the texture becomes softer once thawed. For this reason, frozen celery works best in cooked recipes rather than fresh dishes like salads or celery sticks.
Chopped celery can be added straight from the freezer to soups, stews, casseroles, stir-fries, and stuffing. I love freezing celery specifically so I always have it ready when making soup or building flavor bases like mirepoix.
Celery is often used alongside onions and carrots when building flavor in soups and stews. If you freeze vegetables regularly, you may also enjoy my guides on how to freeze carrots and how to freeze peppers.
For the best quality, celery should be blanched before freezing, but it can also be frozen without blanching if you plan to use it within a few months.
Do You Have to Blanch Celery Before Freezing?
When you blanch food, you partially cook it in boiling water for a brief time, then plunge it into an ice bath to stop the cooking process. Blanching helps slow the enzymes that cause vegetables to lose flavor, color, and texture during freezer storage. It also washes off any bacteria that might be on the surface of the celery.
Blanching celery before freezing is recommended for long-term storage, but it isn’t always necessary if the celery will be used soon.
If you plan on using your celery within about 3 months, you don’t need to blanch it before freezing. Just be sure to rinse it very well before freezing, and cook it before eating.
However, if you want celery to last longer in the freezer, it’s best to blanch it first. Properly blanched, packaged, and frozen celery will maintain its best quality in the freezer for about 10 to 12 months.
How to Freeze Celery (Step-by-Step)
Freezing celery is simple and helps prevent food waste. While celery loses most of its crispness after freezing, it works well in cooked dishes such as soups, stews, stir-fries, stuffing, and other recipes.
Choose fresh, crisp crisp celery stalks for the best results. If your celery is a little limp, trim the bottom and place the stalks in a bowl of cold water for a couple of hours to help rehydrate them before processing.
You’ll find the printable recipe at the bottom of this post, but here are the illustrated steps for freezing celery.
Step 1: Gather Your Equipment
Simple kitchen equipment is all you’ll need to freeze celery:
- Large pot of water
- Colander or mesh strainer
- Large bowl of ice water
- Knife
- Cutting Board
- Baking sheets
- Parchment paper
- Zipper type freezer bags or freezer containers with lids
- Kitchen towels
Step 2: Wash the Celery
Rinse each bunch of celery well under clean running water. Pull the celery stalks apart and rub your thumbs along the ribs to remove any soil and residue.

Step 3: Cut the Celery
Using a sharp knife, trim off the white sections at the base of each stalk. If your celery is stringy, use a knife or a vegetable peeler to remove the coarse strings.
Trim the tops of the celery and chop the ribs into the shapes you will use in your recipes. You can freeze celery in any shape, including chunks, cubes, or half-moon slices. Larger pieces can always be chopped further while frozen if necessary.
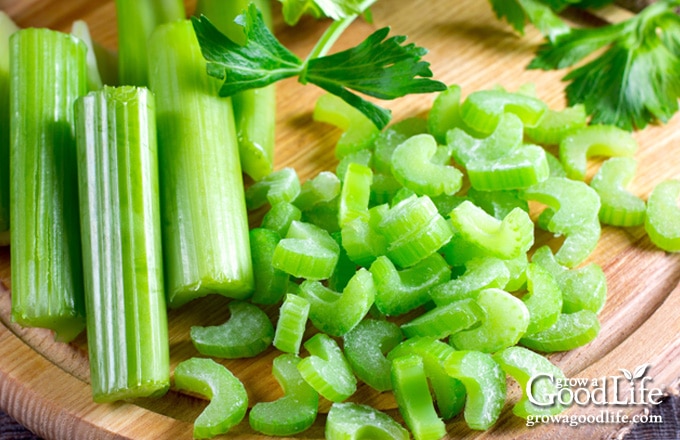
Save the celery leaves, small ribs, and trimmings for making vegetable or chicken stock.
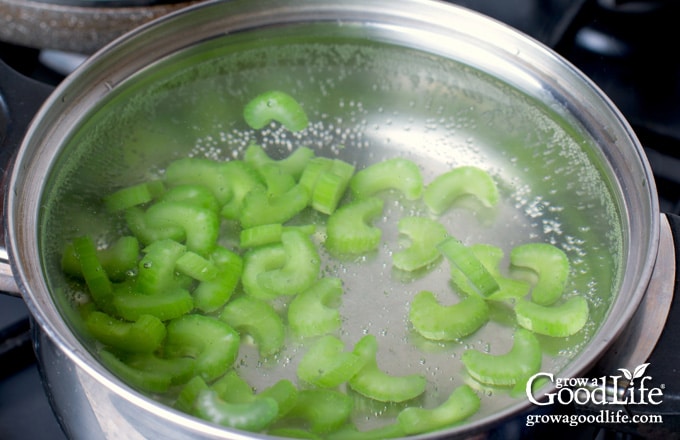
Step 4: Blanch the Celery
Bring a large pot of water to a rapid boil. Add the chopped celery and blanch for 3 minutes.
Step 5: Cool in Ice Water
Remove the celery and immediately plunge it into a bowl of ice water to stop the cooking process. Let it cool for about 5 minutes.

Drain the celery and spread it out on a clean kitchen towel. Pat dry to remove excess moisture before freezing.
Step 6: Flash Freeze
Flash freezing the celery before storing it in freezer bags will help prevent the pieces from sticking together, so you can grab a handful when needed.

To pre-freeze your blanched celery, layer your baking sheets with parchment paper. Spread the celery pieces out on the sheets in a single layer, spacing them so they do not touch. Place the baking sheets in the freezer until the celery is frozen solid, about 1 to 2 hours.

Step 7: Package the Frozen Celery
Transfer the frozen celery into freezer bags, remove as much air as possible, and seal the bag. Label, date, and store the bags in the freezer for up to 10–12 months.

How to Freeze Celery Without Blanching (Quick Method)
Celery can also be frozen without blanching if you plan to use it within a few months.
While blanching helps preserve the best flavor, color, and texture for long-term storage, skipping this step is a quicker option for short-term freezing.
To freeze celery without blanching, simply rinse the stalks well, trim the ends, and chop the celery into the sizes you typically use in recipes.
Spread the pieces out on a parchment-lined baking sheet and freeze until solid, about 1 to 2 hours. Then transfer the frozen celery to airtight containers or freezer bags, remove as much air as possible, label, and store in the freezer. Celery frozen without blanching is best used within 2 to 3 months.
How to Use Frozen Celery
Frozen celery works best in cooked dishes. Because celery contains a lot of water, its texture softens after freezing, so it isn’t ideal for fresh dishes like salads or celery sticks.
The good news is that frozen celery works beautifully in recipes where the vegetables are cooked and softened anyway. There’s also no need to thaw it first; simply add the frozen celery directly to the pot or pan while cooking.
Frozen celery is especially useful in recipes such as:
- Turkey Soup: A great way to use leftover turkey. Frozen celery adds flavor and texture to the broth as it simmers.
- Beef Stew: Chopped celery helps build the savory base along with onions, carrots, and herbs.
- Chicken Stock: Celery is one of the classic vegetables used to create a rich, flavorful homemade broth.
- Turkey Stuffing: Celery adds aroma and flavor to traditional stuffing, especially when sautéed with onions and herbs.
Keeping chopped celery in the freezer makes it easy to add flavor without needing to prep fresh celery each time.
How to Freeze Celery
Ingredients
- 1 bunch Celery
Instructions
- Bring a large pot of water to a boil over high heat.
- As the pot heats, prepare your celery by separating the ribs and rinsing them well under clean, running water to remove any dirt.
- Trim the white sections off the bottom of each stalk and remove strings, if needed.
- Cut the ribs into chunks, cubes, or slices. Save the ends, leaves, and small ribs to use in making chicken or vegetable stock.
- Once the water is boiling vigorously, lower the prepared celery pieces into the pot and boil for 3-minutes.
- Remove the blanched celery and plunge into the bowl of ice water to cool for about 5 minutes.
- Once the celery has cooled, remove and place on a clean kitchen towel to absorb extra moisture.
- Line baking sheets with parchment paper, and arrange the celery pieces on the trays, in a single layer so they do not overlap.
- Place the baking sheets in the freezer and freeze until the celery is solid, about 1 to 2-hours.
- Transfer the frozen celery to freezer bags, squeeze to remove air, and seal the bag. Label, date, and store the frozen celery in the freezer until ready to use in your favorite recipes. Use within 10-12 months.
Nutrition
Frequently Asked Questions About Freezing Celery
Since this article was first published in 2020, a few questions have arisen about freezing celery. Here are quick answers to some of the most common ones:
Can you freeze chopped celery?
Yes, chopped celery freezes very well and is the easiest way to store it for cooking. Simply wash the stalks, chop them into pieces, blanch if desired, and freeze in airtight freezer bags. Frozen chopped celery can be added directly to cooked dishes without thawing first.
Can you freeze celery without blanching?
Yes, celery can be frozen without blanching if you plan to use it within a few months. While blanching helps preserve the best flavor, color, and texture for long-term storage, skipping this step is a quicker option for short-term freezing.
Can you freeze raw celery?
Yes, raw celery can be frozen. However, because celery contains a lot of water, its texture will soften after freezing. Raw, frozen celery works best in cooked dishes rather than in fresh dishes.
Can you freeze celery leaves?
Yes, celery leaves can also be frozen. They add wonderful flavor to soups, broths, and sauces. Simply chop the leaves and freeze them in small freezer bags or containers so you can add them to recipes easily.
Can you freeze celery for soup?
Yes. Freezing celery is a great way to keep it on hand for cooking. I love having chopped celery on hand specifically for soup bases like mirepoix, a mixture of celery, onions, and carrots used to build flavor in many recipes.
Can you freeze cooked celery?
Yes, cooked celery can be frozen, especially when it is part of soups, casseroles, stuffing, or other prepared dishes. The texture will soften further after freezing, but the flavor will remain.
How to Freeze Celery for Soup
If you frequently make soup, freezing celery is a great way to keep it ready for quick meal prep. Many cooks freeze chopped celery specifically for soup bases because celery is one of the classic ingredients in mirepoix, along with onions and carrots.
To freeze celery for soup, wash and chop the celery into small slices or cubes. Blanching helps preserve the best flavor and texture if you plan to store it for several months, but you can also freeze celery without blanching if you will use it sooner.
Spread the chopped celery on a parchment-lined baking sheet and freeze until solid. Then transfer the frozen pieces to freezer bags so you can easily grab a handful whenever you start a pot of soup.
Frozen celery can be added directly to the pot without thawing.
Freeze Celery Now and Save Time Later
Freezing celery is a simple way to reduce food waste and make meal prep easier. Instead of letting extra celery sit in the refrigerator until it goes limp, you can chop it, freeze it, and have it ready whenever you need it.
While frozen celery loses its crisp texture, it still works perfectly in cooked dishes. Having a bag of chopped celery in the freezer makes it easy to build flavor in your favorite recipes without extra prep.
If you often cook with celery, freezing it is a convenient way to keep this versatile vegetable on hand year-round
If you’re stocking your freezer with vegetables, you may also find these guides helpful:
- How to Freeze Carrots
- How to Freeze Peppers
- How to Freeze String Beans
- How to Freeze Zucchini
- How to Freeze Potatoes

can you freeze celery and carrots in small quantities to eat raw with dips
Nancy, Fresh veggies are best for dipping as blanching, freezing, and thawing will alter their texture, making them too mushy for dipping. Frozen celery and carrots are better for cooked recipes.
I was thrilled when I found your “recipe”. For some mysterious reason I opened my produce drawer yesterday and discovered I had 3..yes 3!! bunches of celery. It seems that my husband picked it up for me, my daughter did the same and last but not least I picked it up myself. I like to use celery in my soups and salads but I’m afraid I would have wasted an awful lot.
Tomorrow after doing my gardening I will be busy freezing my over abundance of celery, thanks to you!!
Beverly, So glad I could help. I never seem to use up a whole bunch at once, I can’t imagine being faced with three. LOL!
I used your instructions and prepared two stalks and froze. I have always wrapped my celery in foil which really extends the life but there are times even that goes bad. My daughter is always “borrowing” some celery as she lives across the street from me so I should have enough for both our needs now. I froze in larger pieces to chop to needed size when needed. I hate having to but an entire stalk when all I need at the time is a rib or two. Thank you for posting!!
Sandra, Thank you, I am glad this helped!
Thank you for your recipe. I have never used an entire bunch of celery. From now on I will freeze the unused stalks.
Thanks so much for this tip; It never occurred to me that I could freeze celery. This will cut a lot of waste as I seldom use a whole bunch.
Rachel, Thanks for this tip! I will never again end up throwing out celery because I bought a whole bunch but only needed 2 stalks.
Jean, It is so nice to hear from you! I hope you are well! I am glad this tip helps.