Dill Pickle Recipe for Canning (Kosher-Style Garlic Dill Pickles)
This post may contain affiliate links, which means that I may receive a commission if you make a purchase using these links. As an Amazon Associate I earn from qualifying purchases.
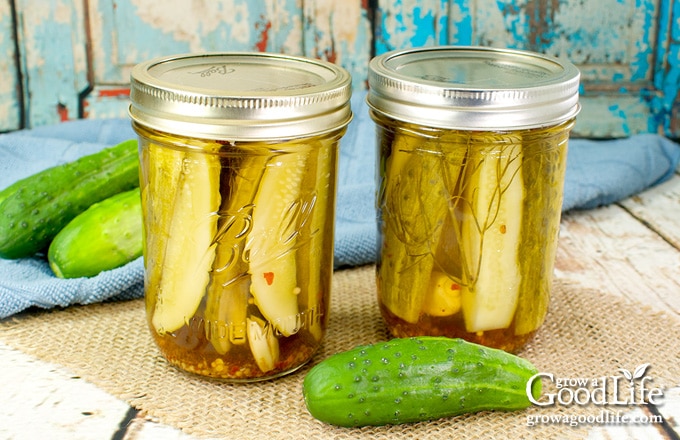
These kosher-style dill pickles have a bold, briny flavor that balances garlic, dill, vinegar, and just a touch of sweetness.

If you grow cucumbers, making homemade dill pickles is one of the best ways to preserve the harvest. This dill pickle recipe for canning turns fresh pickling cucumbers into flavorful jars of garlic-dill pickles that you can enjoy long after the garden season ends.
While my Bread and Butter Pickles recipe is one of the most popular on Grow a Good Life, not everyone enjoys sweet pickles. Many people prefer the bold, briny flavor of classic dill pickles, the kind you find in deli sandwiches or alongside your favorite burger.
These kosher-style dill pickles are a fresh-pack pickle recipe made with a vinegar brine infused with pickling spices, garlic, dill, and a hint of red pepper flakes. The result is a well-balanced pickle with a tangy, garlicky flavor and the classic savory flavor dill pickle lovers expect.
Because the cucumbers are packed fresh and processed in a water bath canner, the jars become shelf-stable and can be stored in your pantry until you’re ready to enjoy them.
Serve these dill pickles with sandwiches, burgers, and barbecue, or chop them up to add a savory bite to salads, potato salad, and homemade tartar sauce.
What Makes Kosher-Style Dill Pickles Different?
Despite the name, kosher-style dill pickles are not necessarily certified kosher. The term refers to the traditional style of dill pickles popularized by Jewish delicatessens in New York City.
These pickles are known for their bold garlic flavor and savory briny taste. Instead of being sweet like bread and butter pickles, kosher-style dill pickles focus on a balance of vinegar, salt, dill, and plenty of garlic.
Most kosher-style pickle recipes include:
- Fresh dill or dill seeds
- Garlic
- Vinegar and salt brine
- Pickling spices for additional flavor
This recipe follows that classic deli-style approach by seasoning the jars with dill, garlic, mustard seeds, and a touch of red pepper flakes before adding the cucumbers and hot brine.
The result is a savory dill pickle with a garlicky bite and tangy flavor that pairs well with sandwiches, burgers, and hearty meals.
Tips for Making Dill Pickles
Starting with freshly harvested pickling cucumbers is the key to flavorful jars of dill pickles. The quality of the cucumbers and the ingredients you use will affect the flavor and texture of your finished pickles. Here are some helpful tips for making a great batch of homemade dill pickles for canning.
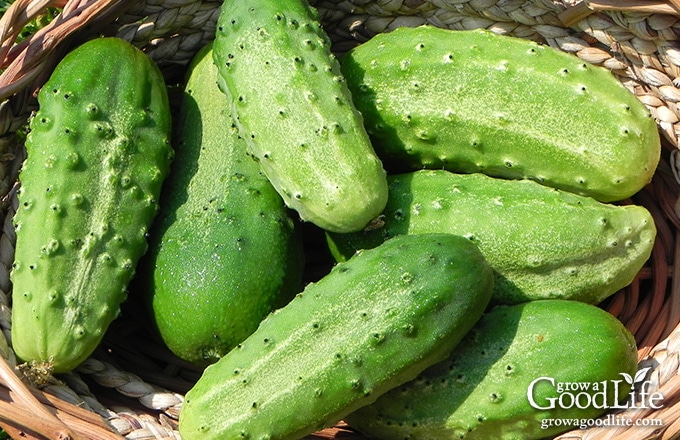
Use Freshly Harvested Pickling Cucumbers
Pickling cucumbers are short, stout, thin-skinned cucumbers that are primarily grown for pickling. Skip the waxed cucumbers often sold at the grocery store because the wax coating prevents the pickling brine from penetrating the cucumber.
For the best quality pickles, harvest your garden cucumbers and make the pickles the same day. If you grow your own cucumbers, pick them early in the morning when temperatures are cool. This helps reduce bitterness and preserves their best flavor.
Choose small cucumbers that are about 3 to 4 inches long. Smaller cucumbers have firmer flesh and smaller seed cavities, which hold up better during the canning process.
You will need about 8 pounds of pickling cucumbers to fill 6 to 7 pint jars. The exact amount will vary depending on the size of your cucumbers and whether you leave them whole, cut them into spears, or slice them into coins.
Use Pickling Salt
Table salt contains iodine and anti-caking agents that can darken pickles and cause cloudiness in the jars. Instead, use pickling salt, which is also called canning salt. Pickling salt dissolves easily and helps produce clear brine.
Use Vinegar With at Least 5% Acidity
Vinegar provides the acidity needed to safely preserve pickles. Always use commercial vinegar labeled with at least 5% acidity when canning pickles.
- Apple cider vinegar is made from fermented apples and has a mild fruity flavor that pairs well with vegetables. Its amber color may slightly darken the pickles, but many people enjoy the added flavor.
- White vinegar is clear and has a sharper, more acidic taste. It produces a brighter-colored pickle and a more traditional dill pickle flavor.
Use Good Quality Water
Water can affect both the appearance and flavor of your pickles. Some municipal tap water contains minerals or chlorine that may cause cloudy brine.
If your tap water is heavily treated or has a strong flavor, consider using filtered water or bottled distilled water when making the pickling brine.
Generously Flavor the Pickles
Part of what makes these kosher-style dill pickles so flavorful is the layered seasoning.
First, the pickling brine is simmered with pickling spices to create a flavorful infusion. If you enjoy pickling vegetables regularly, you may want to mix your own homemade pickling spice blend.
Then each jar is seasoned with fresh dill sprigs or flowers, garlic, mustard seeds, dill seeds, and red pepper flakes before being filled with cucumbers and brine. Bay leaves add additional flavor and may also help maintain pickle texture.
Don’t worry if you don’t have fresh dill flower heads or dill foliage. Much of the characteristic dill pickle flavor comes from dill seeds, so the recipe will still taste great if you only use the seeds.
Safe Changes for this Recipe
When canning pickles, it is important to use recipes that have been scientifically tested for safe home canning. Cucumbers are a low-acid food with a typical pH between 5.1 and 5.8. In improperly preserved foods with a pH above 4.6, Clostridium botulinum can grow and produce harmful toxins.
You can experiment with swapping dried herbs or spices for flavor, but do not change the proportions of vinegar and water.
For more guidance on safe adjustments, see: How to Safely Modify Pickle and Relish Canning Recipes.
Steps for Making Dill Pickles
Making homemade dill pickles is a simple way to preserve cucumbers at their peak. This recipe uses a fresh-pack method, which means the cucumbers are packed raw into warm jars and covered with hot pickling brine before processing in a boiling water bath canner.
If you are new to home canning, it may be helpful to review this guide: Water Bath Canning for Beginners.
Staying organized makes canning day much smoother. I put together a free printable Home Canning Checklist with prep reminders, safety notes, and space to track your batches. Download it here:
Grab your Free copy
Home Canning Checklists
This recipe for kosher-style dill pickles comes from the Ball Blue Book Guide to Preserving. You will find the full printable recipe at the bottom of this article, but the following overview walks you through the basic steps for canning dill pickles at home.
Step 1: Gather Your Canning Gear
- Water bath canner and canning rack
- 7 pint sized canning jars
- Canning lids and bands (new lids for each jar, bands can be reused)
- Canning tools: jar lifter, canning ladle, funnel, and bubble popper
- Plus basic kitchen supplies such as a large sauce pot, large bowl, small pot, towels, knife, and a cutting board.
Step 2: Prepare the Canning Equipment
Wash your jars, lids, bands, and canning tools in warm, soapy water. Rinse well, and set the lids, bands, and tools aside to air dry until you are ready to use them.
Set up your water bath canner with the canning rack on a large burner of your stove. Place the jars upright in the canner and add enough water to cover them. Bring the canner to a simmer (180˚F) for 10 minutes, and keep the jars hot until you are ready to fill them.
Step 3: Make the Dill Pickling Brine
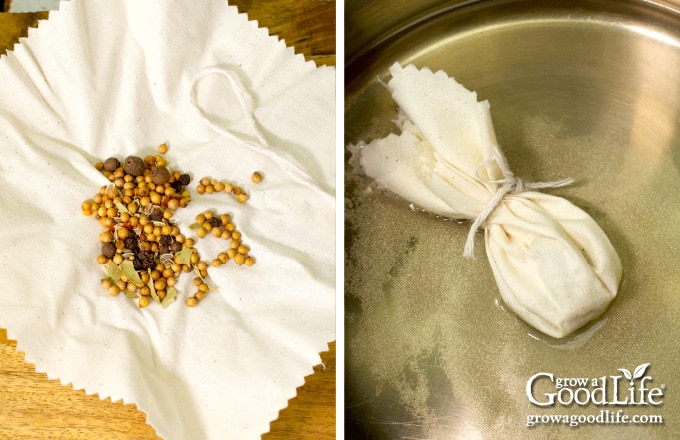
Add the 3 tablespoons of pickling spice to a spice bag. If you don’t have a spice bag, use cheesecloth or a coffee filter to make a pouch, then tie it with thread or kitchen string.
If you don’t have pre-mixed pickling spice, substitute 2 teaspoons mustard seeds, 2 teaspoons coriander seeds, 2 teaspoons dill seeds, 2 teaspoons black peppercorns, and 4 whole dried allspice berries. Add this to your bag and tie it off.
In a large saucepan, combine the vinegar, water, sugar, pickling salt, and the pickling spice bag. Bring the mixture to a boil and stir to dissolve the sugar and salt.
Reduce the heat to low and simmer for 15 minutes. Remove the spice bag and keep the brine warm until you are ready to use it.
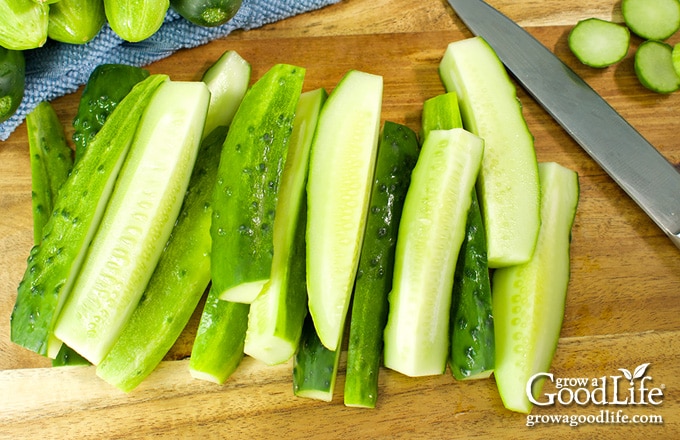
Step 4: Prepare Your Cucumbers
Rinse the cucumbers under running water to remove dust and soil. Run your fingers along the fruit to remove the spines.
The stem and blossom end of cucumbers contain enzymes that can cause bitterness and limp pickles. Cut off about 1/8-inch from the blossom end to help prevent soft pickles. Leave the cucumbers whole, cut them into spears, or slice them into chips.
Step 5: Pack the Jars
Lay a kitchen towel on the counter. Use the jar lifter to remove a hot jar from the canner, drain it, and place it on the towel. Keep the remaining jars in the canner, so they stay warm.
Add the following to each jar: 1 bay leaf, 1 sprig of dill foliage or flower head, 1 clove crushed garlic, 1/2 teaspoon mustard seeds, 1/2 teaspoon dill seeds, 1/2 teaspoon red pepper flakes.
Pack the cucumbers vertically into the jar. It may help to turn the jar on its side and stack the spears inside. Try to pack the cucumbers as tightly as you can. Place the jar upright, add the canning funnel, and pour hot pickling brine over the cucumbers, leaving a 1/2-inch headspace.
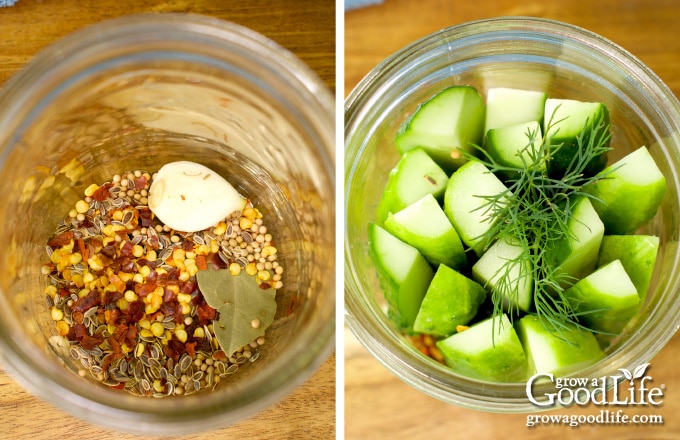
Run the bubble popper through the jar to release any trapped air bubbles. Make sure all the pickles are submerged under the brine. Remove any that stick out, and adjust the headspace again if needed.
If you are canning cucumber slices, add the slices to the jar, fill the jar halfway with the brine, and then give the slices a stir with the bubble popper. This will help separate the slices and combine them with the brine. Top off with more brine while maintaining 1/2 inch of headspace.
Wipe the rim with a damp towel to remove residue. Center a lid on the jar, place the band over the lid, and screw it on until fingertip tight. Place the jar back into the canner, and repeat with the rest of the jars.
Tip: If you find yourself short on brine while filling jars, see What to Do If You Run Out of Pickling Brine.
Step 6: Process the Pickles in a Water Bath Canner
Once the filled jars are in the canner, adjust the water level so it covers the jars by several inches. Cover and bring the canner to a boil, then set a timer and process the jars in a boiling-water bath canner for the times indicated in the recipe below.
When the processing time is complete, remove the jars and let them cool completely for 12 to 24 hours. Then, test the seals, label and date the jars, and store the dill pickles in a cool, dark location. Let the pickles stand for about 4 weeks before opening, so the flavors can develop.
Dill Pickle Recipe for Canning (Kosher-Style Garlic Dill Pickles)
Ingredients
Dill Pickle Brine:
- 4 cups apple cider vinegar 5% acidity
- 4 cups water
- 3/4 cup sugar
- 1/2 cup pickling salt
- 3 tablespoons pickling spices
Pickles:
- 8 pounds small pickling cucumbers 3 to 4-inches long
- 7 bay leaves 1 per jar
- 7 dill flower head or sprig of dill foliage, 1 per jar
- 7 cloves garlic peeled and crushed, 1 per jar
- 3 1/2 teaspoons mustard seeds 1/2 teaspoon per jar
- 3 1/2 teaspoons dill seeds 1/2 teaspoon per jar
- 3 1/2 teaspoons red pepper flakes 1/2 teaspoon per jar
Instructions
Prepare your canning equipment:
- Wash your jars, lids, screw bands, and canning tools in hot soapy water. Rinse thoroughly to remove all suds. Set aside to air dry on a clean kitchen towel.
- Place the jar rack into water bath canner, place jars in the canner, and add water to cover. Bring the canner to a simmer (180˚F) for 10 minutes, and keep the jars hot.
Make the pickling brine:
- Add the 3 tablespoons of pickling spice to a spice bag, or coffee filter and tie off.
- In a large saucepan, combine the apple cider vinegar, water, sugar, pickling salt, and the pickling spice bag. Bring the mixture to a boil and stir to dissolve the sugar and salt.
- Reduce the heat to low and simmer (180˚F) for 15 minutes. Then, remove and discard the spice bag. Keep the brine warm until you are ready to use it.
Prepare your cucumbers:
- While the brine is simmering, rinse the cucumbers under running water. Run your fingers along the fruit to remove the spines.
- Cut off 1/8-inch from each end. Leave whole, or cut into halves, spears, or slices.
Pack the Jars:
- Spread a kitchen towel on the counter. Use your jar lifter to remove a warm jar from canner. Drain and place on the towel.
- Add the following to each jar: 1 bay leaf, 1 dill flower head, 1 clove crushed garlic, 1/2 teaspoon mustard seeds, 1/2 teaspoon dill seeds, 1/2 teaspoon red pepper flakes.
- Raw pack the cucumbers vertically into the jar leaving 1/2-inch headspace.
- Use your canning funnel and ladle to add hot brine over the pickles maintaining 1/2 inch of headspace. Make sure all the pickles are submerged under the brine. Remove and trim any that stick out, and adjust the headspace again if needed.
- Remove air bubbles with the bubble popper and wipe the rim. Center a lid on the jar, and screw on a band until it is fingertip tight. Use your jar lifter to place the jar back into the canner, and repeat with the remaining jars.
Process in a Water Bath Canner:
- Once jars are all in canner, adjust the water level so it is 2-inches over the tops of the jars.
- Cover the canner and bring to boil over high heat. Once water boils vigorously, set a timer, and process for 15 minutes at altitudes of less than 1,000 feet. Adjust processing time for your altitude if necessary (See Note).
Cool and Store:
- When processing time is complete, turn off heat and allow the canner to cool down for 5-minutes.
- Spread a dry kitchen towel on the counter. Remove the cover by tilting lid away from you so that steam does not burn your face.
- Use the jar lifter to remove the jars from canner and place on the towel. Keep the jars upright, and don't tighten bands or check the seals yet. Let the jars sit undisturbed for 12 to 24-hours to cool.
- After 12 to 24-hours, check to be sure jar lids have sealed by pushing on the center of the lid. The lid should not pop up. If the lid flexes up and down, it did not seal. Refrigerate jar and use up within a month.
- Remove the screw on bands and wash the jars. Label and date the jars. Store in a cool, dark location. Allow 4 to 5 weeks for the pickles to develop their flavor. Use home canned jars within a year.
- Yield: Makes 6 to 7 pint jars of dill pickles.
Notes
- 1,001–3,000 feet: Process for 15 minutes
- 3,001–6,000 feet: Process for 20 minutes
- Above 6,001 feet: Process for 25 minutes
Nutrition
Frequently Asked Questions About Canning Dill Pickles
When making dill pickles for the first time, it’s normal to have questions about the process. These answers cover some common concerns:
How long should dill pickles sit before eating?
For the best flavor, allow the pickles to sit for about 4 weeks before opening. This resting time allows the cucumbers to absorb the brine and the dill, garlic, and spices to fully develop their flavor.
Why are my dill pickles soft?
Soft pickles can result from using overripe cucumbers, storing cucumbers too long before pickling, or leaving the blossom end on. Overprocessing can also affect texture.
For best results, use fresh pickling cucumbers about 3 to 4 inches long, trim off the blossom ends, and process the jars according to the tested recipe.
Why are my pickles floating in the jar?
It’s common for some pickles to float after canning. This usually happens when air is trapped inside the cucumbers or when the jars are packed loosely.
Floating pickles are generally safe as long as the jars are sealed properly and the cucumbers remain fully submerged in the brine. The pickles will usually sink as the brine penetrates the cucumbers over time. Packing the cucumbers tightly and removing air bubbles before sealing can help reduce floating.
Can I reduce the salt in this dill pickle recipe?
Yes. In vinegar-based pickle recipes, salt is used mainly for flavor rather than preservation, so it can be reduced if desired. However, reducing the salt may slightly affect the overall flavor.
Can I leave out the sugar?
Yes, the sugar can be reduced or omitted. In this recipe, the sugar simply balances the vinegar flavor and does not affect the safety of the pickles. Without the sugar, the pickles will have a sharper, more tangy taste.
Can this dill pickle recipe be canned in quart jars?
Yes. This recipe can be safely canned in quart jars instead of pint jars. The batch will yield about 3 quart jars when tightly packed. Use the same headspace and the same processing time listed in the recipe.
Can I change the spices in dill pickles?
You can adjust the dried herbs and spices used to flavor the pickles, but do not change the proportions of vinegar or water in the brine. These ingredients control the acidity needed for safe canning.
For guidance, see: How to Modify Pickle and Relish Canning Recipes Safely.
How long do home canned dill pickles last?
For best quality, use home canned pickles within 12 to 18 months. Store sealed jars in a cool, dark place. Once opened, refrigerate the jar and use the pickles within several weeks.
Enjoy Your Homemade Dill Pickles
Canning dill pickles is a great way to preserve fresh cucumbers from the garden or farmers market and enjoy their flavor long after the growing season ends. With garlic, dill, and pickling spices, these kosher-style dill pickles develop a bold, tangy flavor that pairs perfectly with sandwiches, burgers, and hearty meals.
After the jars have rested for a few weeks and the flavors have had time to develop, open a jar and enjoy the savory bite of homemade dill pickles.
If you enjoy preserving vegetables with dill, you may also like these recipes:
More Dill Pickling Recipes:
- Dill Pickle Relish
- Dill Pickled Carrots
- Dilly Pickled Beans
- Dill Pickled Zucchini
- Pickled Green Tomatoes
Other Pickled Canning Recipes to Try:
Having a variety of pickling recipes on hand makes it easy to preserve whatever vegetables your garden produces throughout the season.

Couple questions, 1. Can I increase the amount of sugar? And 2- is it ok if I used fresh dill?
Elizabeth, Yes, it is safe to increase the sugar, and use fresh dill.
Hello! The brining liquid was definitely covering the cucumbers when I put the lids on. After processing the pickles are floating and it looks like they’re sticking out of the brine. What did I do wrong? I packed them as tightly as I could.
Hana, You didn’t do anything wrong. Sometimes pickles float because of the amount of air in the cucumbers. However, they should settle down back into the brine as they infuse the vinegar.
Your pickles will be just fine, but in the future try to pack the pickles a little tighter. They do tend to shrink a little in the canning process.
Frank
Is it possible to use a sugar substitute, such as Monk fruit and erythritol?
Unfortunately, there are no tested recipes that use sugar substitutes or monkfruit sweetener. So it is unknown if there are safety or quality issues. The sugar in this recipe is for flavor, you could omit it when canning, and sweeten to taste with your substitute of choice after opening the jar.
I have never canned anything before but I was given some canning equipment so I’m excited to try this recipe. The jars I was given are 8oz jars so I was wondering what the processing time would be.
Thank you 🙂
Jodie, The processing time for half-pint jars is the same as pint jars.
I made another batch of these wonderful pickles. This time, although I thought I had put enough brine in to cover the pickles, the following day I noticed that about an inch of pickles are not covered at the top. Will they be safe on the shelf? Someone told me I can safely store them for months in the refrigerator because they will not be safe on the shelf with the tops not being submerged in the brine.
Janee, It is the vinegar brine that preserves the cucumbers in this recipe. Unfortunately, the cucumbers that are not submerged completely in the brine will not last in storage. These jars should be refrigerated and eaten first.
Thanks for your reply. How long can I store them in the refrigerator with the tops not covered by the brine?
Not long. I would guess about a week? Don’t eat the pickles if they show signs of mold.
I’ve done this recipe twice now and have given out half my jars. Same comment “best darn pickles”. One comment from a neighbor “ best pickles ever and I am 97 so have eaten a few pickles in my time”
Ellen, I am so glad you, your neighbor, and friends enjoy these pickles.
Would the processing time be the same for quart jars? Thank you, this recipe looks wonderful, cant wait to try
Emily, Increase the processing time to 15 minutes for quart sized jars. I hope you enjoy your pickles!
Can I use white vinegar? Or a half and half with apple cider vinegar? Also can I use apple cider vinegar with the Mother? Or does it need to be the clearer regular one?
Ashley, You can use any type of commercial vinegar with at least 5% acidity. You can safely mix white and apple cider vinegar as long as the acidity of both is at least 5%.
Can I save extra unused brine to use another day?
Janee, Yes, you can save the brine in your refrigerator, and then heat it up on the stove when you are ready to make more pickles.
So this is the first time that I’ve canned and they turned out really good but they seemed really salty does that go away as they sit longer or can I cut the salt down. That was after a week.
Scot, Salt adds flavor and helps preserve the texture of the pickles. However, you can reduce the amount of salt in this recipe. According to AskExtension, “It is safe to make and can pickles without salt as long as there is at least a 1:1 ratio of vinegar to water in the recipe. The flavor and crispness of the pickles might not be top quality but they would be safe.”