Canning Potatoes: How to Pressure Can Potatoes for Food Storage
This post may contain affiliate links, which means that I may receive a commission if you make a purchase using these links. As an Amazon Associate I earn from qualifying purchases.
Pressure canning potatoes is a great way to preserve an abundant harvest for long-term food storage. The shelf-stable jars of potatoes are handy for quick additions to meals.
Potatoes can last a long time when stored in a cool, dark location. Sometimes the storage conditions are not ideal. Preserving potatoes by pressure canning makes them shelf stable so they last longer.

Potatoes that are damaged or small won’t last long in root cellar storage either. So if your potato crop yielded a great deal of small tubers, or you managed to damage a lot while digging them up, pressure canning potatoes is a good way to preserve them.
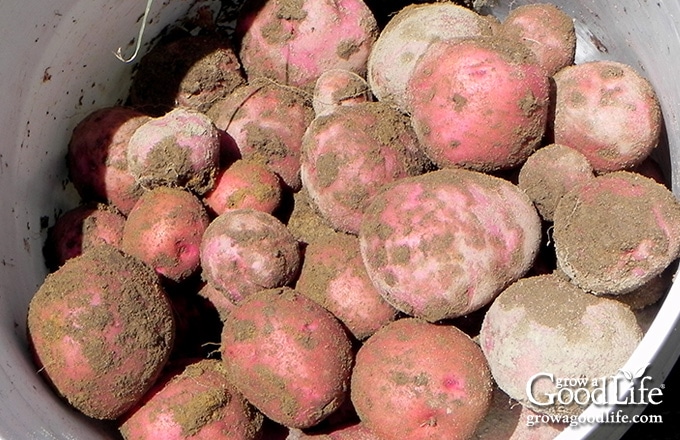
The first time I tried canning potatoes was to save my storage potatoes when they began to get soft and sprout. I still had about 50 pounds of potatoes in our root cellar basement and there was no way we could use them up quickly enough before they spoiled.
So, I pulled out my pressure canner, canning equipment, trusted Ball Blue Book Guide to Preserving, and went to work peeling and cutting the potatoes.
Ways to Use Canned Potatoes
I wasn’t sure if we would even like canned potatoes, but discovered that not only were they similar in texture to regular potatoes, but they were so convenient to cook with.
Canned potatoes are handy to have for speedy side dishes to meals. Since the potatoes are already precooked, peeled, and cut, they are quicker to prepare.
Pressure canned potatoes can be used the same way as cooked potatoes, such as fried, mashed, or roasted. For mashed potatoes, simply reheat them briefly in boiling water, drain, add butter, chives, sour cream, and mash as you would for regular mashed potatoes.
You can also use canned potatoes in chowders, soups, and stews. Since they are already pre-cooked, add the potatoes at the end of your cooking time, so they don’t get too soft.
Now I grow potatoes in two stages in our garden each year instead of one large crop. One is my main crop of storage potatoes that is planted in spring, harvested in fall, and stored in our root cellar basement for winter.
The second is a fall planting of red potatoes that are harvested small right before the ground freezes, and canned for food storage. The storage potatoes are used through winter, and the canned potatoes fill the gap until the next harvest.
Tips for Pressure Canning Potatoes
When canning white potatoes remember to:
Use a Pressure Canner
Potatoes are low acid foods and need to be canned with a pressure canner. A pressure canner provides a high amount of heat necessary to kill bacteria that can cause botulism. You cannot can potatoes safely using a water bath canner.
When I began canning foods, I did some research and purchased, Presto 16-quart pressure canner. It holds a canner load of 9-pint or 7-quart size jars. Plus it is light enough for me to lift a full canner off the stove without help.
Choose the Best Potatoes for Canning
Some potatoes are better for canning than others. Avoid potatoes that are typically used for baking, such as russets and yukon gold potatoes. The amount of starch and mealy texture will not result in a good-quality canned product. Preserve these types as frozen potatoes instead. You can follow this tutorial: How to Freeze Potatoes.
Choose “waxy” or “boiling” types of potatoes for canning. Most red-skinned potatoes are suitable, and many thin skinned white round potatoes and gold potatoes are lower starch and work well when canned. Small potatoes, or young potatoes referred to as “new potatoes,” are also great candidates for pressure canning because they have thin skins and firm flesh. These tend to be less starchy than mature potatoes. Feel free to mix different types of potatoes in the same jar.
You want a potato that keeps its shape and texture during the canning. Potatoes need to be firm enough that they do not become mushy after a lot of heating. Choose potatoes that hold up well after heating, and not one that falls apart when cooked.
Peel the Potatoes
You will need to peel your potatoes before canning. There are no safe tested recipes for canning potatoes with the skins on. Removing the skins by peeling potatoes reduces the amount of bacteria on the potato.
Can Whole or Chunked Potatoes
The starchiness of potatoes makes them a bit tricky to can safely. Starch restricts heat from penetrating into the center of the canning jar. So the only way to can potatoes safely is to either choose small to medium-sized mature potatoes about 2-inches in diameter, or cut larger potatoes into 1- to 2-inch chunks after peeling.
You can get more potatoes into the jar by cutting them into 1-inch pieces, but I find these tend to result in mushy potatoes when pressure canned. Small 2-inch whole potatoes and 2-inch chunks remain slightly firm when canned.
A pint jar holds about 11 ounces of 2-inch sized prepared potatoes. You will need about 6 pounds of potatoes for a canner load of 9 pints. Aim for about 24 ounces per quart, or 11 pounds of prepared potatoes for a canner load full of 7 quarts.
Steps for Pressure Canning Potatoes
Before starting this vegetable canning recipe, it may be helpful to review the pressure canning process. This guide walks you through the basics: Pressure Canning for Beginners.
I also offer a free printable Home Canning Checklist to help keep everything organized while you prepare and process your jars. Download it here:
Grab your Free copy
Home Canning Checklists
This canning recipe is from The Ball Blue Book of Preserving, “Potatoes – White.” A more detailed and printable recipe can be found at the bottom of this article, but these are the general steps for pressure canning potatoes:
Step 1: Gather Your Canning Gear
- Pressure canner with canning rack
- 9 pint sized canning jars or 7 quart sized canning jars
- Canning lids and bands (new lids for each jar, bands can be reused)
- Canning tools: jar lifter, canning ladle, funnel, and bubble popper
- Plus basic kitchen supplies such as a potato peeler, knife, cutting board, several large pots, small pot, colander, and kitchen towels.
Step 2: Prepare the Canning Jars and Lids
Wash the canning jars, lids, bands, and canning tools in hot soapy water, and rinse well. Check the jars over carefully for nicks and cracks. Eliminate any that show damage as these will break in the canner. Set the lids and bands aside until you are ready to use them. Place the pressure canner on the stove, and insert the canning rack.
Add water per your pressure canner manufacturer’s instructions: Presto is 3 quarts, Mirro is 2 quarts, and All American is 2 to 3 inches. Fill the jars halfway with hot water, and then place them on the rack in the canner. Bring the canner to a simmer for 10 minutes (180˚F). Keep the jars hot until you are ready to fill them.
Step 3: Prepare the Potatoes
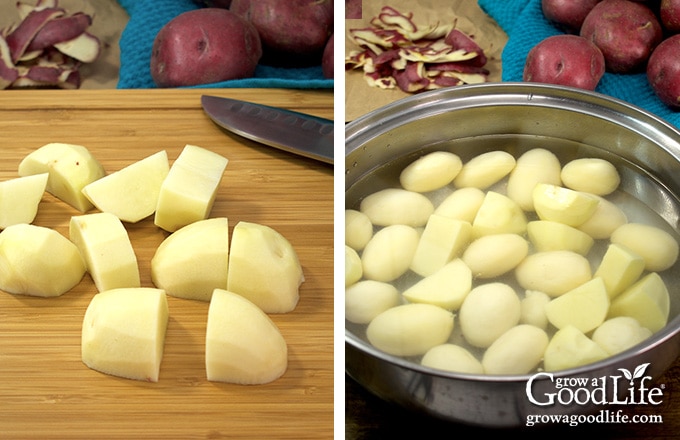
Fill a large pot about half way with cold water. Wash, peel the potatoes, and cut into 2-inch cubes. Leave small potatoes whole if they are about 2-inches in diameter. Trim off eyes, bruises, and any green spots.
As you work, drop the cut potatoes into the pot of cold water. This will help remove some of the surface starch and prevent the potatoes from discoloring from exposure to air.
Drain, and rinse the potatoes with cold water. Fill the pot, par-boil the potatoes for 10 minutes, reduce the heat, and keep them warm until you are ready to can.
Bring a second large pot of water to a boil over high heat and keep warm until you are ready to can. This is the water you will be using to fill your jars. Do not use the water that the potatoes were cooked in. There is too much starch to can safely.
Step 4: Can the Potatoes
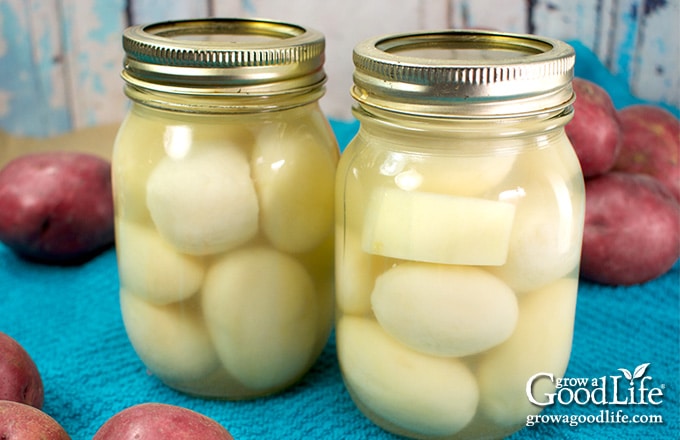
Spread a towel on the counter. Use your jar lifter to remove a jar from the canner. Pour out the water (save it for washing dishes), and place it on the towel. Keep the remaining jars in the canner, so they stay hot.
Place the canning funnel on the jar. Use tongs or a slotted spoon and fill the jar with hot potatoes while maintaining about a 1 1/2 inch headspace.
If you are using salt, add up to 1/2 teaspoon per pint jar, and up to 1 teaspoon per quart jar, and then fill the jar with hot water from the second pot, leaving a 1-inch headspace. Try not to pack the potatoes too tightly. There needs to be space so that water can circulate around the potato pieces while they are being processed.
Remove air bubbles with the bubble popper, adjust headspace if needed, and clean the rim with a damp paper towel. Center a lid on the jar, place the band over the lid, and screw it on until fingertip tight. Place the jar back into the canner, and repeat with the rest of the jars.
Place the lid on the canner, and lock it. Bring the canner to a boil over medium-high heat. Process the jars according to the instructions for your canner for the proper times indicated below.
Let the canner cool, remove the jars, and let them cool completely. Wash the jars with soapy water, label, date, and store the jars of potatoes in a cool location. Use within 12-18 months.
Don’t worry if the jars are cloudy. Potatoes contain different amounts of starch and some with a high starch content will make the liquid cloudy. Just rinse the potatoes before using to remove the starch.
Pressure Canning Potatoes
Ingredients
- 6 pounds white potatoes for pints for pints, see note below for quarts
- canning salt optional for flavor
Instructions
Prepare your canning jars and lids:
- Clean your jars and lids with warm, soapy water and rinse well. Set aside until you are ready to use them.
- Place the canning rack into the pressure canner, and fill with water per your pressure canner manufacturer's instructions: Presto is 3 quarts, Mirro is 2 quarts, and All American is 2 to 3 inches.
- Fill the jars halfway with hot water, and then place them on the rack in the canner. Bring the canner to a simmer for 10 minutes (180˚F). Keep hot until you are ready to fill them.
Prepare your potatoes:
- Fill a large pot about half way with cold water.
- Wash, peel the potatoes, and cut into 2-inch pieces. Leave small potatoes whole if they are about 2-inches in diameter. Trim off eyes, bruises, and any green spots.
- As you work, drop the cut potatoes into the pot of cold water. This will help remove some of the surface starch and prevent the potatoes from discoloring from exposure to air.
- Drain, and rinse the potatoes with cold water. Fill the pot, par-boil the potatoes for 10 minutes, reduce the heat, and keep them warm until you are ready to fill the jars.
- While the potatoes are cooking, bring a second large pot of water to a boil over high heat, reduce the heat to a simmer (180˚F), and keep hot until you are ready to can. This is the water you will be using to fill your jars. Do not use the water that the potatoes were cooked in. There is too much starch to can properly.
Can the potatoes:
- Spread a kitchen towel on the counter. Use your jar lifter to remove a jar from the canner. Pour out the water (save it for washing dishes), and place the jar on the towel. Keep the remaining jars in the canner, so they stay hot.
- Use tongs or a slotted spoon to remove the potatoes from the pot and fill the jar while maintaining about a 1 1/2 inch headspace.
- If using salt, add up to 1/2 teaspoon to each pint jar, and up to 1 teaspoon to each quart (salt is optional but adds a lot of flavor).
- Add fresh hot water to the jar, leaving a 1-inch headspace.
- Run your bubble popper through the jar to release any bubbles that may be caught in between the potatoes, and wipe the rim with a damp towel.
- Center a lid on the jar, and screw on band until it is fingertip tight. Use the jar lifter to place the jar back on the rack in the canner, and repeat with the rest of the jars until the canner is filled, or you run out of potatoes.
- Secure the lid, leave the vent open, adjust the heat to medium-high, and bring the canner to a boil. Allow the pressure canner to vent for 10 minutes, then place weight on the vent. Follow the directions for your pressure canner.
- Once the canner has reached the correct pressure (10 pounds of pressure for weighted gauge pressure canner, and 11 pounds for dial gauge canners.), set a timer, and process pints for 35 minutes, and quarts for 40 minutes at altitudes of less than 1,000 ft. Adjust for your altitude if necessary (see note below). Regulate the heat as needed to maintain a steady pressure.
- When processing time is complete, turn off the heat and let the pressure canner cool and depressurize. The time will depend on your brand and should be between 30 to 60 minutes.
- When the pressure canner is depressurized, spread a kitchen towel on the counter, remove the weight from the vent pipe or open the petcock, and wait 10 minutes for the jars to adjust to the change in pressure.
- While wearing pot holders, unlock the cover and remove the lid while tilting it away from you so that steam does not burn your face. Allow another 10 minutes for the jars to adjust to the change in pressure.
- Use a jar lifter to remove the jars from canner and place on the towel. Keep the jars upright, and don't tighten bands or check the seals yet. The jars will be hot and bubbling. Let the jars sit undisturbed for 12 to 24-hours to cool.
- Wait until the jars have cooled for at least 12-hours, and then check to be sure jar lids have sealed. Test the seal by pushing on the center of the lid. The lid should not pop up. If the lid flexes up and down, it did not seal. Refrigerate the jar and use up within a few days.
- Remove the screw on bands and wash the jars. Label, date, store the jars in a cool, dark place (50 to 70 degrees F). Use within a year for the best quality. Yields 9 pints or 7 quarts.
Notes
- 1,001–2,000 ft. — 11 pounds
- 2,001–4,000 ft. — 12 pounds
- 4,001–6,000 ft. — 13 pounds
- 6,001–8,000 ft. — 14 pounds
- 1,001 ft. and above — 15 pounds
Nutrition
Resources and further learning:
- Safe Canning Resources: Trusted Guides for Home Food Preservation
- Evaluating Canning Recipes: How to Tell if a Canning Recipe is Safe
- Safe Tweaks for Pressure Canning Vegetables
Other Ways to Preserve Potatoes:
You May Also Like:

I canned potatoes but ended up with black spots in the lids. I tried to figure out what I did wrong. I reread the instructions. but, I followed them to the letter. Not sure what caused the black spots. but, to be safe I threw out the potatoes.
Then I read that it might not be mold at all but a chemical reaction. How can I tell the difference so I don’t waste potatoes?
Pamela, Discoloration and dark spots on the underside of lids are not unusual. Natural compounds in food can react with the metal in the lid to form harmless brown or black deposits.
As long as you follow a safe, tested canning recipe and the lids have properly sealed, your food will not spoil and is safe to consume.
Hi, I canned potatoes for the first time. Some of the jars have cloudy liquid. Is that okay or should they be thrown out. I used red potatoes and used fresh boiling water to cover them in the jars. Alot of hard work and I hate to throw them out.
Charlene, The cloudiness is from the potatoes’ starch and is normal. Some potatoes are starchier than others. As long as you followed the recipe, your jars are safe. You can drain and rinse off the extra starch when you open the jar to use them.
Thank you for your article. I was wandering if you can store peeled potatoes in water overnight before canning?
Craig, Yes, you can soak the peeled potatoes overnight. Keep them in the refrigerator overnight, and start up again at step 4 under prepare your potatoes: “Drain, and rinse the potatoes with cold water. Fill the pot, par-boil the potatoes for 10 minutes”
I am new to canning. Did not want my garden potatoes to go to was so figured I would try canning them to be enjoyed this winter and next spring. I did can in quart jars. Some of my jars have no water left and there appears to be a creamy looking paste on the bottom. Not sure what happened but hope you could assist me in understanding my mistake. I not opened them so not sure if they are good or not. I did boil them for 10 minutes, placed in cold water. Filled the jars with potatoes, added water to 1 inch from the top and then added 1 tsp of canning salt. Wiped the lids and placed in pressure cooker for 40 minutes. BTW none of my jars have water at the level they started. Some look fine, just the water level is lower, about half full. Any assistance would be graciously appreciated.
Matt, It sounds like you had a lot of siphoning in your jars. The creamy looking paste is the starch from the potatoes. First, I want to be sure that you used a presser canner, not a pressure cooker, right? Currently, there are no approved canning recipes for pressure cookers.
If you did indeed use a pressure canner to can your potatoes, loss of liquid from your jars can happen for many reasons, including not removing air bubbles, not maintaining the proper headspace, and fluctuating pressure during the canning and cooling process. Here is a link to the NCHFP that may help you troubleshoot what may have happened.
If the jars were processed properly, a loss of liquid does not cause food to spoil, but the potatoes above the liquid will turn grey. If the loss is at least half, you should refrigerate the jars and use within two to three days, or open the jars and freeze the potatoes for longer storage.
I am sorry your canning project didn’t go as planned. Please get in touch with me again if you have any further questions.
Thank you for the feedback. I am using a pressure canner. After rereading the instruction, guess I need to read them closer before starting the next time. I did not leave my potatoes in the hot water after boiling for 10 minutes. I did not heat my jars prior to filling them. Maybe I need to work harder on getting the air bubbles out. I did get some jars to can without issue. I will give this a try again and follow the directions. I have used my pressure canner to can venison which worked great. Look forward to trying this again.
Excellent instructions
I am tired of wrinkled hairy potatoes in January.
Can I put whole garlic with the potatoes?
Karen, Skip the garlic. There are no scientifically tested recipes for pressure canning potatoes with garlic. Feel free to add dried garlic powder though.
Hi, I am new to pressure canning but I do have a question, as well, as to why it is necessary to parboil potatoes since they will cook during processing? I have watched various YouTube methods and some do and some do not parboil. I am new to pressure canning potatoes, but I am not new to cooking with potatoes and I tend to think I prefer not to parboil before canning. But I have been cooking for 40 years and I know that reinventing the wheel is never fun and just want words of canning wisdom from experience to save me regrets.
Claudia, Home canning recipes and procedures cannot be altered like regular recipes. They have been scientifically tested to be sure it is safe for home canning and will not cause illness.
The recipes I publish on Grow a Good Life come from tested, safe canning sources such as the National Center for Home Food Preservation, Ball’s Fresh Preserving website, and various Ball canning books. This recipe is from the Ball Blue Book of Preserving and is published in the USDA Complete Guide to Home Canning and instructs to boil 2-inch whole potatoes for 10 minutes.
Using canning recipes from unknown sources, or deviating from the tested safe canning recipe could result in food that can make you and your family ill. If you are new to pressure canning, please review the canning resources I have linked to in the article so you can learn how to pressure can safely.
Simple instructions. Thank You
This was very informative, other post didn’t list which potatoes would be best to use, just which was not to use. Thank you for this post!!
I am canning for just me. How would the time in canner be for half pint jars?
Jeff, Process half-pint jars for the same time as pints sized jars.
I have a newer canning book that doesn’t require the potatoes be par boiled before processing. What are your thoughts on not par boiling them first?
Cheryl, Can you tell me which canning book this is? I would like to review it before advising.
Just wanted to follow up on this question from Cheryl in case anyone is reading the comments. I never heard back from her, but I believe she is referring to the one jar vegetable canning recipes found in The All New Ball Book of Canning and Preserving. The recipes for Herbed Potatoes, Chipotle Potatoes, and Mediterranean Potatoes are different than this recipe, but are very specific as to the weight and ingredients to include in each jar. My advise as always is to use a tested recipe from a reliable source, and follow the instructions of that particular recipe because that is how it was developed, tested, and deemed safe for home canning. You cannot mix and match instructions from different recipes.
I believe parboiling the potatoes takes some of the starch out of them. You drain it after you boil… If you don’t boil first, all of that starch goes into the jar…. I only did that once. It made them cloudy and questionable. I threw them all out. 🙁
Sue, Yes, you are correct. I never heard back from Cheryl, so I don’t know what book she is referring to.