How to Build a Square Foot Garden (Step-by-Step Tutorial)
This post may contain affiliate links, which means that I may receive a commission if you make a purchase using these links. As an Amazon Associate I earn from qualifying purchases.
Learn how to build a 4×4 square foot garden step by step, including lumber selection, soil mix, and setup tips for a simple raised bed garden.

Want to build your own square foot garden? A simple 4×4 raised bed is all you need to get started.
This step-by-step guide shows you exactly how to build a square foot garden box, mix the classic soil blend, and prepare the bed for planting. The 4×4 size is easy to construct using standard lumber, requires minimal tools, and can often be completed in a single weekend.
We built our first square foot garden beds in 2009 after reading All New Square Foot Gardening, and I still remember how simple the process felt once we gathered the materials and got started. That first season, we built three 4×4 beds in one weekend. Over the years, we’ve rebuilt, expanded, and refined them as our garden evolved.
If you’re ready to build your own, I’ll walk you through the same straightforward steps we’ve used, from choosing lumber and mixing soil to installing the grid.
If you’re new to the method and want a broader overview of how square foot gardening works, including spacing and layout planning, visit my complete guide to Square Foot Gardening: A Beginner-Friendly System for Small Spaces. In this article, we’ll focus specifically on building the bed.
Before You Build: Choosing the Right Materials
Before we start cutting boards and mixing soil, it’s worth taking a few minutes to think about the type of wood you choose and the soil you fill the bed with, and how it will affect how long the garden lasts and how well your plants grow over time.
When we built our first square foot beds in 2009, we focused on keeping things simple and affordable. Over the years, we’ve replaced boards, adjusted soil mixes, and learned what holds up best in our climate. A little planning at the beginning can save you work later, especially when it comes to wood durability and soil quality.
Let’s walk through what to consider before you begin the build.
Choosing the Best Wood for Raised Beds
The wood you choose for your vegetable garden will be in constant contact with moist soil, so durability matters. While raised beds aren’t permanent structures, selecting the right material can mean the difference between rebuilding in a few years or enjoying your beds for close to a decade.
Use Untreated Lumber
For vegetable gardens, it’s best to use untreated lumber. Pressure-treated wood is designed to resist rot, but older formulas contained chemicals that you may want to avoid around food crops. Even though modern treatments are considered safer than they once were, untreated lumber remains the most comfortable choice for edible gardens.
It’s also wise to avoid reclaimed or unknown lumber unless you’re certain of its origin. Wood that has been painted, stained, or treated in the past may introduce unwanted chemicals into the soil.
Comparing Wood Types
Different types of lumber offer different levels of durability and cost. We started out with cheap pine boards. Once the pine rotted, we rebuilt our beds with rough-cut hemlock from a local lumberyard, and they lasted about 8 years before starting to break down.
- Cedar and redwood are naturally rot-resistant and can last many years, but they are often more expensive and not always readily available in all regions.
- Pine and fir are more affordable and widely available at most lumberyards. But, they may only last several years before breaking down.
- Hemlock has been a good middle-ground option in our experience.
Climate and drainage will affect longevity. Beds in damp areas may deteriorate faster than those in well-drained soil.
Longevity and Cost Considerations
If you’re just starting out, it’s perfectly reasonable to build with budget-friendly lumber and plan to rebuild later. A raised bed is easy to reconstruct once the boards begin to rot.
You can also ask your local lumberyard to cut boards into 4-foot sections for you, which makes assembly much easier if you don’t have a saw at home.
Choosing the right wood upfront helps ensure your square foot garden remains sturdy, level, and easy to maintain for years to come.
How Much Soil Do You Need?
Before filling your bed, it helps to know exactly how much soil to prepare. Square foot gardens are typically built 6 inches deep, which makes calculating volume simple.
Soil Volume for a 4×4 Bed
You will need about 8 cubic feet of soil (0.3 cubic yards) to fill one 4×4-foot box that is 6 inches deep.
Here’s how that’s calculated:
- A 4×4 bed has 16 square feet of surface area.
- Since 6 inches equals half a foot, you multiply: 16 × 0.5 = 8 cubic feet.
That 8 cubic feet fills the 4×4 bed to about a 6-inch depth. However, I like to aim closer to 9 cubic feet total. The soil mix settles as it is watered, and having a little extra ensures the bed can be filled level with the top of the boards.
Soil Volume Formula for Other Sizes
If you are building a different size bed, you can calculate the soil needed using this general formula:
- Length × Width ÷ 2 = cubic feet needed
- For example, a 4×8-foot bed: 4 × 8 = 32 32 ÷ 2 = 16 cubic feet
If your bed is deeper than 6 inches, use this formula instead:
- Length × Width × Depth (in feet) 32 ÷ 2 = 16 cubic feet
Preparing a little extra to account for settling is always helpful.
Understanding the Classic Square Foot Gardening Soil Mix
The traditional square foot gardening mix is made from equal parts:
- 1/3 peat moss or coconut coir
- 1/3 vermiculite
- 1/3 blended compost
Each component serves a specific purpose in creating a loose, well-draining, nutrient-rich growing medium.

Peat Moss or Coconut Coir
Peat moss is partially decomposed plant material harvested from peat bogs in northern regions. It is commonly used to lighten soil, retain moisture, and improve overall structure. Peat moss does not contain nutrients, but it creates a soft, workable texture that roots can easily grow through.
Because peat bogs regenerate slowly, you may prefer coconut coir as a more sustainable alternative. Coconut coir is made from the fibrous outer husk of coconuts, a byproduct of the food industry. Like peat, it improves soil structure and moisture retention. Coir is typically sold in compressed blocks that expand when soaked in water.
Either option can work well, depending on your preference and availability.
Vermiculite
Vermiculite is a naturally occurring mineral that is mined and then heated until it expands, almost like popcorn. This process creates lightweight particles with tiny air pockets that help hold moisture while improving aeration.
In the square foot garden mix, coarse vermiculite helps prevent soil compaction, provides good drainage, and keeps the blend light and fluffy.
Compost
Compost is the most important component of the mix because it provides nutrients and supports soil life. Finished compost is decomposed organic matter, and it is the best material to grow your plants. It also feeds earthworms and other microbial life in the soil. The worms will tunnel through the soil to improve aeration and drainage while leaving behind their castings to increase soil fertility.
The best compost is one you make yourself from organic matter such as kitchen scraps, garden debris, grass clippings, and other natural waste.
If you need to purchase compost, the book recommends combining organic compost made from at least five different sources to provide a wide range of nutrients for your plants. For example, combine decomposed farmyard manure with fish and seafood compost, bat guano, mushroom compost, and mixed compost made from forest products.
Can You Use Pre-Mixed Raised Bed Soil?
Since raised beds and square foot gardening have become more popular, it is now much easier to find premixed raised bed soils at local garden centers and even big box stores. This can make the process much simpler if you prefer not to source and blend individual ingredients yourself.
Look for a mix that is rich in organic matter, loose and well draining, and free of large wood chunks or undecomposed material.
While blending your own mix gives you more control over the ingredients, a high-quality pre-mixed raised bed soil can work very well.
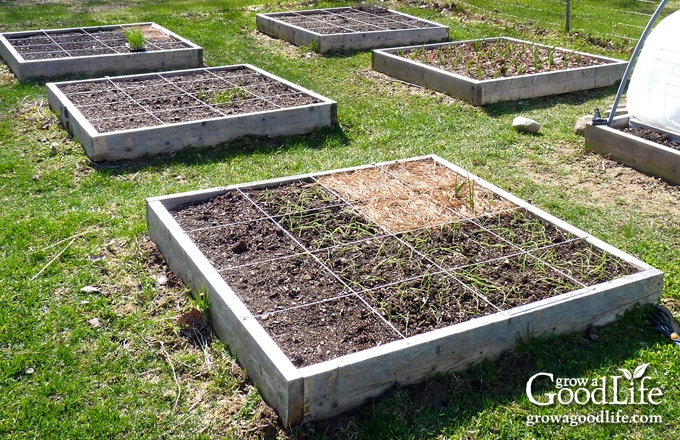
Step-by-Step Instructions to Build a 4×4 Square Foot Garden
The following steps walk through building one standard 4×4 square foot garden bed that is 6 inches deep. This size is easy to construct using two 8-foot boards and provides 16 growing squares once the grid is installed.
If you plan to build multiple beds, simply multiply the materials and soil quantities accordingly. We built three beds at a time in the early years, which made it easy to expand the garden gradually without feeling overwhelmed.
Step 1: Gather Your Materials
Before you begin, gather everything you’ll need so the build goes smoothly. You will need the following for each 4×4 square foot garden:
- Two 8-foot long 2×6 boards
- A box of 6-inch exterior wood screws
- Power drill
- Recycled cardboard or newspaper
- 3 cubic feet peat moss (or coconut coir or other soil less growing medium of choice)
- 3 cubic feet vermiculite
- 3 cubic feet of blended compost made from at least 5 different sources
- String and small nails to make the grid
- Tarp or a garden cart to mix the soil
- Dust mask for mixing dry soil ingredients (optional)
- Plus basic gardening tools such as a shovel, rake, and garden hose with a spray nozzle.
Having everything ready makes it easier to build, fill, and plant in a single weekend.
Step 2: Cut and Assemble the Frame
Measure and cut the boards into 4-foot sections. Pre-drill 3 holes on one end of each board. Position the boards end to end to form a square, and screw them together with 6-inch wood screws.

Step 3: Position and Prepare the Site
Choose a sunny location that receives at least 6–8 hours of sunlight daily.
Trim the grass low where the bed will sit. Position the frame directly on the ground and ensure it is level. Leaving about 3 feet between beds allows enough space to walk comfortably and maneuver a lawnmower or a wheelbarrow.
Place a layer of cardboard beneath the boxes on top of the ground. The cardboard will kill the grass and decompose over time, helping to eliminate weeds from growing in the new garden beds.

Step 4: Mix the Soil
The classic square foot garden soil mix is made from 1/3 peat moss, 1/3 vermiculite, and 1/3 finished compost from several different sources. Measure by volume, not weight. We used a 5-gallon bucket to measure out equal amounts of each ingredient.
Combine the three ingredients in a wheelbarrow, garden cart, or on a large tarp. The dry ingredients are very dusty. It is a good idea to wear a mask so you don’t inhale it. Mist with a garden hose to keep the dust down, but don’t saturate the soil until it is in the boxes.

Step 5: Fill and Hydrate the Bed
Add the blended soil mix to your raised bed. As you add the soil, hose it down several times so the entire mixture is well saturated. When the box is full, give it a final soaking to ensure the mix is hydrated.

Step 6: Add the Grid
Divide the bed into one-foot sections and add a permanent grid. I have used string and small nails to make the grid. You can also use mini blinds, wooden dowels, wood laths, or any thin strips of wood to make your grid. A permanent grid makes planting much easier.

Your Bed Is Ready for Planting
Once the grid is in place, your square foot garden bed is ready to plant.
Before adding seeds or transplants, take a few minutes to sketch your layout so you know exactly what will go into each square. Planning ahead helps prevent overcrowding and ensures taller crops won’t shade shorter ones.
For detailed spacing guidelines, crop recommendations, and layout examples, see my complete guide to Square Foot Gardening: A Beginner-Friendly System for Small Spaces.
From there, you’ll be ready to plant your squares and start growing your own food.

Upgrades for Your Square Foot Garden
Once your bed is built and filled, you can keep things simple, or add a few upgrades to make your square foot garden even more efficient and productive. These additions aren’t required, but they can improve plant health, extend your harvest season, and make maintenance easier.

Add a Trellis for Vertical Growing
Installing a trellis along the north side of the bed allows you to grow vining crops upward instead of outward.
Pole beans, cucumbers, peas, and indeterminate tomatoes all benefit from vertical support. Growing upward saves space, improves airflow, reduces disease pressure, and makes harvesting easier.
A simple trellis can be built using wood framing and fencing, cattle panels, or even sturdy netting secured to posts.
Mulch the Soil Surface
Once plants are established, applying a layer of mulch helps conserve moisture and suppress weeds. Organic mulches such as straw, shredded leaves, or composted materials protect the soil surface and reduce watering frequency during warm weather.
If you’d like to learn more about mulch options, see: 5 Ways Organic Mulch Helps Your Garden.
Extend the Growing Season
Make a dome to extend your growing season by growing under protection. Crisscross two PVC pipes and drape the beds with garden fabric or even a painting drop cloth. Just remember to vent on warm days.
This setup helps protect plants from unexpected frost and allows you to start earlier in spring or grow later into fall.
Maintain Healthy Soil
If you begin with a high-quality soil mix that includes compost from multiple sources, you likely won’t need to fertilize during the first planting season. However, healthy soil isn’t a one-time setup, it’s an ongoing process.
Each time you replant a square, add a small amount of finished compost to refresh nutrients. Over time, this simple habit keeps the soil rich, loose, and biologically active without relying heavily on synthetic fertilizers.
Raised beds make soil maintenance easier because you’re working in a contained space. A yearly top-dressing of compost is often all that’s needed to keep the system productive.
If you’d like to go deeper into building long-term soil health, see: How to Improve Garden Soil Naturally.
Install Drip Irrigation or Soaker Hoses
Raised beds dry out more quickly than in-ground gardens, especially during hot summer weather.
A simple drip irrigation system or soaker hose can deliver water directly to plant roots, reduce water waste, and save time during dry spells. Even a basic timer setup can make watering more consistent.

Ready to Build Your Square Foot Garden?
Building a square foot garden doesn’t require special tools or advanced carpentry skills. With a few boards, quality soil, and a simple grid, you can create an organized growing space in a single weekend.
We built our first beds in 2009 and have rebuilt and expanded them over the years as our garden has evolved. Starting with three 4×4 beds made the process manageable, and it gave us the confidence to grow more each season.
If you’re new to the method, begin with one bed. Fill it well, plan your layout, and see how it performs in your growing space. You can always add more raised beds later.
When you’re ready to plan your planting layout and spacing, visit my complete guide to Square Foot Gardening: A Beginner-Friendly System for Small Spaces for detailed planting recommendations and crop spacing charts.
Square foot gardening is a simple system, but it’s flexible. Build what you can, grow what you love, and adjust as you learn.

I live in zone 9 in Texas. The soil is mostly clay so I plant in containers. This idea for a 4×4 raised garden is something I will try. My only concern is the depth of soil only being 6 inches. Is 6 inches really enough for root growth?
Carol, I’m gardening up in Maine, so my growing environment is quite different from yours in Texas—especially when it comes to heat and soil type. I totally understand your concern about the soil depth.
The original Square Foot Gardening method does use a 6-inch deep raised bed filled with a light, rich growing mix, and it works surprisingly well for many shallow-rooted vegetables like lettuce, spinach, radishes, and even bush beans. But in warmer climates or with heavy feeders like tomatoes, deeper soil can be beneficial, especially when dealing with heat and rapid evaporation.
If you’re growing in containers or raised beds in Zone 9 with clay soil underneath, I’d recommend making the beds at least 8–12 inches deep if possible. That extra depth gives roots more room to grow, helps retain moisture, and reduces heat stress. You can also place your raised bed directly on the ground (rather than a hard surface) so roots can extend into the clay if needed.
I wonder if the lumber frame and plywood bottom will rot. I used pine wood.
Harlén, Yes, pine wood will rot, but you should be able to get a season or two out of it. I covered this in the article under “Wood for Raised Bed Gardens” and suggested some longer-lasting alternatives. Plywood should be avoided because it contains chemical adhesives that can leach into the soil. It also degrades quickly when exposed to moisture.
Hi! Thanks for your reply. I am new to gardening, so don’t know a lot. I only have a very shady ground spot for one bottomless sfg. I ‘ll try there, but am afraid because of the lack of direct sunlight. What would you recommend?
That’s great that you’re eager to try gardening, even in a shady spot! While direct sunlight is ideal for most crops, plenty of vegetables and herbs can thrive in partial shade. I’d recommend checking out two articles on my website that cover this topic: “Over 30 Vegetables that Grow in Shade” and “13 Culinary Herbs that Grow in Partial Shade.” These resources can provide you with valuable insights and options for planting in your shaded area.
Also, I wonder if the rotting pine wood will have a negative effect on the soil (Mel’s Mix) and the vegetables.
What should I put on the ground and under the frame? Newspaper? Cardboard?
Thanks!
The pine wood degrading over time won’t adversely affect your soil mix or veggies. Just remember to amend your garden soil with compost or organic matter each time you replant your garden to replenish nutrients and ensure healthy plant growth. You can place a layer of cardboard at the bottom, which helps suppress weeds.
If I cant find vermiculite is there a substitute I can use?
Brittany, You could substitute perlite for vermiculite. However, vermiculite is better at holding moisture, and it lasts longer. Perlite tends to float to the top of the beds when it rains, and then it can blow away. So you may need to refresh your square-foot gardens with more perlite in a year or so. You should be able to find vermiculite at your local garden center, hardware store, farm and feed store, and online. Even my local Walmart carries it.
Hi! Loved the very informative post. I am really wanting to start a garden like this, but am terrified because I don’t have a green thumb, YET! My heart sure does, though. So maybe I’ll get it worked out soon to be able to start.
Michelle, Please don’t be terrified. Starting a garden can be intimidating, but the only way to truly learn is to do it. Square foot gardening is a great way to start because you begin with good-quality soil and the proper spacing for your plants.
Growing your own vegetables can be a rewarding experience that increases your knowledge of the food you eat and gives you a sense of pride in providing for yourself. The thing with gardening is that no matter your experiences, you will have successes and failures. So focus on the successes, learn from the losses, and keep growing.
I have the book and have NOT gardened in 15 yrs. Have now taken over my son’s raised gardens, which are 4’x4′(5) of them. Have 1 planted and working on the others. Hoping this works. Have to get the vermiculite and peat moss. Don’t know how much to buy.
Marianne, You’ll need about 8 cubic feet of the square foot garden soil mix to fill one 4×4-foot box at 6-inches high. You’ll need a little less since the beds are partially filled. Once it is all mixed it you should be off to a great start this season.
This is such an awesome idea! I don’t think I could ever be this organized, but I would love to try these beds!
This is great!! We use raised beds in our front yard and I love them!
What a helpful post -I have some raised beds, but have never tried planting according to this square foot method. I am pinning this to try it next year – and may even add a new bed or two!