How to Save Bean Seeds to Plant Next Year
This post may contain affiliate links, which means that I may receive a commission if you make a purchase using these links. As an Amazon Associate I earn from qualifying purchases.
Saving bean seeds is an easy and thrifty way to keep growing your favorite variety year after year. Learn how to harvest the seeds from your bean plants, and how to store them for next year’s growing season.

Seed saving is a good way to spare some money in the gardening budget, become more self-sufficient, and adapt a crop to your unique growing conditions. One of the easiest seeds for beginners is open-pollinated, heirloom bean seeds.
The common bean (Phaseolus vulgaris) is a grain legume grown for its edible seeds and pods. Numerous cultivars of beans have been developed, including green beans, shelling beans, and dried beans.
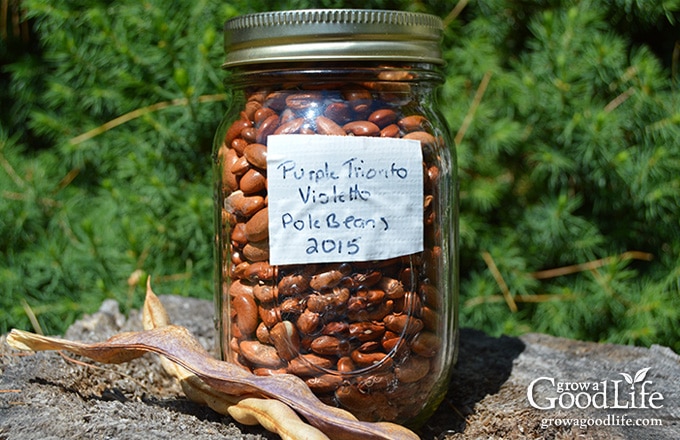
Plants are divided into two categories, bush beans and pole beans. Bush beans grow about 1 to 3 feet and tend to produce their crop around the same time. While pole beans grow 6 to 12 feet on poles or trellis supports, and continues to produce new pods until frost.
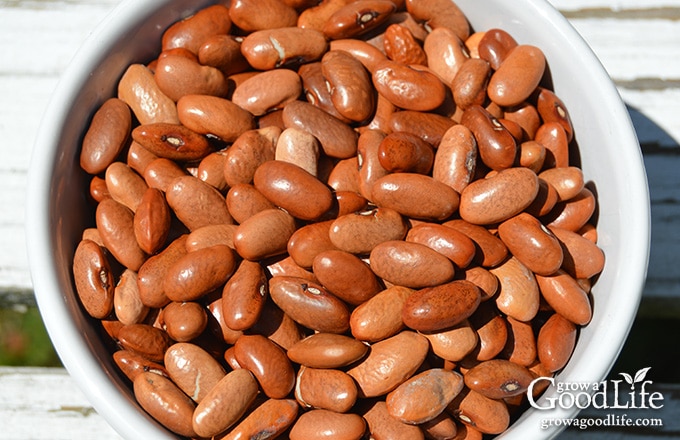
Beans are a good crop to start with if you are brand new to seed saving. Bean seeds are large and easy to see and handle. Other than drying, there is no special process required to prepare the seeds for storage.
Beans are self-pollinating and pollination usually happens even before the blossom opens. So they are less likely to cross-pollinate even when growing close to each other. However, to be on the safe side, try to plant different varieties of beans at least 10 to 20 feet from one another if you are saving seeds to avoid cross pollination.
Steps to Saving Bean Seeds
If you want to save bean seeds, you need to get the plants started early so they have plenty of time to mature fully before fall frost. Beans need warm temperatures and lots of moisture to grow, so try to plant them in early summer for seed saving.
Check out this article on how to grow beans to get your plants started, and then follow the steps below to save seeds:
Step 1: Plant Open-Pollinated Bean Seeds
Grow open-pollinated or heirloom varieties and not hybrids for seed saving. All heirloom plants are open-pollinated, and have developed naturally over years. Saving seeds from open-pollinated plants will result in a plant that has the same characteristics as the parent plant. Plants can also adapt over time to grow well in your garden environment.
Plant breeders create hybrids by cross-pollinating closely related varieties for a desired trait such as disease resistance, larger yield, or color. Plants grown from hybrid seeds don’t usually breed true when seeds are saved and planted the following year.
Step 2: Choose Healthy Plants
Select the heartiest and most vigorous plants to harvest bean seeds for next year’s crop. Do not save seeds from weak or diseased plants, or plants that are infested with pests.
Choose plants that grow quickly, with healthy foliage and vines, and pods that are well developed with plenty of even sized seeds. These will be the healthiest plants to harvest.
Depending on your seed needs, you may need to save just one or two plants to produce a seed crop. Green beans generally average 6 seeds per pod, and most plants produce over 20 pods per plant. So the potential is around 120 seeds per plant!
Step 3: Let the Plants Go
Allow the bean pods to mature fully on the plant. The seeds will fill out the pod as they grow. Then the pod will begin to turn yellow and brown as the pods and bean seeds dry. Seed maturity can take up 4 to 6 weeks, depending on the variety.
Keep in mind, when you allow the pods to mature on the plant, the plant will focus its energy on ripening those seeds, and will stop producing new pods. So either harvest some beans before allowing the plant to go to seed, or dedicate a growing bed to producing seeds only.
Step 4: Collect the Pods
The bean pods should feel papery and dry when ready. You should hear the bean seeds rattle when you shake the pod. Once the pods are dry, pick the beans from the plants to dry further indoors. Be sure to harvest all the pods before frost.
If the pods are not dry before the first frost, pull the whole plants and let them dry further indoors. I tie the plants together, and let them hang from the ceiling in my basement.

Step 5: Dry Out the Bean Seeds
Spread the dried pods in a single layer on a drying screen and let them dry further in a well-ventilated location, until the pods are papery and brittle. Dry for at least two weeks before testing the bean seeds.
Step 6: Test the Seeds
Shell a pod and test several bean seeds with your fingernail. Press your fingernail into the seeds. If it leaves a dent, the seeds need to dry longer. You can also test the beans by hitting them with a hammer. The bean seeds will shatter when they are completely dry.
Step 7: Shell and Store
Once your bean seeds are dry, remove them from the pods, and freeze them to kill any weevils that may be in the seeds. Place the dried beans in a freezer bag, seal, and place in the freezer for about a week. Then remove the bag, spread out the beans in a single layer to let them thaw and evaporate moisture for about a day.
Place your dry beans in an airtight container. Label with the name of the beans and the year collected. Store your seeds in a dark and cool location, at a temperature between 32˚F to 42˚F.
Bean seeds will last up to 4 years when stored properly. If your seeds are older, try this Seed Germination Test to check to see if the seeds are still viable before planting.
Saving bean seeds is an easy and thrifty way to keep growing your favorite varieties year after year. Not only is it a great way to save money, but it also allows you to maintain the quality and taste of your favorite beans. So next time you’re growing beans, be sure to save some of the seeds for future planting!
You May Also Like:
- Tips for Buying Seeds for your Vegetable Garden
- 13 Easy Vegetables to Direct Sow
- 3 Succession Planting Tips to Maximize Your Harvest

I was drying green beans for next year. The were drying well. Just now a freaky rain storm just soak them . Are they done for? Can I continue to dry them ? Can I dehydrate them in my oven. It has a dehydrating feature? Thank you for you help.
Janice, You can continue to dry the beans. The pods get wet from rain when they are on the plant. I don’t suggest dehydrating the beans because the heat may damage them.
Hi, I had a question. If I grew waxed beans and green beans in the same garden, could I still save seeds from them, or would they hybridize? Are they close enough for the pollen of one to fertilize the other?
Raven, Beans are self-pollinating and pollination usually happens even before the blossom opens. So they are less likely to cross-pollinate even when growing close to each other. However, to be on the safe side, try to plant different varieties of beans at least 10 feet from one another if you are saving bean seeds.
This year we planted my great grandmother’s green beans that we had stored in the deep freeze for atleast the last 20 years. Didn’t count how many we planted but many came up, and I came here to find how best to save these seeds to keep it going. I love seeing that other people have been lucky enough that something similar happened for them! Thank you for sharing your tips!
Caitlyn, I love that your grandmother’s bean seeds sprouted after 20 years and that you are continuing to save and replant. Thanks for sharing!
Snow Peas were my first seed saving attempt. Since they produce very early in the year, there is ample time for them to dry on the vine before frost comes. They look dreadful, but its well worth the effort. Hundred or more seed from 45 plants. Just stop harvesting near the end of the picking season! Pick your seed in very late summer.
Hi,Jeri here, I have 2 large bag of green beans that are to old and woody to eat as green beens. Can I dry then in the sun. To turn the pods yellow,or whitish then harvest the seeds.
Jeri, I don’t think that will work. The seeds may not be developed enough since they were picked from the vine before they were fully mature.
I saved some Kentucky pole beans from my grandmother. I kept them in my fridge for 25 years! With working from home I hade more time so I planted 8 of them and they all came up! I am so excited to harvest more seeds for next year to share with my family.
Amy, I love this! What a wonderful way to plant on a little love from your grandmother. Thanks for sharing!
Are Greenbean seed okay to plant that are two years old/
Don, Yes, bean seeds are still good for 3-4 years under the proper storage conditions. You can test them using this Simple Seed Germination Test: https://growagoodlife.com/simple-seed-germination-test/
I find when I leave them on the plant till dry/brown they mostly shrivel up to almost nothing. I’ve started picking them when they are full and yellow. Then I bring them in until the end of the summer to dry and I get more large seeds this way than leaving them to dry on the plants. I also found if I shell them before fully dry, it’s less messy and easier on my fingers & nails.
Jen, Great tips. Thanks for sharing.
I have been letting the pods of my scarlet runner beans stay on the vines to save the seeds for next year. But last night we had a freeze and the pods are now soft and wet. Are they still viable for next year’s planting if they went through a frost?
If the seeds inside the pod were dry, a frost shouldn’t damage them. However, if the seeds were not fully dry, they could be damaged. You can test for germination to find out for sure: Simple Seed Germination Test
Beans & peas are the first veg that I saved seeds for – so rewarding!
Margaret, Me too! If I wasn’t addicted to purchasing seed packages, I would save more seeds from other plants too. Unfortunately, the amount of bean and pea sees in the packages is really small. Luckily, beans seeds are so easy to save from year to year.