No-Knead Dutch Oven Bread
This post may contain affiliate links, which means that I may receive a commission if you make a purchase using these links. As an Amazon Associate I earn from qualifying purchases.
This no-knead Dutch oven bread recipe is simple to make using only four ingredients and bakes up a delicious, chewy artisan loaf. Learn how to make a rustic bread using this easy no-knead bread recipe.

We rely on homemade bread often, and this no knead bread recipe has been a favorite since in was published in the NY Times back in 2006. In the article, Mark Bittman introduced us to Jim Lahey of Sullivan Street Bakery, and his clever way to produce a rustic artisan bread that works for the home baker.
Just about every food blogger has a version of this bread recipe on their website. It is popular for a reason… It’s simple and comes out great every time even for those who don’t bake bread regularly.
The recipe is simple, but the trick is to use a long fermentation to develop flavor and texture, and to bake in a preheated Dutch oven to mimic commercial bread ovens.
Why Make No Knead Breads?
The best things about no knead breads is it is less work, only requires a very small amount of yeast, and then relies on fermenting time to develop the gluten strands that give the bread its texture. The result is a delicious, rustic round bread with a fluffy and moist interior, surrounded by a dense and chewy crust.
Uses Less Yeast
No-knead breads rely on fermenting to help leaven the dough, so you’ll use less yeast in this recipe…just 1/4 teaspoon per loaf to get the fermentation started! The long fermentation of 12 to 18 hours develops a superior flavor and texture in the bread. The gas produced during the fermentation process causes the bread to rise.
Less Work, No Kneading
Simply combine the ingredients and rely on time to ferment the dough to develop the flavor and texture. There is no extensive time and labor spent kneading the dough, or wondering if you kneaded enough.
Extremely Forgiving
I was in the middle of making this bread when we experienced a power outage that ended up lasting for two days. We had a generator keeping our refrigerator operating, but baking in the oven was impossible. I simply placed the bowl of dough in the refrigerator, and pulled it out once power was restored. The chilled dough was much easier to handle and form into a loaf. It took a bit to warm up, but once it doubled in size, it was baked and came out perfect!
Tips for Making No Knead Bread
This no-knead bread is made from flour, water, salt, and a small amount of yeast to get the fermentation going. It is fermented overnight, and baked in a preheated covered Dutch oven that mimics commercial stone hearth bread ovens.
Flour
You can use bread flour or all-purpose flour, or a combination of both flours. I recommend going with bread flour for your first few loaves. Both so you can see how the dough comes together, and because it has a higher level of protein that will give your bread a nice rise and texture.
Once you have mastered your first few loaves, go ahead and try using all-purpose, or even adding a little whole wheat to the bread flour. I don’t recommend more than 1/4 cup of whole-grain flour though. Breads that are not kneaded rely on fermentation to form the gluten strands in the dough. Whole grains interfere with the bonding of the gluten strands and will result in a slightly denser loaf.
Water
Use non-chlorinated water for fermenting. Chlorine is a chemical used to treat city water to eliminate bacteria. Chlorinated water will slow or prevent the yeast from growing and fermenting. If your tap water has chlorine, fill a container with water, leave it open, and let it sit out at room temperature for several days. The chlorine will evaporate from the water.
Salt
Salt plays several important roles in making bread. It slows yeast activity, strengthens the gluten, improves the color of the crust, and balances the flavor of the bread. I use kosher salt for all my baking because it has no additives.
Yeast
Just a small amount of yeast is needed to get the fermentation moving. You can use regular, active dry yeast for this recipe. Even though you are mixing the yeast directly into the flour, you won’t have to activate the yeast first. It will start multiplying once combined in the wet bread dough.
Which Dutch Oven to Use?
A heavy, lidded Dutch oven is the key to giving this bread that crispy, crunchy crust and soft interior. The thick, cast iron provides ample thermal mass to keep the temperature steady. While the dough bakes, it releases steam that is contained in the Dutch oven. This helps keep the dough moist, allowing the bread to rise fully before the crust crisps over and darkens in color.
Any heavy, 5-quart or 6-quart Dutch oven with oven safe cover will work. I have used a Lodge cast iron Dutch oven for many years for making bread. I have also used an enamel-coated cast iron Dutch oven that I scored at a thrift store. Check the manufacture’s instructions. Some Dutch ovens can’t be preheated while empty as it may cause the enamel to crack.
Steps for Making No Knead Bread
This no-knead bread is a delicious way to make a rustic artisan bread. You do need to start the bread the day before baking, but it doesn’t take a lot of hands on time.
Here are the illustrated steps for making no knead Dutch oven bread. Follow the fully detailed, printable recipe at the bottom of this article.
Step 1: Gather Your Kitchen Equipment
- Kitchen scale
- Large prep bowl
- Whisk
- Rubber spatula
- Beeswax wrap or plastic wrap
- Large cutting board
- Parchment paper
- 5-quart Dutch oven, or heavy ovenproof pot with a lid
- Heavy-duty oven mitts or pot holders
- Kitchen towels
- Cooling rack
Step 2: Mix the Ingredients
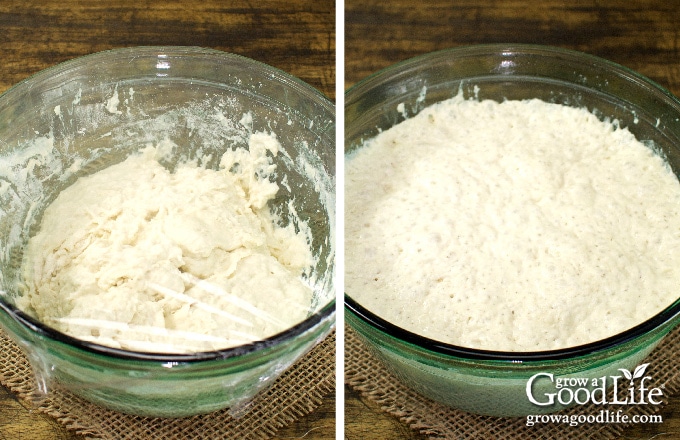
Begin by combining the flour, yeast, and salt in a bowl. Add the water and stir with a rubber spatula. The dough will be very wet.

Step 3: Ferment the Dough
Cover the bowl with plastic wrap or reusable bees wrap, and let the dough sit for 12 to 18 hours overnight to ferment.
Step 4: Shape and Let Rise
Lightly flour a large cutting board and use a rubber scraper to scoop the dough out and on to the floured surface.
Dust the top of the dough with flour, and use the rubber scraper to pull the dough from the sides and fold it over about 3 or 4 times. Let it sit for about 10 minutes to rest.

Spread a square of parchment paper on the counter. Dust your hands with enough flour to keep dough from sticking and shape the dough into a ball. Place the dough in the center of the parchment paper.

Grab the four corners of the parchment paper and lift the dough back into the bowl. Let the dough rise until doubled in size, about 1 to 2 hours.
Step 5: Bake the Bread
About 20 minutes before the dough is finished rising, place the Dutch oven into the oven and preheat to 450˚F.
When the dough is ready to bake, slip on a pair of heavy-duty oven mitts. Carefully remove the hot pot from the oven, place it on the stove, and lift off the cover. Place the dough into the Dutch oven by grabbing the four corners of the parchment paper, lifting the dough out of the bowl, and lowering it into the pot.
Cover and bake for 30 minutes. Remove the lid and bake another 15 to 20 minutes until the loaf is nicely browned. Remove the loaf from the pot, and let it cool before slicing. Recipe makes one 1-1/2-pound loaf.

No Knead Dutch Oven Bread
Ingredients
- 3 1/3 cups unbleached bread flour (430 grams)
- 1/4 teaspoon active dry yeast (1 gram)
- 1 1/4 teaspoons kosher salt (8 grams)
- 1 1/2 cups warm water between 105-115˚F (345 grams)
- extra flour for dusting
Instructions
Mix the Dough
- Add the flour, yeast, and salt to a large bowl and mix well.
- Add the water and mix until combined, about 30 seconds to 1 minute. The dough will be sticky.
Ferment the Dough
- Cover the bowl with beeswax wrap or plastic wrap, and let the dough rest for 12 to 18 hours at room temperature, about 70˚F. The dough is ready when you see bubbles dotting the surface.
Shape the Bread
- Lightly flour a work surface and dump the dough out into the center.
- Dust the top of the dough with flour, and use the rubber scraper to pull the dough from the sides and fold it over about 3 or 4 times. Let it rest for 10 minutes.
- Spread a square of parchment paper on the counter. Dust your hands with enough flour to keep dough from sticking to your hands and shape the dough into a ball. Place the dough in the center of the parchment paper.
Proof the Bread
- Grab the four corners of the parchment paper and lift the dough back into the bowl.
- Sprinkle the top with flour, cover with a kitchen towel, and let the dough rise until doubled in size, about 1 to 2 hours.
Preheat the Oven and Dutch Oven
- About 20 minutes before the dough is finished rising, place the Dutch oven into the oven and preheat to 450˚F.
Bake the Bread
- When the dough is ready to bake, remove the hot pot from the oven. Take off the cover and place the dough into the pot by grabbing the four corners of the parchment paper, lifting the dough out of the bowl, and lower it into the hot pot.
- Cover with the lid and bake for 30 minutes. Remove the lid and bake another 15 to 20 minutes until the loaf is nicely browned.
- Remove the loaf from the pot, and let it cool before slicing.
- Yield: One 1 1/2-pound loaf.
Nutrition
You May Also Like:

Can you add flavor ingredients to this recipe such as rosemary, garlic, honey, etc ? The bread is delicious !
Mike, Absolutely! You can definitely add flavor ingredients to this no-knead bread recipe to customize it to your liking. For rosemary and garlic bread, simply chop fresh rosemary and garlic, then mix them into the dough during the initial mixing process. For a touch of sweetness, add honey to the dough, adjusting the amount to your taste preference. Get creative with your flavor combinations and enjoy experimenting with different ingredients. Happy baking! 😊
I have made 3 loaves so far and it’s great! I would like smaller loaves for the holidays l
If wanting to divide this recipe for smaller loaves when would you divide and would you adjust baking temperature and / or time?
Emi, I am so happy you enjoyed the recipe! I have not tested it, but if you cut the dough in half for smaller loaves, reduce the baking time by half as well. Then, when you uncover and bake again, watch it carefully, so it doesn’t get too brown. Additionally, if you have a probe thermometer, you can check the temperature by sticking it through the bottom of the loaf. The internal temperature should be 190 to 200F.
This was my first attempt at bread-making and it came out perfectly! I will say that I forgot about the dough and it ended up sitting on my counter for about 18 hours and even with that goof it came out beautifully. Super excited for the next time I make this bread. It is divine!
This recipe easy pretty easy to follow and the results are great. I’ve made it twice and both times the middle has been a little raw or dense. This is my first attempts at making dutch oven bread, so I am not sure why. Any suggestion on how to get that nice, airy bread that isn’t so dense in the middle?
Matthew, Did you see my reply to your previous comment? Did you try letting the dough rise longer before baking?
I made this to go with some homemade tomato basil soup. The bread was delicious and the color was perfect. My only hang up was that the dough didn’t rise as much as i would have liked and the inside was a little underdone. After I formed the dough into a ball and let it rise for an hour, I didn’t put a kitchen towel over the ball. Would that have impacted the rise? This was my first ever attempt at making homemade bread. Again, the color and flavor were great, just not as much rise as i was hoping for and the inside was a little underdone.
Matt, It sounds like the dough didn’t rise long enough. Let the dough rise until it is doubled in size. This may take 1 hour or up to 2 hours depending on the yeast and temperature of your home. Also, the towel is to help prevent the dough from drying out. A dried out surface can stop the dough from rising and expanding. I hope you will try this recipe again. You are so close.
This bread is delicious! It was really easy to make, and tastes just as described. Nice crunchy crust and chewy on the inside. Will definitely make this again!
A.S. I am so glad you enjoyed it!
The no-knead Dutch oven bread was the best bread I ever made. I would give it 10 stars out of 10. It meets all my requirements for a weekly loaf. It is light and flavorful with a crunchy but chewy crust. It makes perfect toast with little nooks and crannies to capture butter and honey. It gets a tad denser after a day and is perfect for sandwiches. It’s just like some expensive loaves I sometimes buy but so easy and simple to make! Thank you so much!