Canning Spaghetti Sauce
This post may contain affiliate links, which means that I may receive a commission if you make a purchase using these links. As an Amazon Associate I earn from qualifying purchases.
Pressure canning spaghetti sauce is a great way to preserve the flavors of summer harvested from your vegetable garden. Learn how to make a hearty spaghetti sauce and can it using this step-by-step guide.
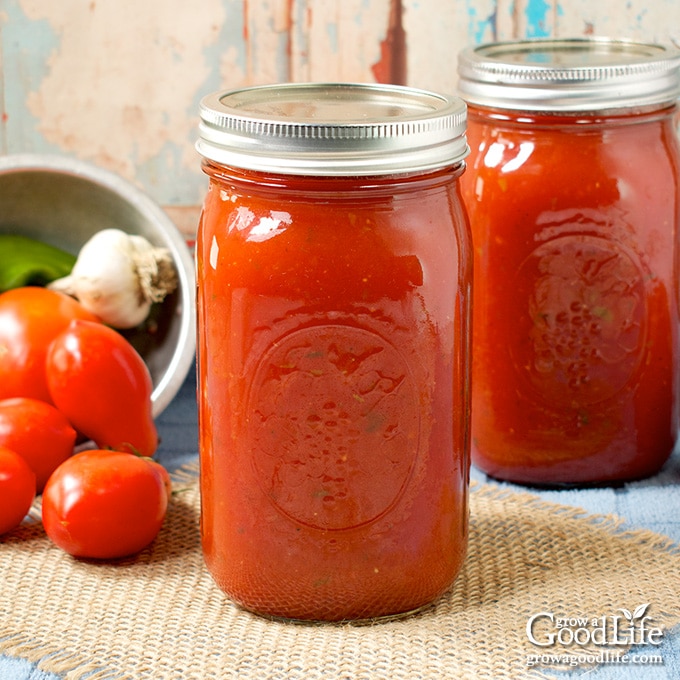
This thick and hearty homemade spaghetti sauce is made from fresh tomatoes, mushrooms, onions, bell peppers, and garlic, then preserved by pressure canning for shelf-stable jars.
It is delicious spooned over grilled meats, layered in lasagna, or tossed with rigatoni, penne, or your pasta of choice.
Tips for Making and Canning Garden Spaghetti Sauce
Here are tips for turning your summer vegetables into a delicious homemade spaghetti sauce and pressure canning it for your food storage shelves:
Use a Pressure Canner
Since this recipe includes low acid ingredients, it needs to be pressure canned for safety. A pressure canner heats the jars at a high temperature required to kill bacteria that can cause food-borne illnesses. I use a Presto 16-quart pressure canner. It fits under my stove hood and is light enough for me to lift off the stove without help. Other brands that make quality pressure canners are Mirro and All-American.
If you don’t want to pressure can this spaghetti sauce, or if you make changes to the ingredients, you can freeze it instead. Also, consider using a canning recipe that can be preserved using a boiling water bath canner. This Seasoned Tomato Sauce recipe is my go-to favorite.
Choosing Tomatoes for Sauce
Paste tomatoes, also called plum tomatoes are oval-shaped fruit with thick, dense flesh, few seeds, and a concentrated tomato flavor. They are ideal for making sauce and salsa because they have very little moisture and produce a thicker sauce.
Most of the tomatoes I grow in the garden are paste-type tomatoes for preserving. My favorites include:
- Amish Paste tomatoes are large, meaty tomatoes with a delicious flavor.
- Roma tomatoes are always a staple in my garden because they are a great canning tomato. They are also a common tomato at your local farmers’ market if you don’t grow your own.
- San Marzano is my favorite tomato for making sauce and salsa. It has a sweet flavor, dense flesh, and very few seeds.
Select good-quality tomatoes with no signs of rot, insect damage, or disease. Ripe tomatoes should have firm flesh that gives slightly when pressed with your thumb. Don’t use tomatoes from diseased or frost-killed vines as these may harbor harmful pathogens that may not be killed during processing.
Peeling and Seeding the Tomatoes
The most time-consuming preparation when canning tomatoes is removing the skins. According to the USDA, peeling is required to home can the tomatoes safely.
“It’s important to follow instructions in tested recipes to ensure safety. We do not have any tested recipes that include the skins. Skins change the density of the product, so the processing time we have available would be inaccurate.” ~ Ask Extension Knowledgebase
The easiest way to remove the skins and seeds is to cook the tomatoes briefly to soften and run them through a food strainer or food mill to remove the skins, seeds, and puree the tomatoes.
If you don’t have a food strainer, you can blanch and peel the tomatoes and scoop out the seeds before making your sauce: See How to Peel Tomatoes for an illustrated, step-by-step tutorial.
Other Ingredients
While fresh tomatoes are the foundation, the mushrooms, onions, and peppers add loads of flavor and texture to this spaghetti sauce.
- Mushrooms: Use fresh mushrooms that have smooth, unblemished caps. The stems may be a little dry on the ends but should not be wholly withered and cracked. Both white button and baby bella mushrooms are perfect for this recipe.
- Onions: You can use any variety of bulb onions, including red, yellow, white, sweet, or a mixture of onions. The intense flavor will mellow after cooking and processing.
- Peppers: Select fresh peppers that are brightly colored and firm with no blemishes, soft spots, or bruises. The peppers called for in this recipe are bell peppers, but you can safely replace the peppers with the same amount of another variety. I grow lots of peppers in the garden, and my favorites for this recipe are Italian peppers such as Carmen, Marconi, and Corno di Toro.
Steps to Canning Spaghetti Sauce
It may be helpful to review this article on pressure canning at the National Center for Home Food Preservation website and the instruction manual that came with your canner. Make sure everything is clean and working correctly. Double-check that the air vent and steam vent pipe are clear.
This canned spaghetti sauce recipe is the “Spaghetti Sauce Without Meat” recipe from the So Easy to Preserve and USDA Complete Guide to Home Canning books and the NCFHP website.
The instructions specifically state, “Do not increase the proportion of onions, peppers, or mushrooms.” You can safely omit or reduce the amount of onions, peppers, mushrooms, and garlic, but you cannot reduce the tomatoes and keep the other vegetables the same.
Other safe adjustments include:
- Swapping some of the peppers for celery.
- Adjusting the dried seasoning.
- Reducing or omitting the oil and sugar.
We have adjusted the seasonings, reduced the amount of salt, and used less oil to sauté the vegetables.
You can find the complete and printable recipe at the bottom of this article, but these are the steps for canning spaghetti sauce:
Step 1: Gather Your Kitchen and Canning Equipment
You’ll need:
- Pressure canner and canning rack
- 8 pint-sized canning jars, or 4 quart-sized jars
- Canning lids and bands (new lids for each jar, bands can be reused)
- Kitchen scale
- Food strainer or food mill, or sieve
- Canning tools: jar lifter, canning ladle, funnel, and bubble popper
- Plus basic kitchen supplies such as a large saucepan, several large prep bowls, large skillet, kitchen towels, measuring cup, large spoon, knife, and a cutting board.
Step 2: Prepare the Ingredients
Use your kitchen scale to weigh 30 pounds of tomatoes for this recipe. You will need two medium or one large onion to get 1 cup chopped and one large bell pepper for 1 cup of chopped peppers. Rinse the tomatoes, mushrooms, and peppers under running water, and spread out on clean towels.
Heating the tomatoes quickly after cutting will preserve the pectin in the fruit, which will help thicken your sauce. Place a large stainless steel saucepan on the stove, and set the heat to medium.
Cut each tomato in half, remove the core, and trim out any bad spots. Drop the tomatoes into the saucepan as you work. Crush the first few tomatoes with the back of your spoon as they heat to release the juice, and occasionally stir to prevent sticking.
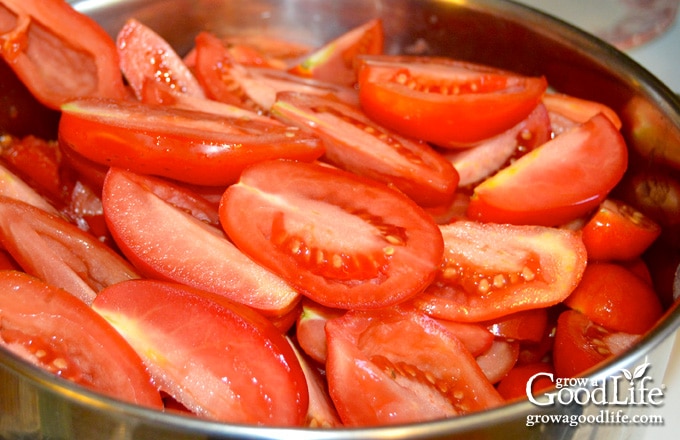
Once all the tomatoes are in the pot, bring it to a boil over medium-high heat, and cook for 20 minutes. Then, turn off the heat, and let the tomatoes cool slightly before straining out the seeds and skins.
Prepare the rest of the vegetables while the tomatoes are cooking:
- Mushrooms: Cut into 1/4-inch slices.
- Onions: Remove the peelings, chop into 1/4-inch pieces, and measure 1 cup of chopped onions.
- Peppers: Cut off the stem, remove the core, chop into 1/4-inch pieces, and measure 1 cup of chopped peppers.
- Garlic: Remove the papery skins, trim the root end, and mince.
Once the cooked tomatoes have cooled slightly, remove the skins and seeds with a food strainer, food mill, or sieve. Return the strained tomatoes to the saucepan.
Step 3: Simmer the Sauce
Heat the oil in a large skillet over medium-high heat. Add the mushrooms, onions, peppers, garlic, and sauté until tender.
Add the sautéed vegetables to the pot of tomatoes along with the brown sugar, parsley, oregano, salt, and pepper. Bring the pot to a boil over medium-high heat, and then reduce the heat to low.
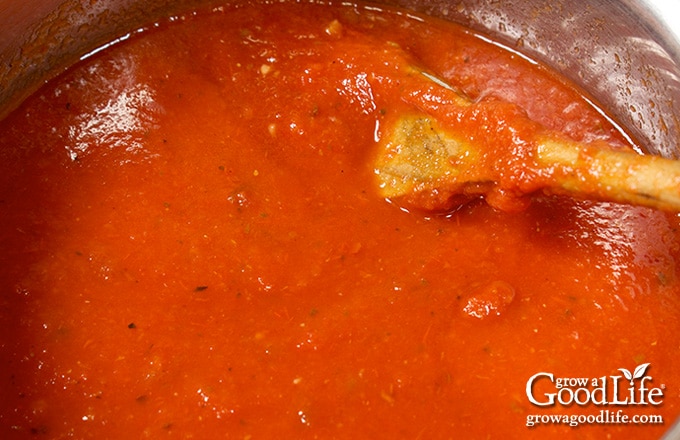
Simmer uncovered until the sauce thickens and reduces by one-half, about 1 to 2 hours, depending on how juicy your tomatoes are. As the sauce simmers, frequently stir to prevent sticking.
Step 4: Prepare the Canning Equipment
Set up the canner, prepare the jars, and organize your work area when the sauce is almost ready.
Wash the canning jars, lids, bands, and canning tools in hot soapy water, and rinse well. Check the jars over carefully for nicks and cracks. Eliminate any that show damage as these will break in the canner. Set the lids and bands aside until you are ready to use them.
Place the pressure canner on the stove, and insert the canning rack. Place the jars in the canner on the rack. Add water per your pressure canner manufacturer’s instructions: Presto is 3 quarts, Mirro is 2 quarts, and All American is 2 to 3 inches.
Fill the jars halfway with hot water, and then place them on the rack in the canner. Bring the canner to a simmer for 10 minutes (180˚F). Keep the jars hot until you are ready to fill them.
Step 5: Can the Spaghetti Sauce
Spread a dry kitchen towel on the counter. Use the jar lifter to remove a jar from the canner. Pour out the water (save it for washing dishes), and place the jar on the towel. Keep the remaining jars in the canner so they stay hot.
Place the canning funnel on the jar, use the canning ladle, and fill the jars with the hot spaghetti sauce leaving 1-inch headspace.
Run the bubble popper through the jar to remove air bubbles, check and adjust the headspace if needed, and wipe the rim with a damp towel.
Center a lid on the jar, place the band over the cover, and screw it on until fingertip tight. Immediately place the jar back on the rack in the canner, and repeat with the rest of the jars. If you have sauce left over, put it in the refrigerator and use it within a few days.
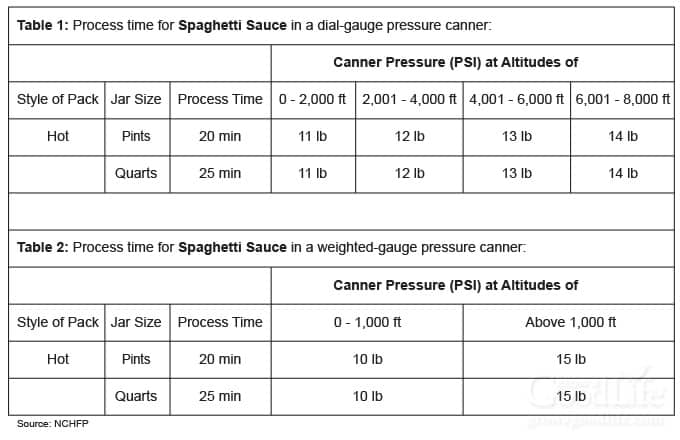
Place the lid on the canner and lock it. Bring to a boil over medium-high heat. Follow the directions for your pressure canner and process for the times indicated in the recipe below.
When the processing time is complete, turn off the heat and let the canner depressurize naturally, remove the jars, and let them cool completely. Date, label, and store the jars in a cool location for 12 to 18 months.
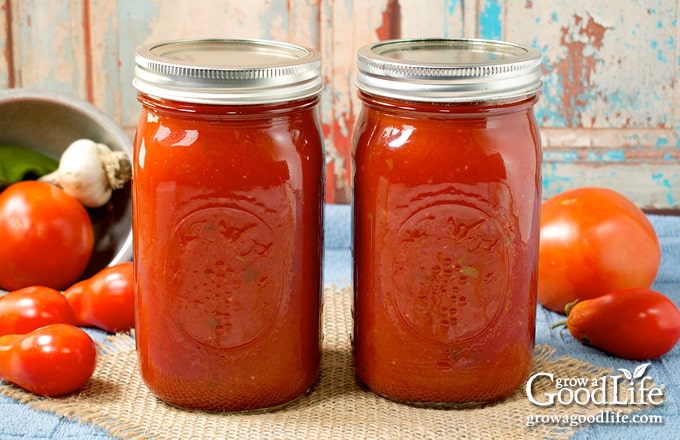
To use, empty the jar into a saucepan and heat on the stove. Adjust seasonings to taste and serve with you favorite pasta, such as zucchini rollups, homemade pasta, ricotta gnocchi, and zucchini lasagna.
Canning Spaghetti Sauce
Ingredients
- 30 pounds paste tomatoes
- 2 tablespoons extra virgin olive oil
- 1 pound fresh mushrooms sliced (optional)
- 1 cup chopped onions
- 1 cup chopped green peppers
- 5 cloves garlic minced
- 1/4 cup brown sugar
- 2 tablespoons dried parsley
- 1 tablespoon dried oregano
- 2 teaspoon kosher salt
- 2 teaspoons ground black pepper
Instructions
Prepare the Ingredients
- Wash the tomatoes, mushrooms, and peppers well under clean running water.
- Cut the tomatoes in half, remove the cores, and place them into a large saucepan over medium heat. Crush the first few tomatoes with the back of your spoon as they heat to release the juice, and occasionally stir to prevent sticking.
- Once all the tomatoes are in the pot, bring it to a boil over medium-high heat, and cook for 20 minutes. Then, turn off the heat, and let the tomatoes cool slightly before straining out the seeds and skins.
- Prepare the rest of the vegetables while the tomatoes are cooking:
- Cut the mushrooms into 1/4-inch slices.
- Peel the onion, chop it into 1/4-inch pieces, and measure 1 cup of chopped onions.
- Remove the stems and seeds, chop the pepper into 1/4-inch pieces, and measure 1 cup of chopped peppers.
- Remove the papery skins, trim the root end, and mince the garlic.
- Once the cooked tomatoes have cooled slightly, remove the skins and seeds with a food strainer, food mill, or sieve. Return the strained tomatoes to the saucepan.
Cook the Spaghetti Sauce
- Heat olive oil in a large skillet over medium-high heat. Add the mushrooms, onions, peppers, garlic, and sauté until tender.
- Add the sautéed vegetables to the pot of tomatoes along with the brown sugar, parsley, oregano, salt, and pepper.
- Bring the pot to a boil over medium-high heat, and then reduce the heat to low. Simmer uncovered until the sauce thickens and reduces by one-half. This will take 1 to 2 hours, depending on how juicy your tomatoes are. As the sauce simmers, frequently stir to prevent sticking.
Prepare the Canning Equipment
- Wash the jars, lids, and rings in hot soapy water and rinse thoroughly. Set the lids and rings aside until you are ready to use them.
- Place the jar rack into the pressure canner, and fill with water per your pressure canner manufacturer’s instructions: Presto is 3 quarts, Mirro is 2 quarts, and All American is 2 to 3 inches.
- Fill the jars halfway with hot water, and then place them on the rack in the canner. Bring the canner to a simmer for 10 minutes (180˚F). Keep hot until you are ready to fill them.
Can the Spaghetti Sauce
- Spread a kitchen towel on the counter. Use your jar lifter to remove a jar from the canner. Pour out the water (save it for washing dishes), and place the jar on the towel. Keep the remaining jars in the canner so they stay hot.
- Use the ladle and canning funnel and fill the jar with the hot spaghetti sauce leaving 1-inch headspace.
- Run the bubble popper through the jar to release air bubbles, adjust headspace if needed, wipe the rim, center a lid on the jar, and screw on the band until it is fingertip tight.
- Place the jar back into the canner, and repeat with the remaining jars.
- Cover the pressure canner and secure the lid. Leave the vent open, adjust the heat to medium-high, and bring the canner to a boil. Allow the pressure canner to vent steam for 10 minutes, then place weight on the vent.
- Once the canner has reached the correct pressure (10 pounds for weighted gauge and 11 pounds for dial-gauge pressure canner), set a timer, process pints for 20 minutes, and quarts for 25 minutes at altitudes of less than 1,000 ft. Adjust pressure for your altitude if necessary (see note below). Regulate the heat as needed to maintain steady pressure.
- When the processing time is complete, turn off the heat and let the pressure canner cool and depressurize. The time will depend on your brand and should be between 30 to 60 minutes. Follow the instructions for your pressure canner.
- Once the pressure canner depressurizes, spread a kitchen towel on the counter, remove the weight from the vent pipe or open the petcock, and wait 10 minutes for the jars to adjust to the change in pressure.
- While wearing pot holders, unlock the cover and remove the lid while tilting it away from you so that steam does not burn your face. Allow another 10 minutes for the jars to adjust to the change in pressure.
- Use a jar lifter to remove the jars from the canner and place them on the towel. Keep the jars upright, and don’t tighten bands or check the seals yet. Let the hot jars sit undisturbed for 12 to 24-hours to cool.
- Wait until the jars have cooled for at least 12-hours, and then check to be sure jar lids have sealed. Test the seal by pushing on the center of the cover. The lid should not pop up. If the top flexes up and down, it failed to seal. Refrigerate the jar and use it up within a few days.
- Remove the screw-on bands and wash the jars. Label, date, and store the jars of spaghetti sauce in a cool, dark place between 50 to 70˚F. Use within a year for the best quality. This recipe makes about 8-pint jars or 4-quart jars.
Notes
Nutrition
You May Also Like:
- Canning Rotel-style Tomatoes and Chilies
- Tomato Puree Canning Recipe
- Roasted Roma Pizza Sauce Canning Recipe
40+ Meals in a Jar Pressure Canning Recipes
In this eBook, you will find 50 pressure canning recipes, including 44 meals, along with homemade stocks and bone broths. Recipes include soups, stews, chilis, beans, beef, pork, and poultry. Explore the world of preserving delicious home-cooked meals for all seasons.

Do I need to add lemon juice to the jars?
Penny, No, you do not need to add lemon juice to the jars for this particular recipe. The University of Georgia extension office has thoroughly tested this pressure canning recipe and acidification is not required in this case. You can confidently follow the instructions provided for safe and delicious results.
Can the mushrooms and other veggies be blended in a blender—will you still get the same flavor from the mushrooms? Thanks!!
Jenilee, I would advise against altering the recipe in this way for home canning. The original recipe was developed and tested with chopped veggies. Pureeing them could cause density issues that affect how heat penetrates the jars as they are being processed. If you’re considering changes, it’s best to freeze the sauce instead.
May I increase the sugar by a lot, like almost one cup. My boys like their sauce very sweet. Thank you, I was looking for a sauce that I could pressure can.
Suzie, The addition of a significant amount of sugar can alter the pH level of the sauce, making it less acidic. Lower acidity can create an environment where bacteria can thrive, which is not safe for canning. If you prefer a sweeter sauce, it’s safer to add sugar to the sauce after opening the jar to heat and serve it, rather than adjusting the recipe for canning. This way, you can enjoy the desired level of sweetness without compromising the safety of your canned spaghetti sauce.
Thank you for this recipe. I have found that it is easier to pressure can this sauce than water bath, which used gallons of water just to cover the jars. Also, many blogs do not say how to heat the jars before putting in the sauce, some peope like the oven method, which I have used but it is not recommended. I prefer your method.
I go to this awesome blog quite often for recipes.
Cate, I also find it much easier to pressure can sauce if I have a large batch to process.
You are correct. The manufacturer does not recommend heating jars in the oven because it can cause the glass to be brittle: “While canning jars are designed to withstand high temperatures in moist environments, such as those in a canner, they are not suitable for use in the dry heat of an oven.” ~ Ball Complete Book of Home Canning, page 414
Heating jars in the canner also pre-heats the canner, and it takes less time to bring it to a boil once the jars are in the canner.