Canning Beef Stock
This post may contain affiliate links, which means that I may receive a commission if you make a purchase using these links. As an Amazon Associate I earn from qualifying purchases.
Beef stock is a must have pantry staple for stews, soups, and gravy. Learn how to make homemade beef stock and preserve it into shelf-stable jars using a pressure canner.
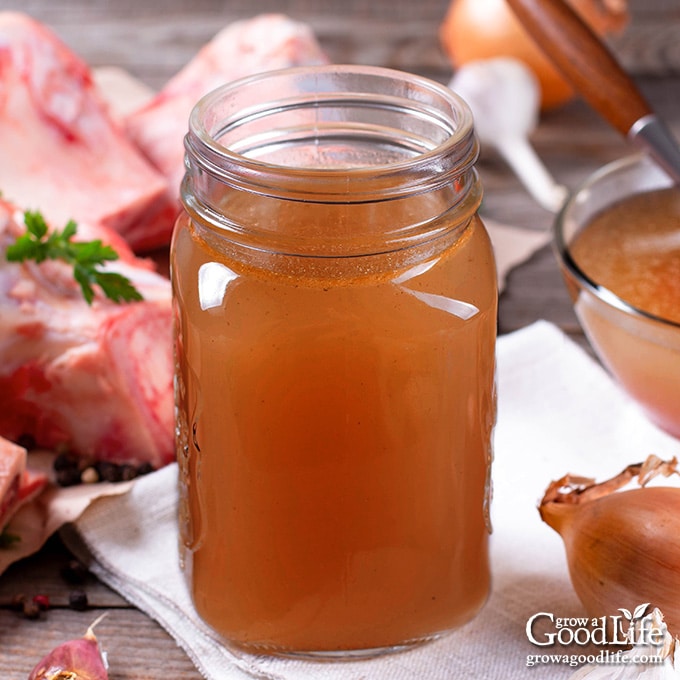
Beef stock is made by combining roasted meaty beef bones with vegetables, herbs, spices, and slowly simmered to build layers of flavor. Once you start making your own homemade stocks, you will find that they taste so much better than store bought.
You also have full control of the ingredients and can eliminate the extra preservatives and sodium found in store bought stocks. There is no salt in this canning recipe. Instead, you can add salt along with the other ingredients when you use it in your favorite recipes.
Tips for Pressure Canning Beef Stock
Making stocks and broths is relatively easy. You will achieve a great tasting stock by simply simmering the bones, and aromatics in a large pot to extract the flavor and collagen. Here are tips for making beef stock:
Beef Stock vs Beef Broth
While stock, broth, and bone broth can be all used in similar ways in cooking, there are some variances in how they are created:
- Beef Stock is made by simmering beef bones and vegetables for 4 hours or longer to extract flavor and collagen from the connective tissues. This results in a rich, flavorful stock, with a silky smooth texture due to the gelatin from the bones.
- Beef Broth is the liquid made by simmering beef meat along with some aromatics for a brief time, less than 2 hours. Broths are a thinner liquid than stocks, and are often seasoned with salt to add flavor.
- Bone Broth is actually closer related to stock than broth. It is created by simmering bones with or without vegetables for 12 hours or longer. The long simmer breaks down the cartilage, bones, and tissues to develop a lot of collagen-rich gelatin in the bone broth.
Other than the minor differences in ingredients and cooking time, homemade beef stock, beef broth from bones, and bone broth can all be preserved by pressure canning in the same way as this recipe.
Where to find beef bones
Bones were once considered a waste product of processing meat and discarded or given away for free by butchers if you were a regular customer. Now that homemade bone broth is more popular, beef bones are often sold right along the various cuts of meat at the butcher shop and supermarket. Sometimes these are found in the freezer section of the meat department.
Ask your butcher for quality, beef bones small enough to fit into a large pot. Aim for a mix of such as oxtail, neck bones, and marrow bones. Knuckle bones are ideal if your butcher can cut in half, so they are more manageable. Including some meaty bones will add more flavor.
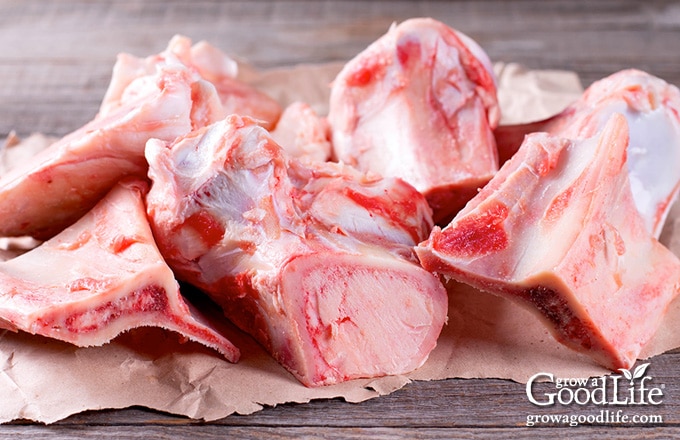
Types of bones you may encounter:
- Leg bones: Beef leg bones seem to be the most common bones I have come across at the supermarket. The marrow bones are the longer bones of the leg and may be cut into 3- or 6-inch pieces. These may be labeled as, “soup bones” or “marrow bones.”
- Knuckle bones: Beef knuckle bones are from the various joints in the legs. These bones have a lot of collagen, which results in a thick stock or broth.
- Oxtail bones: These are bones from the tails of cows. In the past, oxtail bones were from the tails of oxen. The “oxtail” term carried over, but now the bones are commonly the tail of cows. Oxtail bones are sliced from the tail and include some gelatin-rich meat and bone with marrow that will add a hearty beef flavor, and lots of thick gelatin to your stock.
- Saved beef bones: You can also keep bones in the freezer from roasts, ribs, and steaks until you have accumulated enough to turn into broth.
Save your vegetable scraps
While on the subject of saving, consider also saving vegetable scraps to use for making stock. I keep a gallon sized zipper bag in the freezer and add bits and pieces of vegetable scraps over time. It contains onion ends, trimmed celery, carrot pieces, parsley stems, and garlic cloves that have begun to sprout. When the time comes to make stock or broth, I just pull out handfuls of what I need for each recipe.
How to Make Beef Stock
Beef bones are chock-full of flavor. The longer you simmer, the more the collagen and gelatin will break down and infuse flavor and nutrients into the stock.
Plan on at least a two-day process to make and preserve the beef stock. This will allow time for the stock to simmer on the stove to extract lots of flavor and gelatin from the bones. Plus time to cool overnight in the refrigerator so the fat separates and rises to the top for easy removal.
There isn’t a lot of hands-on time required except for an occasional stir and skimming of foam that gathers on top. So you can do other things as the stock simmers on a back burner or a wood stove.
You can find the entire recipe at the bottom of this article, but here are the general steps for making beef stock:
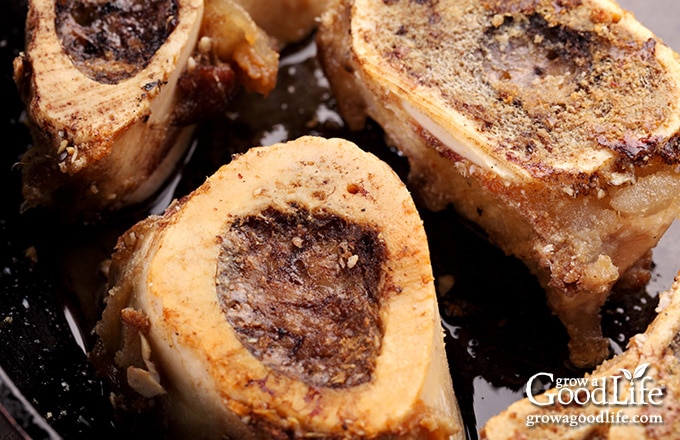
Step 1: Roast the beef bones
Roasted bones add a deep flavor and rich brown color. Rinse bones and place them in large roasting pans and roast in a hot oven until they are nice and brown.
Step 2: Prepare the vegetables
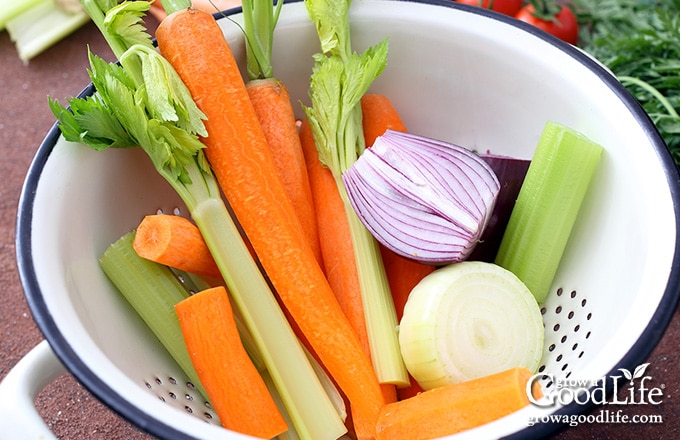
While the bones are roasting, wash the carrots and celery well under clean, running water. Peel the carrots, remove the ends, and chop into pieces. Remove the root end from the celery and cut the ribs into chunks. Remove the root end of the onion and chop into pieces. You can include the onion skins if they look healthy. Discard if they show signs of decay or mold. Crush the garlic.
Step 3: Deglaze the roasting pan
Once the bones have finished roasting. Remove the pans from the oven, and place the bones into a large stock pot. Add a cup of water to the hot roasting pan to deglaze the pan. As the water steams, scrape the pan with a wooden spoon to release the flavor infused brown bits stuck on the bottom of the pan. Pour the flavorful liquid to your pot.
Step 4: Simmer the stock
Add the prepared vegetables, garlic, herbs, and remaining ingredients to the large pot. Cover bones and vegetables with water. Cover pot and bring to a boil over medium-high heat. Reduce the heat to low and simmer for at least 4 hours and up to 24 hours.
While your stock is simmering, it will release fat and impurities that will rise to the top as grey foam. The foam can affect the flavor of the stock if it isn’t removed. So skim it off every now and then as it simmers.
Step 5: Strain and chill
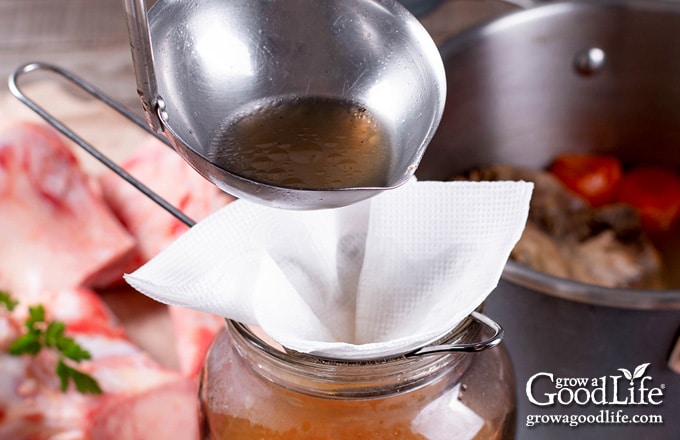
Remove the beef bones and vegetables from the stock using a slotted spoon. Strain the stock through cheesecloth or a fine-mesh sieve into a large container or jars. Let it cool completely, and then refrigerate overnight.
Don’t leave the stock at room temperature for more than 2 hours. To cool it quicker, place the container in an ice-water bath. Change the water as needed to keep it cold, and cool until it is lukewarm. Dry the container and place in the refrigerator. Once the stock cools in the refrigerator, the fat will rise to the top and can be easily removed.
Steps for Canning Beef Stock
You will need to use a pressure canner to can the beef stock safely. There are no safe options for canning stock or broth in a water bath canner. Store it in the freezer if you don’t have a pressure canner.
If you are new to canning or need a refresher, it may be helpful to review this article on pressure canning at the National Center for Home Food Preservation website.
Step 1: Prepare the canning equipment
To can the stock, you will need:
- Pressure canner with canning rack
- 8 pint sized canning jars, or 4 quart sized jars
- Canning lids and bands (new lids for each jar, bands can be reused)
- Canning tools: jar lifter, canning ladle, funnel, and bubble popper
- Plus basic kitchen supplies such as a large sauce pot and clean kitchen towels.
Wash the canning jars, lids, bands, and canning tools in hot soapy water, and rinse well. Set the lids and bands aside to air dry until you are ready to use them.
Place the pressure canner on the stove, and insert the canning rack. Add water per your pressure canner manufacturer’s instructions: Presto is 3 quarts, Mirro is 2 quarts, and All American is 2 to 3 inches.
Fill the jars halfway with hot water, and then place them on the rack in the canner. Bring the canner to a simmer for 10 minutes (180˚F). Keep hot until you are ready to fill them.
Step 2: Warm the Stock
Slide a thin, flat spatula across the chilled stock and remove the fat layer. Removing the fat is beneficial for several reasons, not only will your broth be clearer and contain less fat, but there will be a reduced chance of the thick fat interfering with the seal as the jar is processed in the canner.
Add the stock to a large stockpot. Bring the pot to a boil over medium-high heat.
Step 3: Can the stock
Spread a dry kitchen towel on the counter. Use the jar lifter to remove a jar from the canner. Pour out the water (save it for washing dishes), and place the jar on the towel. Keep the remaining jars in the canner, so they stay hot.
Place the canning funnel on the jar, and use the canning ladle to fill the jar with hot broth. Leave a 1-inch headspace. Run the bubble popper through the jar to release trapped air bubbles. Wipe the lid with a damp towel. Use a towel soaked in vinegar to wipe the jar rims to remove residue.
Center a lid on the jar, place the band over the lid, and screw it on until fingertip tight. Immediately place the jar back into the canner, and repeat with the rest of the jars.
Bring the canner to a boil over medium-high heat. Follow the directions for your pressure canner and process the jars for the times indicated in the recipe below.
After the processing time is complete, let the canner cool and depressurize, remove the jars, and let them cool completely. Wash the jars with soapy water, label, date, and store the jars of beef stock in a cool location. Use within 12-18 months.
That’s it! Now you have a nice supply of ready to use jars of beef stock for your favorite recipes such as beef stew, Swedish meatballs, or as a gravy for pasta or rice.
Don’t be alarmed if you open a jar and the stock has a jelly like consistency. That just means that your stock contains a lot of natural collagen from the bones. When you heat it up, it will return to liquid.
Canning Beef Stock
Ingredients
- 8 pounds meaty beef bones
- 2 large onions chopped
- 2 carrots chopped
- 2 stalks celery chopped
- 3 cloves garlic crushed
- 2 bay leaves
- 1 teaspoon dried parsley or 2-3 sprigs of fresh parsley
- 1/2 teaspoon dried rosemary or 1-2 sprigs of fresh rosemary
- 10 whole peppercorns
- 5-6 quarts water
Instructions
To Make the Beef Stock
- Preheat the oven to 425˚F.
- Rinse the bones and place them into a large roasting pan.
- Roast uncovered in a preheated oven until the bones are brown, about 35-45 minutes. Toss about halfway through so everything browns evenly.
- Remove the roasting pan from the oven. Use tongs to remove the bones from the roasting pan and place them into a large stockpot.
- Add 1 cup of the water to the hot roasting pan to deglaze the pan. As the water steams, scrape the pan with a wooden spoon to release the flavor infused brown bits stuck to the bottom of the pan. Add the flavorful liquid to your pot.
- To your stockpot, add the onions, carrots, celery, garlic, bay leaves, sage, rosemary, peppercorns, and enough water to cover the bones by a couple of inches, about 4 quarts.
- Turn the heat to medium-high and bring the pot to a boil. Reduce the heat to low and simmer for at least 4 hours and up to 24 hours. Stir occasionally and skim off any foam.
- Remove the beef bones and vegetables from the stock using tongs or a slotted spoon. Strain the stock into a large container or extra canning jars. Discard the solids. Let the stock cool completely, and then refrigerate overnight. Can the beef stock the following day.
To Can the Beef Stock
- The next day, prepare the canning equipment by washing the jars, lids, bands, and canning tools in hot soapy water and rinsing thoroughly. Set the lids and bands aside until you are ready to use them.
- Place the jar rack into the pressure canner, and fill with water per your pressure canner manufacturer's instructions: Presto is 3 quarts, Mirro is 2 quarts, and All American is 2 to 3 inches.
- Fill the jars halfway with hot water, and then place them on the rack in the canner. Bring the canner to a simmer for 10 minutes (180˚F). Keep hot until you are ready to fill them.
- Remove the beef stock from the refrigerator and skim off the fat that has risen to the top. Discard excess fat.
- Return the stock to a large pot and bring to a boil over medium-high heat.
- Spread a kitchen towel on the counter. Use your jar lifter to remove a jar from the canner. Pour out the water (save it for washing dishes), and place the jar on the towel. Keep the remaining jars in the canner, so they stay hot.
- Use the canning funnel and ladle and fill the jar with hot stock, leaving a 1-inch headspace at the top of the jar.
- Swirl the bubble popper through the jar and wipe the rim. Center a lid on the jar, place the band over the lid, and screw it on until fingertip tight.
- Use the jar lifter to place the jar back on the rack in the canner, and repeat with the rest of the jars until the canner is filled, or you run out of stock. If you have leftovers, store in the refrigerator or freeze for longer.
- Place the lid on the canner and lock it. Leave the vent open, adjust the heat to medium-high, and bring the canner to a boil. Allow the pressure canner to vent steam for 10 minutes, then place the pressure regulator on top of the air vent, and watch the pressure rise.
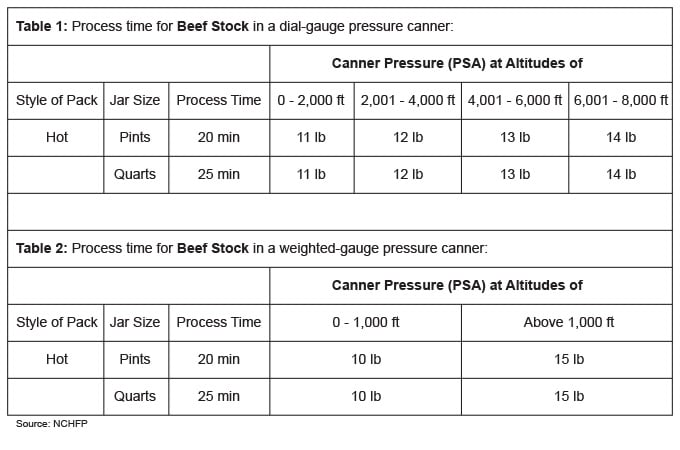
- Once the canner has reached the correct pressure (10 pounds for weighted gauge, and 11 pounds for dial gauge canners.), set a timer, and process pint jars for 20 minutes and quart jars for 25 minutes at altitudes of less than 1,000 ft.
- Adjust the heat as needed to maintain a steady pressure, and adjust altitude if necessary (see chart below).
- When processing time is complete, turn off the heat, and let the pressure canner cool down to 0 pressure on its own. Once the canner is depressurized, let the canner cool additional 10 minutes before removing the lid.
- Spread a kitchen towel on the counter, unlock the cover, and remove it by tilting the lid away from you so that steam does not burn your face.
- Allow another 10 minutes for the jars to adjust to the change in pressure. If jars are still boiling, let them sit in the canner for another 5 minutes, or until the boiling stops.
- Use the jar lifter to lift jars carefully from canner and place on the towel. Keep the jars upright, and don't tighten bands or check the seals yet. Let the jars sit undisturbed for 12 to 24-hours to cool.
- After 12 to 24-hours, check to be sure jar lids have sealed by pushing on the center. The lid should not pop up. If the lid flexes up and down when the center is pressed, it did not seal. Refrigerate the jar and use up within a few days, or transfer to a freezer container and freeze for up to 6 months.
- Remove the ring bands, wash, label, date, and store in a cool, dark location (50 to 70 degrees F). Use within a year for the best quality. Yields about 8 pints or 4 quarts depending on how long you cooked the stock.
Notes
Nutrition
References and Further Reading:
- Principals of Home Canning – National Center for Home Food Preservation
- Using Pressure Canners – National Center for Home Food Preservation
- Selecting, Preparing and Canning Meat – National Center for Home Food Preservation
You May Also Like:
40+ Meals in a Jar Pressure Canning Recipes
In this eBook, you will find 50 pressure canning recipes, including 44 meals, along with homemade stocks and bone broths. Recipes include soups, stews, chilis, beans, beef, pork, and poultry. Explore the world of preserving delicious home-cooked meals for all seasons.

I am anxious to try this recipe. Can I leave the vegetables in the stock? . Would the pressure timing be different if I leave the vegetables in?
Thank you.
Jan, This turkey stock recipe is for pressure canning liquid stock only. Including vegetables makes it a soup rather than a stock and requires a longer processing time. You could follow this recipe for canning chicken soup and omit the chicken or this soup recipe from the NCHFP website, which gives you some flexibility on the types of ingredients.
Does this need any salt ?
Krista, You can add salt to taste if you’d like, but it doesn’t need salt for safe canning.