Canning Green Beans for Food Storage
This post may contain affiliate links, which means that I may receive a commission if you make a purchase using these links. As an Amazon Associate I earn from qualifying purchases.
String beans are an easy vegetable to grow and can be very productive. Home canning green beans is a great way to preserve them for year-round use. Learn how to pressure can beans with this tutorial.

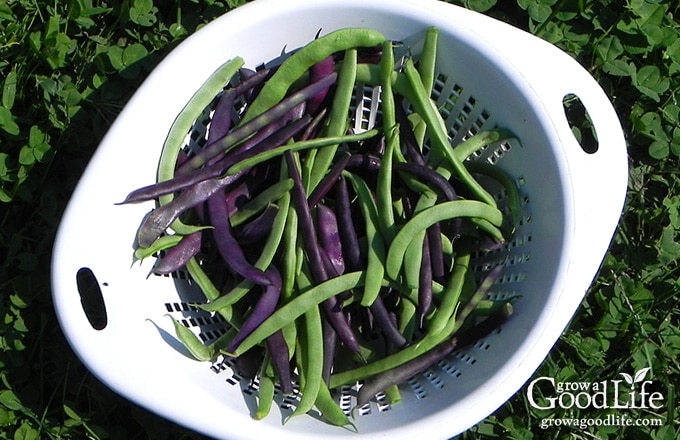
Freshly harvested string beans are one of my favorite vegetables from the garden. The first year I started my garden, I planted a lot of different types of bush and pole beans. I loved the variety of colors and shapes. I may have gone a bit overboard.
After eating my fill and giving a lot away, I blanched and froze extra to enjoy over winter. It didn’t take long until I filled up my freezer, but still couldn’t keep up with the abundant harvest. I decided to try canning green beans instead.
Tips for Canning String Beans
If you like string beans, you can easily grow your own and preserve them in jars for your food storage shelves. Home canned beans taste much better than the commercially canned beans you buy in the store. You won’t have that metallic flavor, and since salt is used just for flavoring, you can omit it giving you full control of the amount of sodium.
Types of Beans
String beans are also referred to as green beans, or snap beans because they make a snapping sound when you break fresh beans into pieces. You can home can any type of string beans, including green beans, French beans, purple beans, Romano or Italian beans, and yellow wax beans.
String beans are whole, immature pods, while dried beans are the seeds inside pods that have matured. Check out this article if you are looking for a recipe for canning dried beans: How to Can Dried Beans.
Use a Pressure Canner
String beans are a low acid food, and can only be canned safely by using a pressure canner to achieve the high temperature necessary to kill organisms that can cause food borne illness.
There are no safe recipes for canning beans in a water bath canner unless you preserve them using vinegar like in this pickled dilly bean canning recipe.
The mission of preserving green beans is what prompted me to invest in a pressure canner. I did some research and purchased the least expensive one I could find that had rave reviews. This Presto 16-quart pressure canner has served me well for over 10 years. It holds a canner load of 9 pint sized jars and I can lift a full canner load off the stove without help. A pressure canner is a great investment for home food preservation.
Harvest Fresh Beans
Harvest your beans in their prime when they are tender and small to medium sized. String beans grow quickly and I like to pick them every day, so they don’t grow too big, but sometimes they get away from me.
Select small to medium tender and crisp pods for the best quality canned beans. The large or seedy pods may taste ok when eating fresh, but they don’t hold up very well to canning, tend to get soft, and add unwanted starch that makes the jars cloudy. Discard any pods that show signs of disease, rust, or insect damage.
You can harvest, wash, and store your beans in zipper bags in the refrigerator for a few days until you have enough for a full canner load. But don’t wait too long to can your beans. Beans that are soft and limp will turn out shriveled and rubbery when processed.
Raw Pack vs. Hot Pack
The beans can be packed into canning jars using either the raw-pack or hot-pack method. Raw pack, also known as cold pack just means to fill the jars with raw beans, and cover with boiling water. In hot packing, the beans are partially cooked first, then packed in jars, and covered with boiling water.
Raw packing is quicker because there is less cooking involved, but hot pack has its advantages. Pre-cooking the beans will make them softer allowing you to shove more in each jar. It also removes some air from the tissue, which will improve the quality and shelf life.
Let the Canner Cool Naturally
Take the time to allow your canner to cool down naturally. Don’t rush the release of pressure by venting or removing the weighted gage. Doing so may cause the liquid to siphon out of your jars.
How to Can String Beans
If you have never pressure canned before, it may be helpful to review my Pressure Canning guide, along with the instructions that came with your pressure canner. Make sure everything is clean and working properly. Double check that the steam vent is clear.
I also created a free Home Canning Checklist you can print and keep nearby while you work. It includes safety reminders, preparation steps, and space to track your batches. Get your copy here:
Grab your Free copy
Home Canning Checklists
A full, printable recipe can be found at the bottom of this article, but here are the detailed steps to canning green beans:
Step 1: Prepare the Canning Gear
Gather your canning equipment, prepare the jars, set up the canner, and organize your work area.
You will need the following equipment:
- Pressure Canner with canning rack
- 9 pint sized canning jars, or 7 quart sized jars
- Lids and bands (new lids for each jar, bands can be reused)
- Canning tools: lid lifter, jar lifter, canning ladle, funnel, and bubble popper
- Plus basic kitchen supplies such as a large sauce pot, large bowl, small pot, towels, knife, and a cutting board.
Wash the canning jars, lids, bands, and canning tools in hot soapy water, and rinse well. Set the lids and bands aside to air dry until you are ready to use them.
Place the jar rack into the pressure canner. Add water per your pressure canner manufacturer’s instructions: Presto is 3 quarts, Mirro is 2 quarts, and All American is 2 to 3 inches.
Fill the jars halfway with hot water, set the jars in the canner, and simmer for 10 minutes (180˚F). Keep the jars hot until you are ready to fill them.
Also, bring a large pot of water to a boil over high heat. This will be the water you’ll use to fill the jars.
Step 2: Prepare the String Beans
I like to aim for about 10 pounds of string beans to fill 9 pint sized jars, and 15 pounds for a canner load of 7 quarts.
Rinse the beans well under running water, remove the strings, trim ends, and snap or cut into 1-inch pieces.
If you are hot packing, add the prepared beans to a large pot, cover with water, bring the pot to a boil over high heat, and cook the beans for 5 minutes.

Step 3: Pack the String Beans into Hot Jars
Spread a kitchen towel on the counter. Use the jar lifter to remove a jar from the canner. Pour out the water (save it for washing dishes), and place the jar on the towel. Keep the remaining jars in the canner, so they stay hot.
Pack the prepared string beans into the jar leaving 1-inch head space. If you are using canning salt, add up to 1/2 teaspoon per pint jar, and 1 teaspoon of canning salt per quart jar.
Ladle boiling water from your large pot into the jar over the beans maintaining 1-inch headspace. Remove air bubbles with the bubble popper, and wipe the rims with a damp towel.
Center a lid on the jar, place the band over the lid, and screw it on until fingertip tight. Immediately place the jar back into the rack in the canner, and repeat with the rest of the jars.
Step 4: Process the Jars
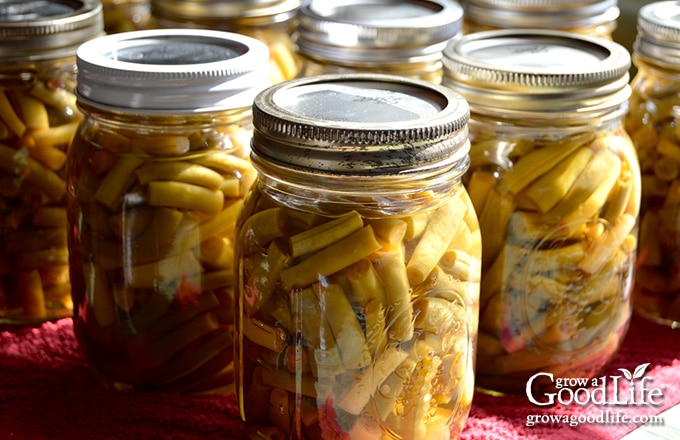
Bring the canner to a boil over high heat. Follow the directions for your pressure canner and process the jars. When the processing time is complete, turn off the heat and let the canner cool naturally, remove the jars, and let them cool completely. Date, label, and store in a cool location for 12 to 18 months.
Pressure canned string beans are shelf stable, and can be prepared quickly for meals. Since the canning process cooks them, they only need 10 minutes on the stove to heat up. Canned string beans are a great addition to homemade soups. Add the whole jar at the end of the cooking time and boil for at least 10 minutes.
Canning Green Beans for Food Storage
Ingredients
- 10 pounds green beans (or 15 pounds for a canner load of 7 quarts.)
- Canning salt optional
Instructions
Prepare the Canning Equipment:
- Wash your jars and lids in hot soapy water and rinse thoroughly. Set aside until you are ready to use them.
- Place the jar rack into the pressure canner, and fill with water per your pressure canner manufacturer's instructions: Presto is 3 quarts, Mirro is 2 quarts, and All American is 2 to 3 inches.
- Fill the jars halfway with hot water, and then place them on the rack in the canner. Bring the canner to a simmer for 10 minutes (180˚F). Keep hot until you are ready to fill them.
- Fill a large pot with fresh, clean water and bring to a boil. Keep hot until you are ready to use.
Prepare the Beans:
- Prepare your string beans by rinsing well under clean running water, remove the strings, trim the ends, and snap or cut into 1-inch pieces.
- If you are hot packing your string beans, add the prepared beans to a large pot, cover with water, bring the pot to a boil over high heat, and cook the beans for 5 minutes.
Can the Beans:
- Spread a kitchen towel on the counter. Use your jar lifter to remove a jar from the canner. Pour out the water (save it for washing dishes), and place the jar on the towel. Keep the remaining jars in the canner, so they stay hot.
- Use the canning funnel and pack the prepared string beans into the jar. Try to pack them in tightly while leaving a 1-inch headspace. If you are using canning salt, add 1/2 teaspoon per pint jar, and 1 teaspoon per quart jar.
- Ladle boiling water over string beans and fill the jar maintaining the 1-inch headspace. Remove air bubbles with the bubble popper and wipe the rims.
- Use the magnetic lid lifter to lift the lids out of the warm water, center each lid on the jars, and screw on the bands until fingertip tight.
- Center a lid on the jar, place the band over the lid, and screw it on until fingertip tight. Using your jar lifter, immediately place the jar back on the rack in the canner, and repeat with the rest of the jars until the canner is filled, or you run out of beans.
- Close the pressure canner and secure the lid. Leave the vent open, adjust the heat to medium-high, and bring the canner to a boil. Allow the pressure canner to vent for 10 minutes, then place the weight on the vent.
- Bring the canner to 10 pounds of pressure, start your timer, and process pints for 20 minutes, and quarts for 25 minutes at altitudes of less than 1,000 ft. Follow the directions for your pressure canner and adjust processing time for your altitude if necessary (see note below).
- When processing time is complete, turn off heat, and allow pressure canner to cool down to 0 pressure on its own. Once the canner is depressurized, let the canner cool 10 minutes before removing the lid.
- When the canner is cooled down, spread a kitchen towel on the counter, unlock cover, and remove it by tilting lid away from you so that steam does not burn your face. Allow another 10 minutes for the jars to adjust to the change in pressure.
- Use a jar lifter to lift jars carefully from canner and place on towel. Don't tighten bands or check the seals yet. Let the jars sit undisturbed for 12 to 24-hours to cool.
- After 12 to 24-hours, check to be sure jar lids have sealed by pushing on the center. The lid should not pop up. If the lid flexes up and down when the center is pressed, it did not seal. Refrigerate the jar and use up within a few days.
- Remove the ring bands, wash, label, date the jars, and store the jars in a cool, dark location (50 to 70 degrees F). Use within a year for the best quality. Yields 9 pints or 7 quarts.
Notes
- 1,001–2,000 ft. — 11 pounds
- 2,001–4,000 ft. — 12 pounds
- 4,001–6,000 ft. — 13 pounds
- 6,001–8,000 ft. — 14 pounds
- 1,001 ft. and above — 15 pounds
Nutrition
Resources and further learning:
- Safe Canning Resources: Trusted Guides for Home Food Preservation
- Evaluating Canning Recipes: How to Tell if a Canning Recipe is Safe
- Safe Tweaks for Pressure Canning Vegetables
You May Also Like:
40+ Meals in a Jar Pressure Canning Recipes
In this eBook, you will find 50 pressure canning recipes, including 44 meals, along with homemade stocks and bone broths. Recipes include soups, stews, chilis, beans, beef, pork, and poultry. Explore the world of preserving delicious home-cooked meals for all seasons.

I’m just starting to garden and I’m growing bush and pole beans. Can I mix the beans when I can them? Do they each have a different flavor or texture when canned? The same question with carrots…I’m growing Nantes, Danvers, Parisians and Mixed color carrots. Can they be mixed or do they also have different tastes and textures when canned?
Thank You for your help!
Trish, Yes, you can mix the beans when canning. The only time I notice a flavor or texture difference is when I can bean pods that are older. These tend to come out a little rubbery. The same with carrots — go ahead and mix different varieties.
My husband and I canned a batch of fresh green beans today (raw packing). I was just wondering will they taste as soft as store bought can goods or will they taste fresher and still have a little texture to them?
Lisa, the beans will be soft like canned beans with either raw or hot pack.
How long is pressure canned green beans good for? Thank you
Vera, Home-canned jars are best used within 12 to 18 months for optimal quality. However, as long as the jars were processed properly, stored in a cool location, and the lids remain sealed, they are safe to consume for longer. Keep in mind that the flavor, texture, and nutrition value of the food can diminish over time.
Some times when I process green beans in my pressure canner the water level will drop just below the beans during the processing.. are they still safe? They have been processed the full time at the right pressure. What should I do differently?
Amber, Yes, the beans are still good, but the ones on top will soften and darken.
Here is some info on why it happens from the Ball website:
What causes loss of liquid from jars during processing?
Loss of liquid from jars during processing typically result from the following:
– Food not heated before packing into jars;
– Food packed too tightly;
– Incorrect headspace;
– Air bubbles not removed before capping jars;
– Steam-pressure canner temperature allowed to fluctuate during processing;
– Jars not covered with water in boiling-water canner;
– Jars removed from canner too quickly after processing is complete;
– Food absorbed liquid.
The food in the jar that is not covered by liquid may darken, but should not spoil as long as it was processed according to up-to-date guidelines (see Canning Basics) and there is a vacuum seal on the jar. Do not open jar to replace liquid.
My family perfer green beans fully cooked for several hours before we eat them . My ? is can I fully cook a large batch before i pressure can them
Jimmy, Pressure canning will cook the green beans. You can cook them further after opening the jar for slow cooked green beans.
How long after canning green beans in pressure cooker do you wait before eating them.
Debbie, You’ll need to let the jars cool for at least 12-hours before opening.
Last night my husband and I canned green beans using a pressure cooker for the first time ever… We used to freeze them , but like everyone else, we experienced the rubber texture and not so good taste. Being rookies with using a pressure cooker for the first time, I’m not real sure we did it right, being that the pressure cooker wasn’t working properly but our jars are sealed. So my question is, how do I know our beans are safe for our family to eat?
Tammy, Unfortunately, you don’t know. The only way to be sure that the beans are safe is to process pints in a pressure canner for 20 minutes (adjust for altitude). Sealed jars do not mean that that the beans are safe. There is a risk of botulism from under-processed green beans. You can re-process the jars within 24 hours. Here is more information about green bean safety from the National Canning website: http://nchfp.uga.edu/publications/nchfp/factsheets/greenbeans.html
My grandma’s canned green beans won ribbons at the Hardin County fair . . I sure wish I knew her secret!!!
oh, I’m with you on the frozen green beans. And yet, in my hurry this summer, I froze some because I was tired. I served them last night and no one ate more than one bite. I really need to remember this lesson.
Put them in soups and stews. You’ll never know