Organic Mulch for Vegetable Gardens: Benefits, Types, and How to Use It
This post may contain affiliate links, which means that I may receive a commission if you make a purchase using these links. As an Amazon Associate I earn from qualifying purchases.
Learn how garden mulch can improve your soil, retain moisture, and reduce weeds in your vegetable garden. Discover the best types of organic mulch, how to apply it properly, and common mistakes to avoid for a healthier, more productive garden.

Mulching is one of the simplest and most effective ways to improve your vegetable garden, but understanding how to use the right organic mulch makes all the difference.
Organic mulch, such as straw, shredded leaves, and wood chips, does more than just make your garden look tidy. It helps retain moisture, suppress weeds, regulate soil temperature, and gradually improve soil health as it breaks down. When used correctly, it can reduce the time you spend watering and weeding while helping your plants grow stronger and more productive.
Over the years, I’ve experimented with different types of organic mulch in my own garden, learning what works well and what doesn’t. Some mulches are better for vegetable beds, while others are more useful for pathways or long-term soil improvement.
In this guide, I’ll walk you through the benefits of organic mulch, the different types you can use, and how to apply it properly so you can build healthier soil and grow a more productive vegetable garden.
What Is Organic Mulch?
Organic mulch is a layer of natural material spread over the soil surface to protect and improve your garden. Common types of organic mulch include straw, shredded leaves, grass clippings, compost, and wood chips.
In a vegetable garden, organic mulch does more than just cover the soil. It helps retain moisture, suppress weeds, regulate soil temperature, and improve soil structure as it breaks down over time. Unlike synthetic mulches, organic materials gradually decompose, feeding the soil and supporting beneficial organisms like earthworms and microbes.
This slow breakdown is what makes organic mulch so valuable. Instead of simply acting as a barrier, it becomes part of your soil, increasing organic matter and helping create a healthier growing environment season after season.
While inorganic mulches like plastic or landscape fabric can help with weed control, they don’t contribute to soil health. That’s why I prefer using organic mulch in my vegetable garden whenever possible.
My Early Struggles with Weeds
I was thrilled to have an established vegetable garden when I first moved into my home. After years of apartment living, I couldn’t wait to grow my own food. That first spring, I eagerly cleared the weeds and planted my garden, imagining lush, productive beds.
But it didn’t take long for the weed growth to return stronger than ever. I hoed them down, and they came back. I dug them up again, and they returned with a vengeance. It felt like a never-ending battle, and by the end of the season, I had all but surrendered, letting the weeds take over.
Two Changes That Improved My Weedy Garden:
Even though I lost my battle with the weeds that first year, I did enjoy some harvests and was confident that I could get more yields for my efforts if the plants didn’t have to compete with weeds.
Determined not to repeat my first-year struggle, I spent the winter researching better gardening techniques. The following spring, I made two key changes:
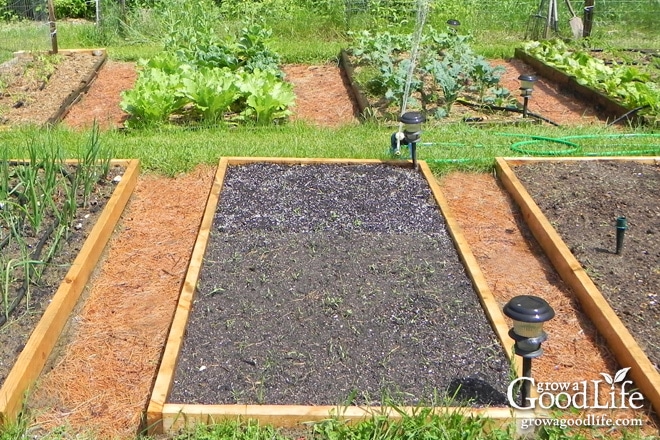
- Added New Raised Beds: The following spring, I built three 4×4 Square Foot Gardens and filled them with new soil. The new raised beds provided a fresh start with nutritious and weed free soil that allowed my plants to grow and flourish without competition from weeds.
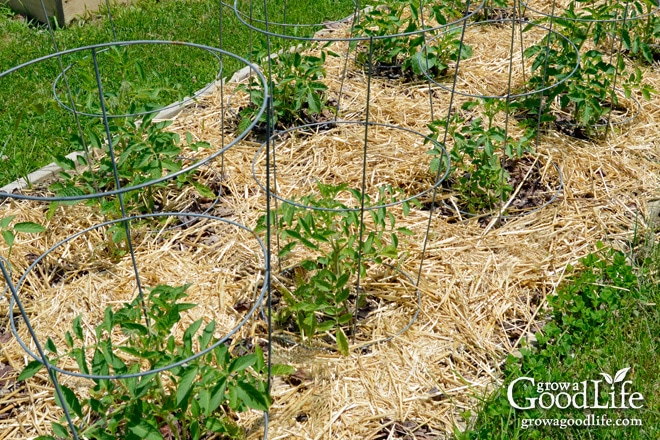
- Mulched the Existing Garden Beds: In my in-ground garden beds, I started weeding as soon as the soil was workable, then added compost and a thick layer of straw mulch to keep new weeds from sprouting.
These two changes made an immediate difference, and each year since, my garden has become more manageable and productive.
5 Ways Organic Garden Mulch Helps Your Vegetables
Organic mulch does more than just reduce weeds. When used consistently, it supports the overall health of your soil and helps create a more balanced, productive growing environment. Over time, I’ve found that adding mulch is one of the simplest ways to make a vegetable garden easier to manage and more resilient throughout the season.
Here are five key ways organic mulch helps your garden thrive:
Suppresses Weeds
A generous layer of organic mulch shades the soil surface and blocks sunlight, making it much harder for weed seeds to germinate and grow. It also helps prevent new weed seeds carried by wind or birds from reaching the soil and taking root.
In my garden, mulching has made a noticeable difference in how many weeds I have to deal with. The few that do manage to sprout are usually much easier to pull because the soil stays loose and moist underneath the mulch.
Conserves Soil Moisture
Organic mulch acts like a protective barrier, reducing evaporation caused by sun, wind, and heat. This helps the soil retain moisture longer and creates more consistent growing conditions for your plants.
I’ve found that mulched beds don’t dry out nearly as quickly, which means less frequent watering and less stress on plants during hot, dry weather. This is especially helpful during the peak of summer when keeping up with watering can become a challenge.
Prevents Soil Erosion
Heavy rain and strong winds can wash away or disturb the top layer of soil, especially in exposed garden beds. Organic mulch helps protect the soil surface by absorbing the impact of rain, preventing the soil from forming a crust, and reducing runoff.
By keeping the soil covered, mulch helps preserve valuable topsoil and prevents nutrients from being lost, which is especially important in both raised beds and in-ground gardens.
Regulates Soil Temperature
Organic mulch helps insulate the soil, keeping it cooler during hot summer days and reducing temperature fluctuations. This creates a more stable environment for plant roots, which can improve overall growth and reduce stress.
In the heat of summer, I’ve noticed that mulched beds stay noticeably cooler than bare soil, which helps plants continue growing even during periods of intense sun.
Adds Organic Matter and Improves Soil Health
One of the biggest benefits of organic mulch is what happens over time. As materials like straw, leaves, and wood chips break down, they add organic matter to the soil and support beneficial microbes, fungi, and earthworms.
This gradual improvement helps build better soil structure, increases nutrient availability, and creates a healthier growing environment year after year. It’s one of the reasons I prefer organic mulch over synthetic options.
The type of organic mulch you choose can influence how well these benefits work in your garden. Some mulches are better for vegetable beds, while others are more suited for pathways or long-term soil improvement.
Types of Organic Mulch for Your Vegetable Garden
Over the years, I’ve experimented with a variety of organic mulches in my garden. Each type has its strengths, and choosing the right one often depends on where you plan to use it and what your goal is, whether that’s suppressing weeds, building soil, or creating clean garden paths.
Here are some of the most effective types of organic mulch and how I use them:
Straw:
Straw is my favorite organic mulch for vegetable beds. I usually buy a large rectangular bale in the spring, and it’s enough to cover most of my garden with some left over for the chicken coop.
- Learn more: Mulching with Straw: A Simple Way to Reduce Weeds and Build Healthier Soil.
- How I use it: Spread a 4 to 6-inch layer around plants, leaving a small gap around stems. Replenish as needed throughout the season.
Straw is lightweight, easy to spread, and does an excellent job of suppressing weeds while still allowing water and air to reach the soil. It also creates a clean surface around plants, which helps reduce soil splashing and the spread of disease.
Shredded Leaves
Shredded leaves are one of the easiest and most cost-effective mulches to use. In the fall, I collect and shred leaves using my mower and bagger, then store them for use throughout the season.
- Learn more: Leaf Mulch: How to Use Shredded Leaves in the Garden
- How I use them: Apply a 3 to 4-inch layer around plants and fluff occasionally to prevent compaction.
They provide great coverage and gradually break down into leaf mold, which improves soil structure and supports beneficial soil life. I’ve found that shredding is key as whole leaves tend to mat down and block water and airflow.

Pine Straw (Pine Needles)
Pine straw is simply pine needles that have fallen from the tree. Since I have plenty of pine trees nearby, it’s a free and readily available option.
- Learn more: Pine Needle Mulch: How to Use Pine Needles in Your Garden
- How I use it: Apply a 2 to 3-inch layer around plants or a thicker layer over pathways. Replenish as needed.
I’ve found pine needles work best in garden paths and between rows. They don’t compact, allow water to pass through easily, and create a clean surface to walk on. While they can be used in beds, I tend to use them more selectively.
Grass Clippings
Grass clippings are a nitrogen-rich mulch that breaks down quickly and feeds the soil. They’re easy to come by during the growing season and can be a great way to recycle lawn waste.
- How I use them: Apply in thin layers (about ½ inch at a time), allowing each layer to dry before adding more.
Because they decompose quickly, they work best as a supplemental mulch rather than a long-term solution. Thick layers can mat down, so it’s important to apply them carefully.
Arborist Wood Chips
Wood chips are a long-lasting mulch that works especially well for pathways and perennial areas. When sourced from local arborists, they are often free and provide a natural mix of wood and foliage that supports long-term soil health.
- Learn more: Tips for Using Wood Chip Mulch in a Vegetable Garden
- How I use them: Apply a 2 to 4-inch layer around plants, leaving space around stems, or use a thicker layer in pathways.
I’ve found they’re especially useful in garden paths and around established plants, where they help suppress weeds and retain moisture over time. Because they break down more slowly, I tend to use them more in paths than in annual vegetable beds.

Compost
Compost can double as both a mulch and a soil amendment. It’s rich in nutrients and supports healthy plant growth while helping retain moisture.
- Learn more: How to Make Compost for Your Vegetable Garden
- How I use it: Apply a 1 to 2-inch layer around plants or combine with other mulches.
I like using compost as a top dressing around plants or layering it under other mulches for an added boost of nutrients.

Living Mulch (Cover Crops)
Living mulch involves growing low-growing plants, such as clover or oats, to cover the soil. These plants help suppress weeds, retain moisture, and improve soil health as they grow and decompose.
- Learn more: Tips for Planting Cover Crops in Home Gardens
- How I use it: Interplant between rows and trim regularly to prevent competition.
This approach takes a bit more planning but can be a great option for long-term soil improvement.

How to Choose the Right Organic Mulch
With so many options available, choosing the right organic mulch can feel a little overwhelming. The best choice often depends on your goals and where you plan to use it in your garden.
Over time, I’ve found that matching the mulch to the situation makes a big difference in how well it performs.
Here’s a simple way to think about it:
For Vegetable Garden Beds
If your goal is to suppress weeds and keep your plants healthy throughout the growing season, straw and shredded leaves are my top choices.
- Mulching with Straw: A Simple Way to Reduce Weeds and Build Healthier Soil
- Leaf Mulch: How to Use Shredded Leaves in the Garden
Straw provides excellent coverage without compacting, while shredded leaves help improve soil as they break down. Both are easy to work with and effective for maintaining productive garden beds.
For Building Soil Over Time
If you’re focused on improving soil structure and increasing organic matter, shredded leaves and leaf mold are excellent options.
These materials break down into rich organic matter that supports beneficial microbes, improves moisture retention, and helps create healthier soil year after year.
For Garden Paths and Walkways
For pathways and between rows, I prefer longer-lasting mulches like wood chips or pine needles.
- Tips for Using Wood Chip Mulch in a Vegetable Garden
- Pine Needle Mulch: How to Use Pine Needles in Your Garden
These materials hold up well under foot traffic, help reduce mud, and provide good weed suppression in areas that don’t need frequent planting.
For a Quick, Free Option
If you’re looking for something readily available, grass clippings and leaves are easy to use and often free.
Just be sure to apply grass clippings in thin layers to prevent matting, and shred leaves so they don’t compact and block water from reaching the soil.
For Long-Term Soil Health
In most cases, I try to use organic mulches that do more than just cover the soil.
Materials that break down over time, like straw, leaves, and compost, help feed the soil and improve its structure, making them a better long-term investment for the garden.
How to Use Mulch in Your Vegetable Garden
Using mulch properly can enhance soil health, reduce weeds, and conserve moisture throughout the growing season. Follow these steps to get the most out of mulching in your vegetable garden:
- Prepare the Garden Bed: Start with a weed-free bed by removing any existing weeds and adding a layer of finished compost or manure to enrich the soil. Water thoroughly before planting.
- Plant Your Vegetables: Arrange your plants as desired, ensuring proper spacing for healthy growth.
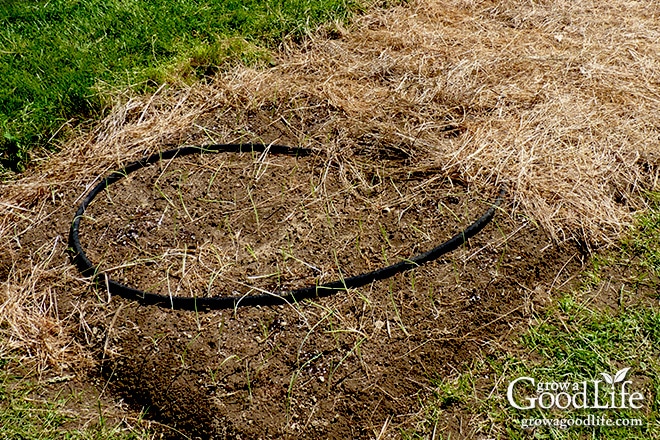
- Apply Mulch: Spread a 4 to 6-inch layer of organic mulch evenly around plants, keeping it a few inches away from stems to prevent rot and pest issues. If using a drip irrigation or soaker hose system, lay the drip line or hoses first, then cover them with mulch to retain moisture efficiently.
- Maintain and Replenish: Occasionally check for weeds that manage to break through and remove them before they spread. Add fresh mulch as needed throughout the season to maintain coverage and continue protecting the soil.
By following these steps, your mulch will effectively support your vegetable garden, helping you grow healthier plants with less effort.
Mulching for Winter Protection
It’s important to let your garden soil freeze over the winter. Freezing temperatures naturally eliminate many fungal diseases and pests. Applying too much mulch can insulate the soil, preventing it from freezing and creating a cozy environment for pests to overwinter. Instead, follow these guidelines for effective winter mulching:
Winter Garden Prep
After the growing season, rake aside old mulch, remove plant debris, and spread a fresh layer of compost. Then, lightly cover the beds with the old mulch.
A thin layer helps protect the soil from erosion while still allowing it to freeze, an essential step in reducing pests and diseases. For more tips on winter garden prep, check out this article: 7 Tips to Prepare Your Vegetable Garden for Winter.
After the Ground Freezes
If you are overwintering crops and perennials, wait until after the ground has frozen before adding a thick layer of mulch.
Once the ground is frozen and plants are dormant, mulch garlic, perennial herbs, and overwintered crops with a generous layer. This helps regulate temperature fluctuations and prevents the ground from freezing and thawing repeatedly, which could cause roots to be pushed out of the soil.
Let the Soil Warm Up in Spring
As temperatures rise in spring and the soil begins to thaw, rake back the mulch to allow the soil to warm up.
Once the ground is drained and workable, pull any weeds that have sprouted, then sow seeds or transplant seedlings. When the plants are established, reapply mulch to conserve moisture and suppress weeds for the growing season.
Common Mulching Mistakes to Avoid
Mulching is one of the best things you can do for your garden, but it’s important to apply it correctly to get the most benefits. Avoid these common mistakes to ensure your mulch is helping, not harming, your plants:
Applying Mulch Too Thickly
While a good layer of mulch helps retain moisture and suppress weeds, too much can create problems.
A mulch layer thicker than 3 to 4 inches can compact over time, making it difficult for water to reach the soil. In extreme cases, it can even suffocate plant roots and create conditions for mold or fungal growth. Aim for a balanced layer to get the benefits without the drawbacks.
Piling Mulch Against Plant Stems or Tree Trunks
It may be tempting to mound mulch around the base of plants or trees, but this can lead to rot and invite pests.
Volcano mulching results in excess moisture around the stems or tree trunks, creating a damp environment where diseases can thrive. Instead, leave a small gap around plant bases, keeping the mulch a few inches away to allow airflow and prevent decay.
Using Mulch Contaminated with Weed Seeds or Pesticides
Not all mulch is created equal. Some materials, like fresh hay or grass clippings, may contain weed seeds that will sprout in your garden, creating more work for you later.
Additionally, some hay or straw may have been treated with herbicides that can linger in the soil and affect plant growth. To avoid these issues, source mulch carefully, use aged straw, untreated grass clippings, or wood chips from a trusted source.
By keeping these common mistakes in mind, you can make the most of your mulch and create a healthier, more productive garden.
Organic Mulch: Common Questions from the Garden
If you’re new to using organic mulch, or just looking to improve your approach, you may have a few questions. Over the years, I’ve run into many of these myself while experimenting in my own garden. Here are some of the most common questions, along with what I’ve learned along the way.
The Long-Term Benefits of Mulching
Using mulch transformed my weedy, labor-intensive garden into a more productive and manageable space. While it hasn’t eliminated weeds completely, it has significantly reduced them, making the ones that do sprout much easier to remove. Plus, as organic mulch breaks down, it continually improves my soil, enhancing its texture and fertility year after year.
If you find yourself constantly battling weeds, give mulching a try. It can save you hours of work while benefiting your plants and soil in the long run.
Building healthy soil is the foundation of a productive vegetable garden
Using natural methods like cover crops, compost, and organic mulch materials can enrich the soil, boost fertility, and support a thriving garden ecosystem without relying on synthetic fertilizers or pesticides.
Combining these techniques allows you to create nutrient-rich soil that nourishes your plants season after season. For more tips on improving your garden soil, explore these helpful resources:

I’m planning on making raised beds for my garden this spring, so this post will be very helpful! I’m excited to try these tips out.
Sage, I’m thrilled to hear that you found the tips helpful! Best of luck with your raised beds project this spring.
My straw mulch started growing all linds of mushrooms and fungi as it decomposed. It also seemed to stay wet longer. Should I turn it under? Add another layer? Ignore the fungi?
Leah, This is just what you want to see. The fungi and mushrooms are all part of the decomposition process that will feed that help create healthy soil. You can add another layer of straw on top to keep the moisture in, but there is no need to turn it under. The worms and other microorganisms in your soil will break down the organic matter and convert it into nutrient-rich humus over time.
I live in upstate SC and am using once ground mulch (trees,limbs, etc) and it works fine, plus it doesn’t wash away when it downpours. Get a lot of good gardening info from Davidthegood.com.
Rex, We had some trees taken down last year and asked to keep the ground up wood chips. I am experimenting with it as a mulch in the garden this year and really like how well it holds in moisture.
I love straw, but now so many farmers are using such horrible chemicals I don’t know where to find safe straw any longer.
Tina, Sadly, this is something to worry about in straw and animal manure.
Very interested in this. I will try it going forward this fall!
Thanks
I use wood chips on the paths around my raised beds. In the beds themselves, i use a chopped straw product called Mainely Mulch (comes from Maine of course). It is heat treated to kill any weed seeds and the fact it is chopped makes it easy to spread on the beds and around plants. It lasts the season then decomposes well over the winter.
Dave, Wood chips in the paths is a good idea. I bet it lasts longer than pine straw. I tried the heat treated, Mainely Mulch this year too with mixed results. I don’t think I was generous enough with it. I found weeds popped up through it quite easily. I think maybe a thicker layer would work better.
Gosh this mulch sounds like a dream come true! I will have to try to find it or something similar locally here in Northern Nevada!! Thanks, Carolyn
Now that I volunteer at a farm, I am really aware of the difference between weeding open land and in raised beds. I knew there would be a difference, but wow – it’s pretty dramatic. Straw is my favourite mulch for the beds as well & I use wood chips for the paths. The paths, especially, are a lot of work in the beginning but once that initial layer of mulch (and in my case cardboard to smother the grass) is down, maintenance is so much easier.
I didn’t know about heavily mulching AFTER the ground freezes so thank you for that tip!