Roasted Red Peppers Canning Recipe
Learn how to preserve the bounty of your homegrown sweet peppers with our step-by-step guide to canning roasted bell peppers. Enjoy that garden-fresh goodness all year long!
Ingredients
- 8 pounds bell peppers or peppers of choice
- canning salt optional for flavor
Instructions
Prepare the Peppers
- Wash the bell peppers under cold water, then dry them with a clean towel.
- Cut each pepper in half and remove the stem, seeds, and white parts. Cut them into quarters so they're about the same size. Place the peppers on baking pans with the skin facing up.
- Set your oven's rack about 4 inches below the broiler and turn on the broil setting. Put the pans with peppers under the broiler and cook for 6 to 8 minutes or until the skins are charred and blackened.
- Take out the pans when the peppers are charred. Use tongs to move the hot peppers to a heatproof bowl and cover it with a baking sheet or foil to trap steam.
- Let the peppers sit in the covered bowl for 10 minutes. The steam will make the skin easier to peel.
- After steaming, uncover the bowl and use your fingers to remove the charred skin—it should come off easily. Don't worry if some bits remain; they add flavor.
Prepare the Canning Equipment
- Wash the jars, lids, bands, and canning tools in hot, soapy water. Rinse them well. Set the lids and bands aside for later.
- Put the jar rack into the pressure canner and add water per your canner's instructions: 3 quarts for Presto, 2 quarts for Mirro, and 2 to 3 inches for All American.
- Fill the jars halfway with hot water and put them on the rack in the canner. Let the canner simmer for 10 minutes at 180˚F. Keep it hot until you're ready to fill the jars.
- Get a big pot of clean water boiling on the stove.
Fill the Jars
- Lay a dry towel on the counter. Use the jar lifter to take out a jar from the canner. Pour out the water (save it for washing dishes) and place the jar on the towel. Leave the other jars in the canner so they stay warm.
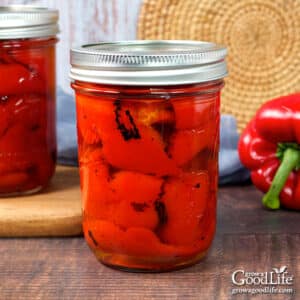
- Fill the jar loosely with the roasted peppers. If you are using salt, add up to a 1/2 teaspoon of salt to each pint jar, and 1/4 teaspoon salt per half-pint. Leave a 1-inch headspace.
- Use the ladle to pour hot water over the peppers until the jar is filled, maintaining a 1-inch space at the top.
- Slide a bubble popper through the jar to release air bubbles. If needed, add more water to maintain the 1-inch space, and wipe the rim clean.
- Center a lid on the jar, and screw on the band until it is fingertip tight.
- Use the jar lifter to put the jar back into the pressure canner. Repeat this for the rest of the jars.
Process in a Pressure Canner
- Cover the pressure canner and make sure the lid is secure. Keep the vent open.
- Set the heat to medium-high and let the canner come to a boil. Allow the steam to vent for 10 minutes.
- Put the pressure regulator on the air vent. Keep an eye on the pressure; it should rise.
- Once the canner reaches the correct pressure (10 pounds for weighted gauge and 11 pounds for dial gauge canners), start a timer.
- Process half-pint and pint jars for 35 minutes if you're below 1,000 ft in altitude. Follow your canner's instructions, keep the heat steady, and adjust for altitude if necessary (see notes).
- When the time's up, turn off the heat. Let the canner cool down to 0 pressure on its own. After depressurizing, wait another 10 minutes before opening the lid.
- Spread a dry towel on the counter, unlock the cover, and remove the lid by tilting it away so that steam does not burn your face.
- Allow another 10 minutes to adjust to the change in pressure. If the jars are still boiling, leave them in the canner for 5 more minutes or until the boiling slows.
- Take the jars out with the jar lifter and place them on the towel. Keep them upright and don't tighten the bands or check the seals yet. Let them sit untouched for 12 to 24 hours to cool down.
- After 12 to 24 hours, check if the lids have sealed by pressing the center. It shouldn't pop up. If it does, it didn't seal. Put the jar in the fridge and use it in a few days.
- Remove the screw-on bands and wash the jars. Label and date them, and store them in a cool, dark place. Use within 12 to 18 months for the best quality. This makes about 8 pint jars, or 16 half-pints of roasted red peppers.
Notes
This safe canning recipe is from So Easy to Preserve, USDA Complete Guide to Home Canning, and the NCHFP website. Changing the recipe may make the product unsafe for canning.
All times are at altitudes of less than 1,000 feet. Make the following adjustments for altitudes greater than 1,000 feet:
Dial-Gauge Canners:
- 1,001–2,000 ft. — 11 pounds
- 2,001–4,000 ft. — 12 pounds
- 4,001–6,000 ft. — 13 pounds
- 6,001–8,000 ft. — 14 pounds
- 1,001 ft. and above — 15 pounds
Nutrition
Serving: 4ouncesCalories: 30kcalCarbohydrates: 5gProtein: 1gFiber: 1g
Tried this recipe?Let us know how it was!