Chicken Chili Verde Canning Recipe
Are you looking for a hearty and flavorful meal that is easy to prepare and can be enjoyed whenever you want? Then look no further than home-canned chicken chili verde!
Servings: 16 servings
Calories: 110kcal
Ingredients
Sauce Ingredients:
- 1 pound tomatillos husks removed, rinsed well, and cut in half
- 1 medium jalapeno sliced
- 1 small onion cut into wedges
- 1 clove garlic
- 2 tablespoons bottled lime juice
- 1 tablespoon chopped fresh cilantro leaves
- 1/8 teaspoon ground cumin optional for flavor
Chili Ingredients:
- 4 cups chicken stock or water
- 4 pounds boneless chicken cut into 2-inch pieces
- 2 cups canned beans drained and rinsed
- 2 cups sliced green onions
- 4 cloves garlic sliced
- 3 medium jalapenos sliced
- 1/4 cup chopped fresh cilantro
- 1 teaspoons salt
- 1/2 teaspoon ground black pepper
Instructions
Make the Salsa Verde Sauce:
- Preheat the oven to 425˚F.
- Add the prepared tomatillos, jalapenos, onions, and garlic to a rimmed sheet pan.
- Roast the vegetables in a preheated oven until charred and slightly softened, about 15 to 20 minutes.
- Remove the pan from the oven and let it cool briefly, about 5 minutes.
- Add the roasted vegetables and their liquid to a food processor along with lime juice, cilantro, cumin, and process until smooth.
- Measure 2 cups of verde sauce and set aside. You can add chicken broth or water if you are short.
Warm the Jars and Canner:
- Place the jar rack into the pressure canner, and fill it with water per your canner manufacturer's instructions: Presto is 3 quarts, Mirro is 2 quarts, and All American is 2 to 3 inches.
- Fill the clean jars halfway with hot water and place them on the jar rack in the canner.
- Bring the canner to a light simmer to 140°F for raw packing, heat for at least 10 minutes, and keep warm.
Prepare the Ingredients:
- Add the chicken stock to a medium saucepan and bring to a boil over medium-high heat, and keep it hot.
- Combine the prepared chicken with 2 cups of salsa verde, beans, green onions, garlic, jalapeno, cilantro, salt, and pepper in a large prep bowl. Mix well.
Fill the Jars:
- Lay a dry kitchen towel on the counter. Use the jar lifter to remove a jar from the canner. Drain the water in a separate bowl or in the sink, and place it on the towel. Keep the remaining jars in the canner so they stay warm.
- Use tongs to tightly pack the chicken mixture into the jar, leaving a little over one inch at the top, and then add chicken broth to fill the jar to 1-inch headspace.
- Poke the bubble popper through the jar to release any air bubbles, and adjust the headspace again if needed.
- Wipe the rim to remove any residue, center a lid on the jar, and screw on a band until it is fingertip tight.
- Use the jar lifter to place the jar back into the canner, and repeat with the remaining jars.
Process in the Pressure Canner:
- Place the lid on the canner and lock it. Leave the vent open, adjust the heat to medium-high, and bring the canner to a boil.
- Once boiling, let the pressure canner to vent steam for 10 minutes, then place the pressure regulator on top of the air vent, and let the pressure rise.
- When the canner has reached the correct pressure (10 pounds for weighted gauge or 11 pounds for dial gauge pressure canner), set a timer and process pint jars for 75 minutes, and quarts for 90 minutes at altitudes of less than 1,000 ft.
- Adjust the pressure for your altitude if necessary (see chart below), and regulate the heat as needed to maintain a steady pressure.
- When the processing time is complete, turn off the heat, and allow the canner to sit until pressure drops to 0. Once the canner is depressurized, let the canner cool additional 10 minutes before removing the lid.
- Spread a dry towel on the counter, unlock the cover, and remove it by tilting the lid away from you so that steam does not burn your face.
- Allow another 10 minutes for the jars to adjust to the change in pressure. If the jars are still boiling vigorously, let them sit in the canner for another 5 minutes or until the boiling slows.
- Use the jar lifter to remove he jars from the canner and place them on the towel. Keep them upright, and don't tighten bands or check the seals yet. Let the jars sit undisturbed for 12 to 24 hours to cool and seal.
- After 12 to 24 hours, check to be sure the jar lids have sealed by pushing on the center. The cover should not pop up. The jar failed to seal if the top flexes up and down. Refrigerate it and use it within a few days.
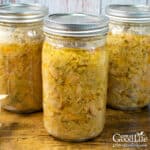
- Remove the screw-on bands and wash the jars in warm soapy water to remove any residue. Then label, date, and store the jars in a cool, dark place. Use within 18 months for the best quality. Yields 8 pints or 4 quarts.
Notes
This is a tested safe canning recipe from The All New Ball Book of Canning and Preserving. Changing the recipe may make the product unsafe for canning.
All times are at an elevation of less than 1,000 ft. Visit whatsmyelevation.com to check your elevation and adjust the processing time if necessary. Make the following adjustments for altitudes greater than 1,000 ft:
- Dial Gauge Pints and Quarts at altitudes of 2,001 – 4,000 ft. increase pressure to 12 pounds, 4,001 – 6,000 ft. is 13 pounds, and 6,001 – 8,000 ft. is 14 pounds.
- Weighted Gauge Pints and Quarts at altitudes of 1,001 ft. and above, increase pressure to 15 pounds.
Nutrition
Serving: 1cup | Calories: 110kcal | Carbohydrates: 13.4g | Protein: 10g | Fat: 2.3g | Saturated Fat: 0.6g | Cholesterol: 22mg | Sodium: 230mg | Potassium: 311mg | Fiber: 2.7g | Sugar: 1.5g | Calcium: 82mg | Iron: 2mg