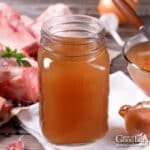
Canning Beef Stock
Beef stock is a must have pantry staple for stews, soups, and gravy. Learn how to make homemade beef stock and preserve it into shelf-stable jars using a pressure canner.
Servings: 20 servings
Calories: 89kcal
Ingredients
- 8 pounds meaty beef bones
- 2 large onions chopped
- 2 carrots chopped
- 2 stalks celery chopped
- 3 cloves garlic crushed
- 2 bay leaves
- 1 teaspoon dried parsley or 2-3 sprigs of fresh parsley
- 1/2 teaspoon dried rosemary or 1-2 sprigs of fresh rosemary
- 10 whole peppercorns
- 5-6 quarts water
Instructions
To Make the Beef Stock
- Preheat the oven to 425˚F.
- Rinse the bones and place them into a large roasting pan.
- Roast uncovered in a preheated oven until the bones are brown, about 35-45 minutes. Toss about halfway through so everything browns evenly.
- Remove the roasting pan from the oven. Use tongs to remove the bones from the roasting pan and place them into a large stockpot.
- Add 1 cup of the water to the hot roasting pan to deglaze the pan. As the water steams, scrape the pan with a wooden spoon to release the flavor infused brown bits stuck to the bottom of the pan. Add the flavorful liquid to your pot.
- To your stockpot, add the onions, carrots, celery, garlic, bay leaves, sage, rosemary, peppercorns, and enough water to cover the bones by a couple of inches, about 4 quarts.
- Turn the heat to medium-high and bring the pot to a boil. Reduce the heat to low and simmer for at least 4 hours and up to 24 hours. Stir occasionally and skim off any foam.
- Remove the beef bones and vegetables from the stock using tongs or a slotted spoon. Strain the stock into a large container or extra canning jars. Discard the solids. Let the stock cool completely, and then refrigerate overnight. Can the beef stock the following day.
To Can the Beef Stock
- The next day, prepare the canning equipment by washing the jars, lids, bands, and canning tools in hot soapy water and rinsing thoroughly. Set the lids and bands aside until you are ready to use them.
- Place the jar rack into the pressure canner, and fill with water per your pressure canner manufacturer's instructions: Presto is 3 quarts, Mirro is 2 quarts, and All American is 2 to 3 inches.
- Fill the jars halfway with hot water, and then place them on the rack in the canner. Bring the canner to a simmer for 10 minutes (180˚F). Keep hot until you are ready to fill them.
- Remove the beef stock from the refrigerator and skim off the fat that has risen to the top. Discard excess fat.
- Return the stock to a large pot and bring to a boil over medium-high heat.
- Spread a kitchen towel on the counter. Use your jar lifter to remove a jar from the canner. Pour out the water (save it for washing dishes), and place the jar on the towel. Keep the remaining jars in the canner, so they stay hot.
- Use the canning funnel and ladle and fill the jar with hot stock, leaving a 1-inch headspace at the top of the jar.
- Swirl the bubble popper through the jar and wipe the rim. Center a lid on the jar, place the band over the lid, and screw it on until fingertip tight.
- Use the jar lifter to place the jar back on the rack in the canner, and repeat with the rest of the jars until the canner is filled, or you run out of stock. If you have leftovers, store in the refrigerator or freeze for longer.
- Place the lid on the canner and lock it. Leave the vent open, adjust the heat to medium-high, and bring the canner to a boil. Allow the pressure canner to vent steam for 10 minutes, then place the pressure regulator on top of the air vent, and watch the pressure rise.
- Once the canner has reached the correct pressure (10 pounds for weighted gauge, and 11 pounds for dial gauge canners.), set a timer, and process pint jars for 20 minutes and quart jars for 25 minutes at altitudes of less than 1,000 ft.
- Adjust the heat as needed to maintain a steady pressure, and adjust altitude if necessary (see chart below).
- When processing time is complete, turn off the heat, and let the pressure canner cool down to 0 pressure on its own. Once the canner is depressurized, let the canner cool additional 10 minutes before removing the lid.
- Spread a kitchen towel on the counter, unlock the cover, and remove it by tilting the lid away from you so that steam does not burn your face.
- Allow another 10 minutes for the jars to adjust to the change in pressure. If jars are still boiling, let them sit in the canner for another 5 minutes, or until the boiling stops.
- Use the jar lifter to lift jars carefully from canner and place on the towel. Keep the jars upright, and don't tighten bands or check the seals yet. Let the jars sit undisturbed for 12 to 24-hours to cool.
- After 12 to 24-hours, check to be sure jar lids have sealed by pushing on the center. The lid should not pop up. If the lid flexes up and down when the center is pressed, it did not seal. Refrigerate the jar and use up within a few days, or transfer to a freezer container and freeze for up to 6 months.
- Remove the ring bands, wash, label, date, and store in a cool, dark location (50 to 70 degrees F). Use within a year for the best quality. Yields about 8 pints or 4 quarts depending on how long you cooked the stock.
Notes
This is a tested safe canning recipe from the USDA Complete Guide to Home Canning and the Ball Blue Book Guide to Preserving. Altering the recipe may make it unsafe for canning.
All times are at altitudes of less than 1,000 ft. Adjustments must be made for altitudes greater than 1,000 ft. (see chart below).
Nutrition
Serving: 1cup | Calories: 89kcal | Carbohydrates: 9g | Protein: 7g | Fat: 5g | Cholesterol: 12mg | Sodium: 150mg | Potassium: 250mg | Fiber: 0.4g | Sugar: 1g | Calcium: 11mg