Old-Fashioned Pickled Dilly Beans
Dilly Beans are zesty pickled string beans flavored with dill, garlic, and spicy pepper flakes. Learn how to preserve green bean pickles with this easy canning recipe.
Servings: 8 servings
Calories: 63kcal
Ingredients
- 2 pounds fresh string beans
- 1/4 cup canning salt
- 2 1/2 cups white vinegar or apple cider vinegar
- 2 1/2 cups water
- 4 cloves garlic divided
- 8 teaspoons dried dill seeds or 4 heads dill, divided
- 1 teaspoon red pepper flakes divided
Instructions
- Wash your jars, lids, screw bands, and canning tools in hot soapy water. Rinse thoroughly to remove all suds. Set aside to air dry on a clean kitchen towel.
- Place the jar rack into water bath canner, place jars in the canner, and add water to cover. Bring the canner to a simmer (180˚F) for 10 minutes, and keep the jars hot until you are ready to fill them.
- Rinse the string beans and cut into 4-inch pieces to fit in the jar.
- Combine the salt, vinegar, and water in a large pot. Bring to a boil, reduce the heat, and simmer (180˚F) for 10 minutes.
- Spread a kitchen towel on the counter. Use your jar lifter to remove a warm jar from the canner, drain, and place on the towel. Keep the remaining jars in the canner, so they stay hot.
- Add 1 clove of garlic, 1/4 teaspoon red pepper flakes, and 2 teaspoons of dried dill seeds or 1 head of dill to the bottom of the jar.
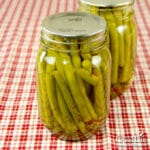
- Pack the string beans lengthwise into the jars. Try to pack the beans tightly. Pour the hot pickling liquid over the string beans, leaving 1/2 inch of headspace.
- Run the bubble popper through the jar to release any trapped air bubbles. You can also tilt the jar back and forth to let air escape. Add more brine to adjust the headspace again if needed to maintain a 1/2 inch. You want to be sure all the beans are submerged beneath the brine.
- Place the jar back into your canner, and repeat with the rest of the jars.
- Once the jars are in the canner, adjust the water level so it is 2-inches above the top of the jar.
- Cover the canner, and bring it to a boil over high heat. Once the water boils vigorously, continue boiling for 10 minutes at altitudes of less than 6,000 feet. Adjust processing time for your altitude if necessary (See Note).
- When processing time is complete, turn off heat, and let the canner cool down and settle for about 5 minutes.
- Spread a dry kitchen towel on the counter. Remove the cover by tilting lid away from you so that steam does not burn your face.
- Use the jar lifter to remove the jars from canner and place on the towel. Keep the jars upright, and don't tighten bands or check the seals yet. Let the jars sit undisturbed for 12 to 24-hours to cool.
- After 12 to 24-hours, check to be sure jar lids have sealed by pushing on the center of the lid. The lid should not pop up. If the lid flexes up and down, it did not seal. Refrigerate jar and use up within 2 weeks.
- Remove the screw on bands and wash the jars. Label, date, and store your jars in a cool, dark place for 12 to 18 months. Allow 2 to 4 weeks for the dilly beans to develop their flavor. Once the jar is open, store in the refrigerator for up to 2 weeks. Recipe makes about 4 pints.
Notes
This is a tested safe canning recipe from the So Easy to Preserve book. Changing the recipe may make the product unsafe for canning.
All times are at altitudes of less than 6,000 ft. Adjustments must be made for altitudes greater than 6,000 ft. Processing time for altitudes above 6,000 feet is 15 minutes.
Nutrition
Serving: 8ounces | Calories: 63kcal | Carbohydrates: 11.2g | Protein: 2.7g | Fat: 0.7g | Saturated Fat: 0.1g | Sodium: 2894mg | Potassium: 341mg | Fiber: 4.6g | Sugar: 1.9g | Calcium: 1000mg | Iron: 0.4mg