Small Batch Chokecherry Jelly from Foraged Fruit
This post may contain affiliate links, which means that I may receive a commission if you make a purchase using these links. As an Amazon Associate I earn from qualifying purchases.
This small batch of chokecherry jelly recipe uses only one pound of foraged chokecherries. It is a perfect balance of tart and sweet resulting in a jelly that tastes delicious on homemade bread and pairs well with poultry dishes.

We had a stand of chokecherry trees on our property when I was growing up. It was rumored that a neighbor would painstakingly harvest gallons of ripe chokecherries every year and transform them into homemade wine, but that was well before my time.
No one made use of this foraged fruit while I was growing up. All I remember is childhood dares on how many chokecherries we could eat before our mouths turned numb. We knew the risks, if we ate too many, we would have a stomachache for days. We also would spit out the pits because we were told they were poisonous, and we listened to our elders. After all, none of us wanted to die young.
Our mothers cursed the chokecherries as we used the ripe fruit as weapons of opportunity in our make believe wars as we stripped the fruit from the trees and flung them like tiny grenades towards our opponent showering their clothing with bright red stains as the fruit made contact.
I was an adult when I tasted my first sample of choke cherry jelly. It was delicious, both sweet and tart at the same time. The flavor is very similar to cranberry sauce. I was so excited when I found a few choke cherry trees behind the shed on our property and couldn’t wait to try making jelly.
How to Identify Chokecherries
The natural range of the common Chokecherry (Prunus virginiana) tree includes much of southern Canada and northern United States. The chokecherry is adaptable and reproduces by seed and underground rhizomes. It is often found growing in groups in forests, along edges of woods, fencerows, edges of the road, and stream banks.
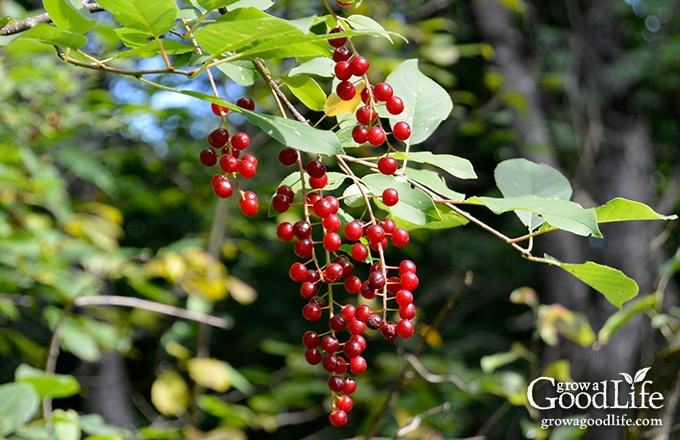
- The leaves are oval shaped, slightly pointed at the tip, and finely edged with serrated teeth. The color is dark green and shiny on top and pale and dull underneath.
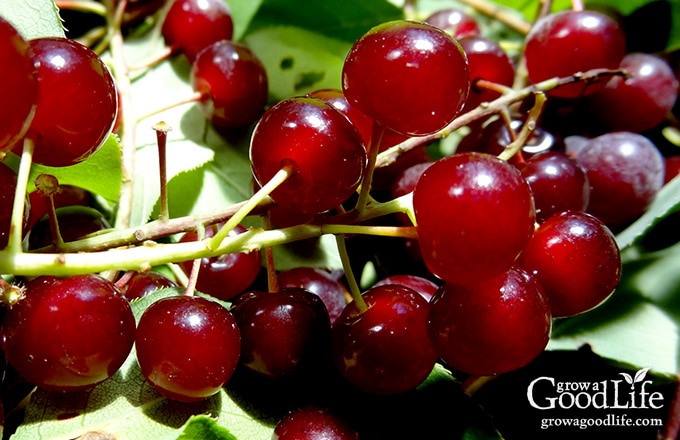
- The flowers appear in late spring after the tree has leafed out. The white blossoms grow on racemes, or an elongated flower cluster with the separate flowers attached with stalks to a central stem. Each flower produces a single-seeded red berry that turns dark red-purple when ripe.
- The berries are pea sized and have a very astringent, sour taste. Ideal harvest time is usually in August through September in my area.
- More tips on how to identify chokecherries plus pictures here.
Most parts of chokecherry tree are toxic to humans and livestock in large quantities. The seeds, leaves, twigs, and bark contain cyanide. The tart fruit is not poisonous and can be safely eaten.
Right off the tree, the flavor of the chokecherry is very astringent, but is delicious when balanced with a sweetener and turned into jelly, syrup, or wine.
Foraging for Chokecherries
I spotted the familiar blossoms in the spring several years ago in an overgrown section of our property behind our shed. I checked on the choke cherries in August and saw many clusters of the red fruit. I remember waiting patiently for the fruit to ripen from red to a deep burgundy that first year because I knew they would taste a little less astringent.
I wasn’t the only one watching and waiting for the most opportune time. Unfortunately, the birds got to the chokecherries first and ate them all leaving only empty stems behind.
Even this year as I climbed a ladder to pluck the chokecherry branches from the tree, I had to contend with several robins that stopped by for a mid-morning snack. They landed on the branches near me to dine on the ripe fruit. I don’t think they realized I was there at first, as they seemed suddenly startled by my presence and flew off in a panic to the trees nearby. The robins scolded me from the safety of the trees the entire time I was there.
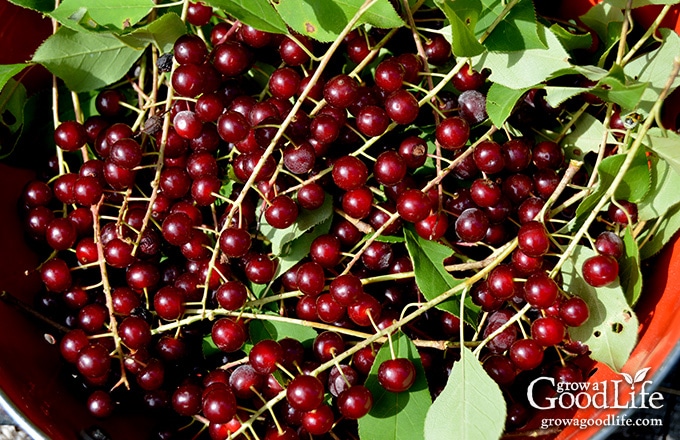
I gathered as many of the chokecherries from the bottom limbs and left the rest for the birds. The easiest way to harvest chokecherries is with using scissors or pruning shears to cut the bundles from the trees.
Tips for Making Chokecherry Jelly
I have tried different chokecherry jelly methods over the last few years. The grove of chokecherry trees on our property is small and yields only a limited amount of fruit. I only have one chance each season to try to make a small batch of jelly. I have ended up with syrup many times.
Since chokecherries have some natural pectin, I first experimented with making jelly using no pectin. It took a long time of boiling and I ended up with very little jelly for my efforts.
The next experiment using boxed pectin resulted in a nice chokecherry jelly, but it was too sweet for my taste. Finally, I found a recipe for chokecherry jelly on the Pomona’s Pectin website and never looked back. It always gels and is a perfect balance of sweet and tart flavor. Plus you can scale the recipe easily depending on how much fruit you have gathered.
Use Pomona’s Universal Pectin
This recipe uses Pomona’s Universal Pectin instead of your regular boxed commercial pectin. Pomona’s is a citrus pectin that uses calcium powder to gel instead of lots of sugar. The benefit is you can use less sugar in your jellies and jams so you can taste the fruit rather than the sweetness of the sugar.
You can find Pomona’s Universal Pectin in stores with the other canning supplies or online. The package comes with full instructions and recipes for making jams, jellies, and preserves.
Don’t Have a Water Bath Canner?
A large water bath canner is overkill for this small batch jelly recipe. Instead, you can use a tall saucepot to process the jars. Your pot will need to be tall enough to cover the tops of the jars by a few inches of water, plus two inches of space to prevent boiling water from splashing out of the pot.
Place a rack in the bottom to elevate the jars up away from direct heat, and allow the water to circulate around the jars as they are processed. For small batch canning, I use an 8-quart tall pot with an 8-inch canning rack. It can fit 4 half pint sized canning jars. Which is perfect for small batch jams and jelly recipes.
How to Make Chokecherry Jelly
This small batch chokecherry jelly is made by extracting the juice from homegrown foraged chokecherries, sweetening with sugar to balance the tartness, thickened with Pomona’s Universal Pectin, and processed in a water bath canner for shelf stable jars.
If you are new to canning or haven’t canned in a while, it may be helpful to review this article on water bath canning at the National Center for Home Food Preservation website.
A more detailed and printable recipe can be found at the bottom of this post, but these are the general steps for making Chokecherry Jelly.
Step 1: Gather the kitchen equipment
You’ll need:
- Water Bath Canner or large pot with a canning rack
- 3 half-pint canning jars
- Lids and bands (new lids for each jar, bands can be reused)
- Canning tools: jar lifter, canning ladle, funnel, and bubble popper
- Jelly strainer or cheesecloth and a colander
- Kitchen scale
- Small clear jar with a lid for the calcium water
- Plus basic kitchen supplies such as a large sauce pot, towels, potato masher, and measuring cup.
Step 2: Prepare the chokecherries and extract the juice
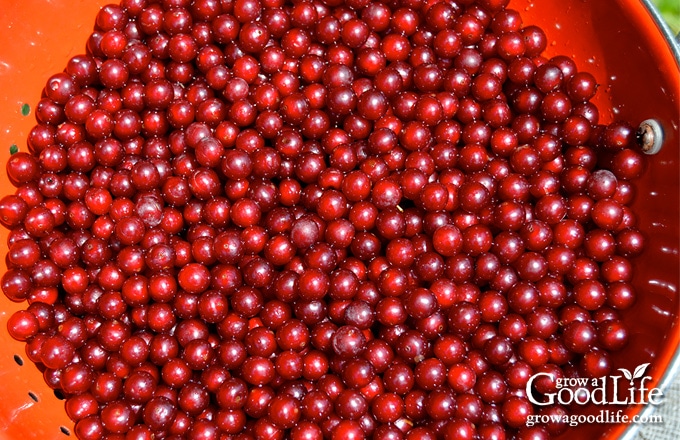
Remove the berries from the stems and use a kitchen scale to weigh one pound of fruit. One pound of chokecherries yields about 2 cups of juice. Wash the chokecherries well in plain water.
Extract the juice by combining the fruit and water in a large saucepan. Bring to a boil over medium-high heat then reduce to a simmer over low heat. Gently mash the fruit with a potato masher to release the juice without crushing the seeds. Continue simmering over low heat for 15 minutes, while stirring occasionally.
Strain the fruit through a damp jelly bag or double layers of cheese cloth, and let the juice drip for several hours at room temperature, or overnight in the fridge.
Chokecherry juice is not clear, so feel free to squeeze the bag a squeeze to press out all the delicious juice. Discard solids. Remember the seeds are toxic, so toss the solids into the trash rather than composting if you have livestock that has access to your compost bins.
Step 3: Prepare the canning equipment
Wash jars, lids, screw bands, and canning tools in warm, soapy water. Rinse well, and set aside to air dry until you are ready to use them.
Jars must be heated before filling to prevent breakage due to thermal shock. Place the jar rack into the water bath canner, place jars upright on the rack, and add warm water to fill the pot covering the jars. Bring the canner to a simmer (180˚F) for 10 minutes, and keep the jars hot until you are ready to fill them.
Step 4: Make the chokecherry jelly
Mix the calcium water by combining 1/2 teaspoon calcium powder (from the small packet in the Pomona’s pectin box) with 1/2 cup water in a glass jar with a lid. Shake well and set aside. You will need 2 teaspoons of calcium water for this recipe. Store extra in the refrigerator for other jelly recipes.
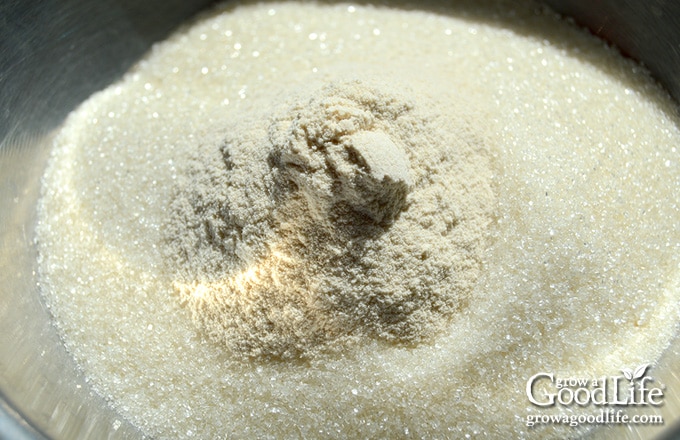
In a small bowl, combine the sugar and pectin powder. Set aside.
Measure 2 cups of chokecherry juice (add water if needed) and pour into a saucepan. Add calcium water and lemon juice and stir to mix well. Bring the juice to a boil over medium-high heat.
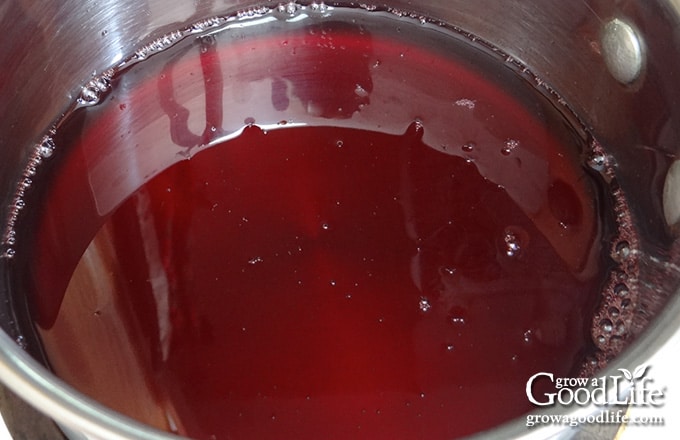
Add the pectin-sugar mixture and stir to dissolve. Continue stirring until the jelly comes back to a boil. Once it boils, remove from heat and skim off any foam.
Step 5: Can the jelly in a water bath canner
Spread a kitchen towel on the counter. Use the jar lifter to remove a jar from the canner, drain, and place on the towel. Keep the remaining jars in the canner so they stay hot.
With the canning funnel and ladle, add jelly to the jar leaving 1/4-inch headspace. Run the bubble popper through to release any trapped air bubbles.
Wipe the rim with a damp towel to remove any residue. Center a lid on the jar, place the band over the lid, and screw it on until fingertip tight. Place the jar back into the canner, and repeat with the rest of the jars.
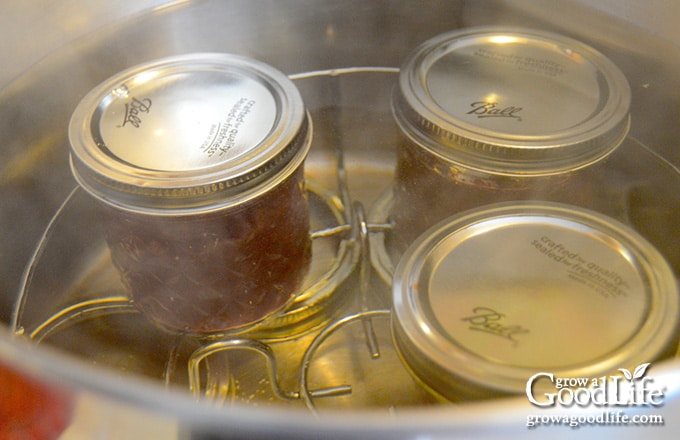
Once the jars are in the canner, adjust the water level so it is covering the jars by two inches, bring the canner to a boil, and process the jars for the times indicated in the recipe below. Let the jars cool, test the seals, label and date the jars, and store in a cool, dark location for 12 to 18 months. Refrigerate the jars once opened and consume within 3 weeks.
Chokecherry Jelly Recipe
Ingredients
- 1 pound chokecherries
- 1/2 cup water
- 1/2 - 1 cup cane sugar
- 2 tablespoon lemon juice
- 2 teaspoons calcium water from the Pomona's box
- 2 teaspoons Pomona's Universal Pectin from the Pomona's box
Instructions
Prepare the Chokecherries
- Wash the chokecherries plain water and extract the juice by combining the fruit and water in a large saucepan. Bring to a boil over medium-high heat then reduce to a simmer over low heat.
- Gently mash the fruit with a potato masher to release the juice without crushing the seeds. Continue simmering over low heat for 15 minutes, while stirring occasionally.
- Strain the fruit through a damp jelly bag or double layers of cheesecloth. Let the juice strain for several hours, or overnight. Discard the solids in the trash.
Prepare the Canning Equipment
- Wash your jars, lids, and canning tools in hot soapy water. Rinse thoroughly to remove all suds. Set aside to air dry on a clean kitchen towel.
- Place the jar rack into water bath canner, set the jars on the rack, and add water to cover the jars.
- Bring the canner to a simmer (180˚F) for 10 minutes, and keep the jars hot until you are ready to fill them.
Make the Jelly
- Prepare your calcium water by combining 1/2 teaspoon calcium powder with 1/2 cup water in a small, clear jar with a lid. Shake well. Store extra in the refrigerator.
- In a small bowl, add sugar, pectin powder, and stir to blend together. Set aside.
- Measure 2 cups juice (add water if needed) and pour into a saucepan. Add calcium water and lemon juice and stir to mix well.
- Bring the juice to a boil over medium-high heat.
- Add the pectin-sugar mixture and stir to dissolve.
- Continue stirring until the jelly comes back to a boil. Once it boils, remove from heat and skim off foam.
Can the Jelly
- Spread a kitchen towel on the counter. Use your jar lifter to remove a jar from the canner, drain, and place on the towel. Keep the remaining jars in the canner so they stay hot.
- Use your canning ladle and funnel and add the hot jelly to the warm jar leaving 1/4-inch headspace. Swirl your bubble popper through the jars to release air bubbles. Wipe the rim of each jar with a damp towel.
- Center a lid on the jar, and screw on the band until it is fingertip tight. Use the jar lifter to place the jar back into the canner, and repeat with the remaining jars. Try to leave some space in between the jars.
- Once all the jars are in canner, adjust the water level to two inches above the jar tops.
- Cover the canner and bring to a rolling boil over high heat. Once water boils vigorously, continue boiling for 10 minutes at altitudes of less than 6,000 ft. (adjust processing time for your altitude if necessary – see notes below).
- When processing time is complete, turn off the heat, remove the cover, and allow the canner to cool down and settle for about 5 minutes.
- Spread a dry towel on the counter, and use the jar lifter to transfer the jars from the canner to the towel. Don't tighten bands or check the seals yet. Let the jars sit undisturbed for 12 to 24-hours to cool.
- After the jars cool for at least 12 hours, check to be sure jar lids have sealed by pushing on the center of the lid. The lid should not pop up. If the lid flexes up and down, it did not seal. Refrigerate the jar and use up within a few weeks.
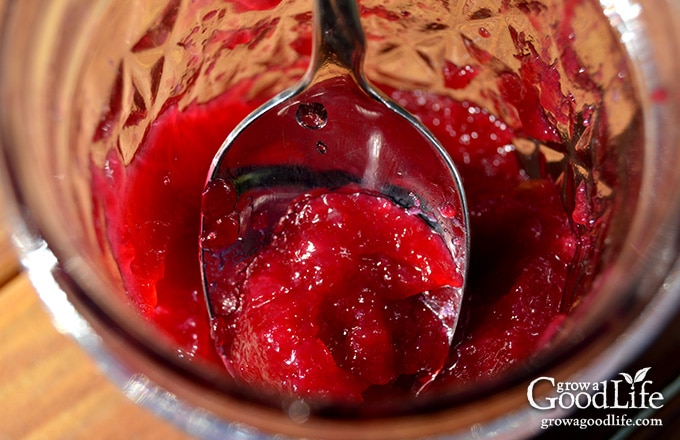
- Remove the screw on bands and wash the jars. Label, date, and store your jars in a cool, dark place. Use within 12 to 18 months. Refrigerate the jar once opened and consume within 3 weeks. Yields about 2-3 half pint jars.
Notes
Nutrition
You May Also Like:
Good planning is key to a successful vegetable garden
Whether you are new to growing your own food or have been growing a vegetable garden for years, you will benefit from some planning each year. You will find everything you need to organize and plan your vegetable garden in my PDF eBook, Grow a Good Life Guide to Planning Your Vegetable Garden.

I have never heard of the seeds being toxic. In fact, when picking them I have come across a LOT of bear poop and there is a TON of seeds in there. Well the bears gorge themselves on them. I have seen bears munching on the cherries but never seen a dead bear of doing such. I thought a few times a bear might fight me for my buckets of cherries…lol. I read where one lady gives the seeds to her chickens. They love them.
Brenda, A quick Google search will bring up a lot of studies of animals being dying quickly after eating chokecherry stems, leaves, and seeds. All cherries and other species of Prunus have poisonous pits. They contain amygdalin, which the body converts into cyanide. Bears would have to eat a lot to be affected. Plus they tend to swallow the berries whole instead of crushing them.
Looks delicious – I had not heard of calcium water before. Since it’s included in the box of pectin, I’m assuming that it helps with the gel?
Margaret, Yes, Pomona’s Pectin is activated by calcium. Some fruit contain calcium naturally, but adding it assures that it will gel: http://www.pomonapectin.com/faq/do-i-have-to-add-calcium-water-to-my-jam-or-jelly/